Tutorial: Developing .NET COBOL
Overview
This tutorial introduces the Visual Studio IDE, and shows how to create a solution for a Windows application with a Windows form that says "Hello World".
Starting Visual COBOL
To run this tutorial, you must have both Microsoft Visual Studio and Visual COBOL installed.
To start Visual COBOL:
- Depending on your Windows version, do one of the following:
- Windows 7 and Earlier
-
- From your Windows desktop, click Start > All Programs > Micro Focus Visual COBOL > Visual COBOL for Visual Studio 2015.
- Windows 8.1
-
- From the Windows Start screen, click the Visual COBOL for Visual Studio 2015 tile.
- Windows 10 and Later
-
- From your Windows desktop, click Start > Micro Focus Visual COBOL > Visual COBOL for Visual Studio 2015.
- You might be prompted to set the environment, depending on the version installed. If you are prompted, choose General development environment. In this setup Visual Studio is customized for work with COBOL projects.
The IDE is shown in the figure below, although the information displayed in the large pane will be different.
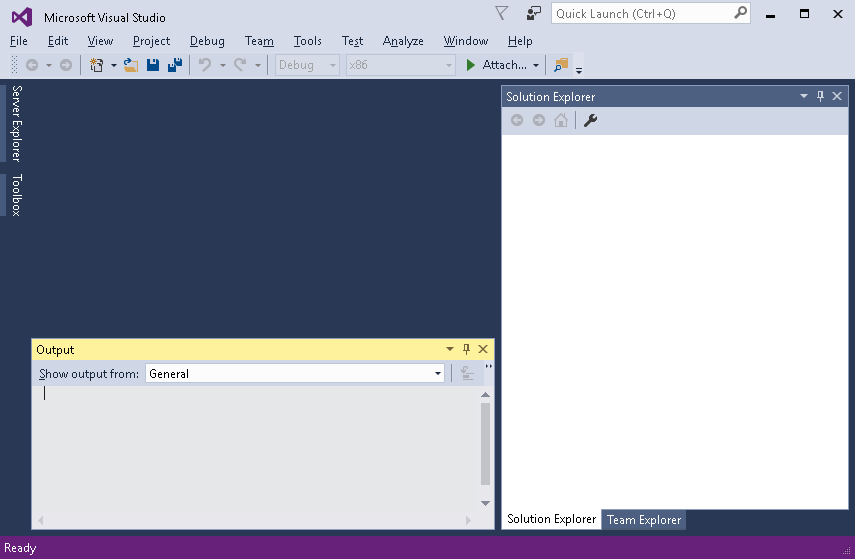
The large pane is where your solutions and projects will be opened. At the moment, this shows the Start Page, with up-to-date information on Visual Studio. When you start work, this is the pane where your code is displayed.
The pane at the bottom is the Output window, where messages from the IDE and Compiler are displayed.
The right-hand pane is the Solution Explorer, which displays the structure of your solution and projects. At the bottom of the Solution Explorer pane are some tabs. Solution Explorer appears by default.
If any of these panes is hidden, you can show it from the View menu.
Creating a Solution and a Project
The first task is to create a solution and a project. A solution is a container holding one or more projects that work together to create an application. The solution has the extension .sln and is a readable text file. Microsoft recommends that you do not edit the file outside of Visual Studio.
A COBOL project has the extension .cblproj and again is human readable but Microsoft recommends that you do not edit it. Different types of project have different extensions, so for example a C# project has the extension .csproj.
In this section, you create a project and solution, as follows:
- Start Visual Studio.
- In Visual Studio, click .
- In the New Project dialog box, expand .
- Select Managed.
- In the center pane, select Windows Forms Application.
The drop-down list above the center pane allows you to change the version of the target framework. Select the framework your clients are using to ensure your application includes classes and methods supported by it. You can leave the default .NET Framework for this demonstration.
- In the
Name field at the bottom of the window, specify
WinHello as the name of the project.
Notice that the Name and Solution Name fields have the same name. Changing the name of the project automatically changes the name of the solution.
- In the
Location field, browse to a directory where you want to put this tutorial.
For example, if you create a folder on your c: drive called "Tutorials," change the location field to c:\tutorials. The solution will be stored in a subdirectory WinHello, according to the project name.
- Click OK.
This creates a solution, a project and an empty form, which is opened in the form designer. The Solution Explorer pane shows the WinHello project, which contains:
- Properties, which contains the full project properties.
- References, which contains the references to assemblies containing classes such as System.Windows.Forms that are used by the project. From the context menu for the References folder you can add references to other .NET assemblies, COM objects registered on your machine as well as other assemblies that your .NET code refers to.
- Form1.cbl, which contains your code for the form. Under the expanded Form1.cbl is Form1.Designer.cbl, which is created by the form designer. Don't edit this code, because this defines the form, and if you change it you might not be able to open the Design window. Also, any changes you make might be overwritten by the form designer.
- Main.cbl, which contains the trigger program that displays the main form.
If you need to view the contents of the project directory, you can open it from the IDE as follows:
- In Solution Explorer, right-click the WinHello project and choose Open Folder in Windows Explorer.
Painting a Button and a Label
This section "paints" a button and a label on the page or form.
- Paint a button as follows:
- Click
 or
View >
Toolbox.
or
View >
Toolbox.
- If the Button object isn't listed, click Common Controls in the Toolbox.
- Point to the Button object and drag it onto the page or form.
- Click
- Change the text on the button to "Say Hello", by editing the button's Text property, as follows:
- Click on the button.
- In the
Appearance section of the Properties pane, scroll to the
Text property.
Note: Right-click the button in the designer, and then click Properties to display the Properties pane if it is not visible.
- Edit the text to
Say Hello and press
Enter.
Notice that the Name property of the button (in the Design section of the Properties pane) is, and remains, "button1."
- Paint a label somewhere on the form by dragging the Label object in the same manner as you did the Button object.
- Clear the default text in the label, by deleting the text in the Text property field and pressing
Enter.
The label essentially disappears upon this action, but remains on the form, as you will see when you build and run the application. Notice that the name property of the label control is, and remains, Label1 (or label1).
Adding a Click Event Handler
Now, you add an event handler to display "Hello World" when the button is clicked.
- Create a click event handler for the button by double-clicking the button.
This generates a method called button1_Click in the code.
Look at the code for the button1_Click method. It is just a skeleton and does nothing. The procedure division is empty. We will look at the rest of the code when we have run the application.
- In the procedure division of the button1_Click method, insert the following line:
move "Hello World!" to self::label1::Text
- or you could equally write:
set self::label1::Text to "Hello World!"
This moves the text "Hello World" into the Text property of the label you painted.
Building and Running the COBOL Application
There are two default build configurations for each project type: Debug and Release. These configurations define how to build the project for the different situations.
To build the project for debugging and to run it:
The Build menu offers the choice of building and rebuilding the solution, as well as building and rebuilding our project. The Build option builds only those files that have changed since they were last built. Whereas the Rebuild option builds all the files in the project, regardless of whether they have changed since they were last built.
To build and run the project:
- Check the build configuration in use, by clicking Build > Configuration Manager.
- In
Active solution configuration, ensure
Debug is selected and click
Close.
Notice in the Standard toolbar at the top of the IDE, that Debug shows as the active configuration.
- Click Build > Build WinHello.
- Check that the project compiled successfully by looking in the Output pane. To display this pane, click View > Output .
- Run the application, by clicking
Debug >
Start Without Debugging or
 .
.
- When the page or form displays, click the
Say Hello button.
The label should now say "Hello World!"
- Click the X at the top right to close the page or form.
Project References
When you create a project, the full project properties contain the references to assemblies containing classes that are used by the project, such as the System assembly and, for our Windows application, System.Windows.Forms. You can see this on the Namespaces page of the full project properties.
If you write code that uses other classes in other assemblies, you add the assemblies as references as follows:
- Right-click the WinHello project in Solution Explorer.
- Click Add Reference.
- In the Add Reference dialog box, expand Assemblies and click either Framework to select .NET Framework assemblies or other .NET assemblies. Click Extensions under Assemblies and scroll to MicroFocus to see the available Micro Focus assemblies.
- Expand COM and then click Type Libraries to select the COM objects that you have registered on your machine.
- Expand Solution and then click Projects to select other assemblies that your .NET code refers to. There are currently none available to the project in this tutorial.
- Click OK when you have completed your selections.
For more information, see the Visual Studio Help.
Project Properties
Project properties define characteristics of the project and enable you to control a project's behavior, among other things.
Brief project properties are by default dynamically displayed in the Properties pane, below the Solution Explorer. Here are some tips on viewing brief project properties:
- To see brief project properties, select the project or solution in the Solution Explorer. The Properties pane is displayed below the Solution Explorer, by default.
- If the Properties pane is not visible, you can show it by clicking View > Properties Window.
- A description of the selected property is displayed dynamically at the bottom of the Properties pane. To turn this description on and off, right-click in the toolbar of the Properties pane.
Full project properties are available by selecting the project in Solution Explorer and clicking Project > ProjNameProperties. The full properties that you can specify for your native or managed project can apply to all configurations or only to the selected configuration, such as Debug or Release.
Assemblies
Each project is built into a code assembly.
Assemblies are documented in the Visual Studio Help, which describes them as "a collection of one or more files that are versioned and deployed as a unit. An assembly is the primary building block of a .NET Framework application. All managed types and resources are contained within an assembly and are marked either as accessible only within the assembly or as accessible from code in other assemblies.
Assemblies also play a key role in security. The code access security system uses information about the assembly to determine the set of permissions that code in the assembly is granted". For the basic concepts on assemblies see the Visual Studio Help.
Assemblies are created automatically when you build projects. You need to create a strong-named assembly if you want to include it in the Global Assembly Cache (GAC), which makes it secure and shareable among all the applications on your machine.
Examining the Generated Code
The form designer creates broadly-speaking two partial classes for the page or form. One partial class contains the generated code for your application, and you can edit and add to this. The other partial class is in the file Form1.Designer.cbl. It contains code owned by the designer, and you must not edit it.
The partial class containing the generated code contains, among other things:
- A declaration of the class as a partial class such as the following for a Windows form:
class-id WinHello.Form1 is partial inherits type System.Windows.Forms.Form. - The object Working Storage section. This allocates storage for the controls for the form, or more precisely, for object references for the controls.
- The New method, which invokes the InitializeComponent method in the designer-owned partial class.
- The button1_Click method, which you edited to say "Hello World."
Examining the Event Handlers in the Design View
When you double-click a control in the Design view, a click event handler is created and a method is inserted in the generated code. You created the Button1_Click event handler in this way.
You can rename the event handler and add and delete others.
To change the name of the event handler:
- Display the Design view. One way to do this is to select the page or form in Solution Explorer, and then click View Designer.
- Select the Say Hello button.
- In the Properties pane, display the events, by clicking
 .
.
(The events are found in the Action section of this pane.) You can scroll through the events to see what is available.
- Change the name of the click event handler to
readButton1_Click then press
Enter.
This adds a new method for readButton1_Click in Form1.cbl.
- Display the Design view again.
- Check the event handlers for
Say Hello button.
Note that there are now two click event handlers for the button in the drop-down list. You need to remove button1_Click event handler and move its functionality to readButton1_Click.
- Edit
Form1.cbl and move the following code from the method for
button1_Click to the procedure division of the method for
readButton1_Click:
set self::label1::Text to "Hello World!"
- Delete the method for button1_Click and save the file.
- Display the Design view again.
- There is now only one click event handler for Say Hello button - readButton1_Click.
Similarly, if you double-click a control by mistake (say on the label control), you generate an unwanted event handler. You cannot simply delete this event handler in the code view, because some event handler code is also in the design. Instead you need to delete the event handler in the design view. Do this in much the same way as you edited the name of the event handler, but instead delete the name.
Changing the Startup Form
This section adds another form and uses this as the startup form.
Notice that the form you created was called Form1. This form is opened when you run the application. If you rename the form, you also need to change the name of the form that starts the application. Similarly, if you delete this form, you need to specify another form as the startup form.
To demonstrate this, add another form and use this as the startup form, as follows:
- Create a second form similar to the first, as follows:
- Right-click the project in Solution Explorer.
- Click Add > New item.
- In the Add New Item dialog, expand Installed, COBOL Items and then click Managed.
- Choose Windows Form and specify a name for the form, such as "HelloAgain."
- Click Add.
- Paint the form however you wish and add an event handler. You could paint a form similar to the Hello World one, but with slightly different text, such as "Hello again."
- Set the main form to the new form, by editing the lines that define and create the main form in the program
main.cbl, as follows:
- Double-click Main.cbl in Solution Explorer.
- In the local-storage section, change from:
01 mainForm type WinHello.Form1.
to:
01 mainForm type WinHello.HelloAgain.
- In the procedure division, change from:
set mainForm to new WinHello.Form1()
to:
set mainForm to new WinHello.HelloAgain()
- Build and run the application.
Debugging the COBOL Project
The IDE provides debugging facilities, such as stepping, examining data item values and setting breakpoints. To see some of these facilities:
- On the toolbar, click
Debug >
Step Into , or
 .
.
If you are prompted to rebuild the project configurations, click Yes.
The IDE enters debug mode. You can see a yellow arrow at the left of the Editor window pointing to the first line to be executed.
- Click Debug > Continue (or the green Continue arrow on the toolbar).
Close the IDE window now. You do not need to explicitly save anything, because the files are automatically saved when you build them.