Accessing a Micro Focus COBOL Product Running in a Container
The following demonstration shows how you can use Visual Studio Code with the Micro Focus COBOL extension to edit, compile and debug a COBOL applications in a Docker container that has Micro Focus Visual COBOL or Enterprise Developer installed in it.
On the local machine, you only have Visual Studio Code and the sources of your COBOL application. You do not need any Micro Focus products installed locally.
An existing Microsoft technology enables you to connect your local Visual Studio Code to a container, a Linux container in this demonstration. This enables you to mount your COBOL sources from the local machine into the container, and use Visual COBOL or Enterprise Developer installed in it.
Prerequisites
This demonstration requires the following:
- A Windows machine with Visual Studio Code
- Docker Desktop
- Docker Support for Visual COBOL or Enterprise Developer - this is available from the Micro Focus Software Licenses and Downloads site, if you have a license for Visual COBOL or Enterprise Developer.
Local machine
First, you need to prepare your local machine, install Visual Studio Code and ensure it can connect to a Docker container. The local machine does not need a Micro Focus COBOL product installed on it.
- Install Visual Studio Code.
- In
Visual Studio Code, install Microsoft's
Remote - Containers extension. This is also included in the
Remote Development extension pack from Microsoft so you can install either extensions.
The extension enables you to mount the sample files into the container from the local file system and use Visual COBOL or Enterprise Developer installed in the container. You then work with Visual Studio Code as if you were developing locally on your machine though the source files are now isolated inside the container.
Sample program
This demonstration uses the HelloWorld demonstration supplied with the COBOL Docker images for Enterprise Developer and Visual COBOL 7.0.
For example, you can find the Program1.cbl file in the Visual COBOL Build Tools Docker image, and in the Examples\Build_HelloWorld\src subfolder supplied with the image archive.
- Save Program1.cbl into a folder on your machine, such as c:\DockerSample, which we will refer to as the workspace folder.
- Create a text file in the same folder, and rename the file to bld_src.sh. This script will contain the compile instructions for your source file in the Linux environment.
- Edit the file in a text editor, and add the following code to it:
ls -ld . *

cob -vx -C anim Program1.cbl -o HelloWorld
if [ "$?" -gt 0 ]; then exit $?;  fi
Docker container
- Install Docker Desktop on your local machine.
- Download the Micro Focus Dockerfiles and build a Docker Image containing the Visual COBOL Development Hub product.
- Start the image inside Docker Desktop.
Open the sample program in Visual Studio Code
- Open the folder that contains the sample program in Visual Studio Code.
- Open Program1.cbl in the editor - there is no colorization in the editor because there is no extension in Visual Studio Code to provide support for the COBOL language.
Next, you need to add a file to your workspace that prepares it to work with a container.
- Click
 (Open Remote Window). This opens the list of the Remote extension commands:
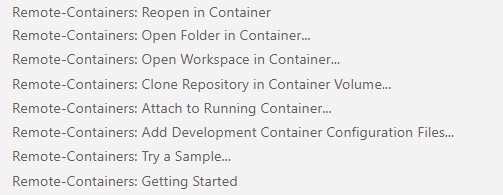
- Click Remote - Containers: Add Development Container Configuration files, and then click Show All Definitions.
- Select a definition such as
Bash.
This adds a devcontainer.json file inside a .devcontainer subfolder of the sample's folder.
- Open the file in
Visual Studio Code and change its contents to the following:
{
	"name": "COBOL DevHub",
	"image": "image-name",

	// Set *default* container specific settings.json values on container create.
	"settings": {
		"terminal.integrated.shell.linux": "/bin/bash",
		// Point to the install location of your Micro Focus product which is installed in the container
		"microFocusCOBOL.installLocation": "/opt/microfocus/VisualCOBOL"
	},

	"extensions": [
		"Micro-Focus-AMC.mfcobol"
	]

}
Where image-name must be the name of your image exactly as shown in Docker Desktop.
This code specifies which Docker image Visual Studio Code should use, and what settings to apply when you start it. It also installs the Micro Focus COBOL extension for you when the container starts the first time.
In this case, it sets the settings on the remote end automatically.
The microFocusCOBOL.installLocation setting indicates where the Micro Focus COBOL product is installed in the container.
The last part that has Micro-Focus-AMC.mfcobol in the extensions property will enable Visual Studio Code to install the extension from the Visual Studio marketplace when the container is created.
Reopen Visual Studio Code in the Container
Now that the devcontainer.json file includes the link to the container your folder will be mounted in, you can connect your Visual Studio Code with the container.
- Click
(Open Remote Window). This opens the list of the Remote extension commands:
- Click
Remote-Containers: Reopen in Container.
This starts the process of reloading Visual Studio Code in container mode, starts the container with the settings you have specified, and volume mounts your local files in the container.
Click Starting in Dev container (show log) in the right bottom corner of Visual Studio Code.
If you see a Desktop - Filesharing dialog appear in the Windows task bar - click Share It.
-
See the messages in the TERMINAL pane showing Visual Studio Code connecting to the container. Once this is complete, check the Remote connection button - it now shows that Visual Studio Code is connected to your container.

Installing the Micro Focus COBOL extension
The .devcontainer file includes the instructions to download and install the Micro Focus COBOL extension in Visual Studio Code inside the container. To check that the extension has been installed:
- In Visual Studio Code, open the Extensions panel.
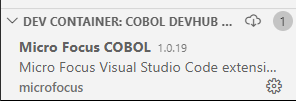
- Check the
Extensions panel and note that the extension is not displayed in the list of locally installed extensions. Instead,
Visual Studio Code shows that it is installed in the container:
Build your application
In order to build your application, you need to add a tasks.json file to your folder:
- In Visual Studio Code, click Terminal > Configure Tasks.
- Click
Create tasks.json file from template and click
Others.
This creates a tasks.json inside a .vscode subfolder in your samples folder, and opens the file in the editor.
- Edit the file to modify the name of the task, add a command to execute the build script in a Linux environment, and add the
task to the build group of tasks:
{ // See https://go.microsoft.com/fwlink/?LinkId=733558 // for the documentation about the tasks.json format "version": "2.0.0", "tasks": [ { "label": "MyCOBOLBuild", "type": "COBOL-shell", "command": "./bld_src.sh", "group": "build", "problemMatcher": [] } ] } - Click
Terminal > Run Build Task, and select
MyCOBOLBuild.
This performs a build of your program inside the container.
- Check the TERMINAL pane to see the output messages. Note that there is a Linux-style path from setting the environment which confirms you are running the build in the container.
- Check the folder in Visual Studio Code - you can see the .idy, .int and .o files produced by the build.
- Type
ls in the
TERMINAL pane. This starts a new bash view and lists the contents of the folder as mounted in the container:
COBDIR set to /opt/microfocus/VisualCOBOL
user@adbf71521d5b:/workspaces/DockerSample> ls
bld_src.sh  HelloWorld  Program1.cbl  Program1.idy  Program1.int  Program1.o
user@adbf71521d5b:/workspaces/DockerSample>
Debug your application
Debugging with Visual Studio Code in the container is the same as debugging on the local machine. You need to add a launch.json file to your workspace:
- In
Visual Studio Code, click
Run > Add Configuration, and click
COBOL: (native).
This creates a launch.json file in the .vscode folder.
- Delete the second attach configuration and replace
<insert-program-name-here> with the name of the executable for your program:
{ // Use IntelliSense to learn about possible attributes. // Hover to view descriptions of existing attributes. // For more information, visit: https://go.microsoft.com/fwlink/?linkid=830387 "version": "0.2.0", "configurations": [ { "type": "cobol", "request": "launch", "name": "COBOL: Launch", "program": "${workspaceFolder}/Program1.int", "cwd": "${workspaceFolder}", "stopOnEntry": true }, ] } - Open Program1.cbl and add a breakpoint somewhere in the code.
- Click
Run > Start Debugging.
This starts the debugger inside the container.
- Step through the program. Check the values of items added to the WATCH WINDOW, and note the Linux-format paths in the CALL STACK.