Remote COBOL Development
A common scenario for when you can use Visual Studio Code with the Micro Focus COBOL extension is if you want to make quick edits to your COBOL applications running on a remote machine.
The following demonstration shows how you can use Visual Studio Code with the Micro Focus COBOL extension from a local machine to edit, compile, and debug a COBOL application that runs on a remote Linux machine. On your local machine you do not need to have any Micro Focus products installed nor to have the COBOL sources.
An existing Microsoft technology enables you to connect your local Visual Studio Code to remote machine using SSH. It initializes a Visual Studio Code server on the remote machine that has direct access the COBOL sources stored on the remote machine while managing them from the local Visual Studio Code interface.
Local machine setup
First, you need to prepare your local machine. You need to install Visual Studio Code and set it up to connect to the remote Linux machine.
- From your Visual Studio Code, install the Remote Development extension pack from Microsoft. This installs three extensions - for remote connections using SSH, Containers, and WSL, the Windows Subsystem for Linux. For this demonstration you are going to use an SSH connection.
- Follow the instructions in the Visual Studio Code documentation to connect to your remote machine via SSH: click here for details. This includes instructions about setting up the OpenSSH client on your local machine.
Note that you do not need any Micro Focus COBOL products on your local machine nor your COBOL sources.
Remote machine
On your remote Linux machine, you need the following:
- SSH must be enabled for this machine.
- Micro Focus Visual COBOL Development Hub or Enterprise Developer Unix Components installed and licensed.
Sample program
For this demonstration, we are going to use the tictac sample available with the installed Micro Focus COBOL products. In real life scenarios, the executable files will be stored on the remote machine so you do not need to compile your code. In this demonstration, you are going to see how you can compile as well.
Copy the tictac.cbl file from its original install location to a working directory on the remote machine. You are going to need a script file that includes the command to compile the source code:
- Create a shell script, build.sh, in the directory that contains the tictac.cbl file.
- Add the following code to it:
cob -xg -C errformat=3 tictac.cbl
Where errformat=3 sets the ERRFORMAT Compiler directive for when you are building the source code. You need to compile with this directive in order to get the error information to include in Visual Studio Code with a Problem Matcher. - Run the following command to give the script executable permissions:
chmod +x ./build.sh
Because the tictac application uses character screens for Input and Output, you also need to ensure that the information can appear in an X terminal. Follow the instructions in the Debugging Using the Remote Development Extensions topic.
Create an SSH connection in Visual Studio Code to the remote machine
- Start
Visual Studio Code and note the
 (Open Remote Window) in the bottom left corner of the UI.
This button is provided by the Remote extension pack. You can check the status that it displays to know whether the particular Visual Studio Code instance you are looking at is running on the local or the remote machine.
- Click
(Open Remote Window). This opens the list of the Remote extension commands:
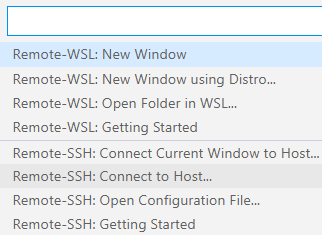
- Click Remote-SSH: Connect to Host in order to establish an SSH connection to the remote machine.
- Click Add New SSH Host.
- In the connection command widget, specify your connection details for the Linux machine:
UserName@machineNameorIPaddress, then press
Enter.
This starts a new instance of Visual Studio Code.
- Check the status bar next to
in the new instance which shows that
Visual Studio Code is trying to connect to the remote machine. You can see a notification in the bottom right corner that SSH is being installed
on the remote machine and that
Visual Studio Code server is initialized on it as well.
- Click Linux in the widget asking you to specify the platform the remote machine is running.
- Enter your password for the account for the remote machine when prompted.
Visual Studio Code installs Visual Studio Code server on the remote machine. Note that the status next to the
button shows the IP address of the remote machine.
You are now running a local instance of Visual Studio Code that is connected to the remote machine and can access its file system and the Micro Focus COBOL environment on it. There are no Micro Focus COBOL products installed locally.
Open the directory on the remote machine that contains your sources
- In the new instance of
Visual Studio Code, click
File > Open Folder.
This opens the Open Folder widget. This is showing a UNIX-style path which confirms you are connected to the remote machine.

- Navigate to the working directory on the remote machine that has your tictac program, and click
OK.
This now shows the files in the folder that contains the tictac example.
- Open the
tictac.cbl file:
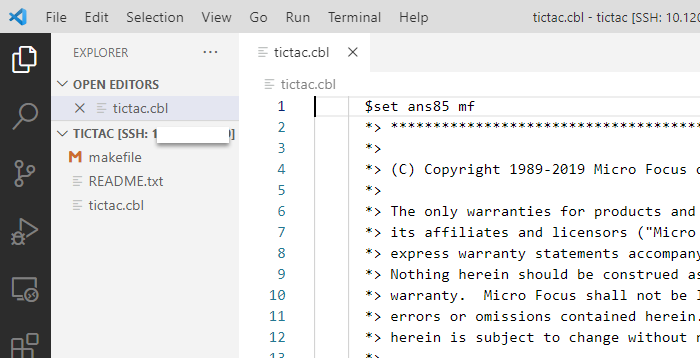
Note that the editor does not show any colorization yet. This is because you do not have the Micro Focus COBOL extension installed yet.
Install the Micro Focus COBOL extension
You are now going to install Micro Focus COBOL in the Visual Studio Code server instance running on the remote machine:
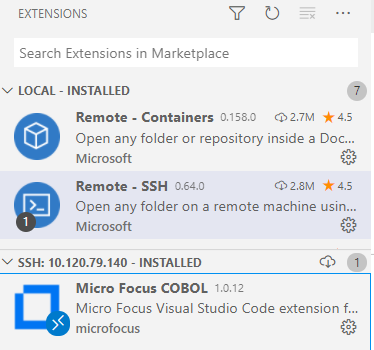
- In the new instance of Visual Studio Code, open the Extensions panel.
- Search for the
Micro Focus COBOL extension in the online Visual Studio
Marketplace, and install it.
Alternatively, you can install it from a .vsix file saved to your local machine.
Visual Studio Code shows a notification once the installation has completed. It also shows a notification that you need to install Visual COBOL or Enterprise Developer in order to enable compiling and debugging. In the next section, you are going to configure the extension to use the Micro Focus COBOL product which is already installed on the remote machine.
The COBOL source opened in the editor from the remote machine is now colorized which means the editing support provided by Micro Focus COBOL is now available.
- Check the
Extensions panel and note that the extension is not displayed in the list of locally installed extensions. Instead, it is shown as installed
via SSH in
Visual Studio Code server on the remote machine:
Enable compiling and debugging support
In order to be able to compile and debug your COBOL sources, you need to specify the location of a licensed Micro Focus product in the extension. As the extension is installed on the remote machine thanks to Visual Studio Code server and the Remote-SSH extension, you can specify the location to the Micro Focus product already available on the remote machine:
- Open the extension settings - click
 (Manage) for the extension, and click
Extension Settings.
(Manage) for the extension, and click
Extension Settings.
- Enter the location of your Micro Focus COBOL product in UNIX format in the
Micro Focus COBOL: Install Location field.
The default install locations are /opt/microfocus/EnterpriseDeveloper and /opt/microfocus/VisualCOBOL, respectively, but your product might be installed in a different location.
- Enter the location of your Micro Focus COBOL product in UNIX format in the
Micro Focus COBOL: Install Location field.
Compile your source code
Visual Studio Code uses build tasks to compile source code. You created the build.sh script that includes the necessary compile instructions so you need to integrate this file into a build task:
- Click
Terminal > Run Build Task.
As there are no predefined tasks, the selection widget provides an option for configuring one.
- Click
Configure Build Task, then
Create tasks.json file from template, and then
Others.
This creates a default tasks.json file in a .vscode subdirectory in the working directory on the remote machine where your tictac program is stored.
- Edit the task as follows to add your build script as the command to execute, and also to integrate a Problem Matcher that
matches any errors in the COBOL source:
{ "label": "cobol", "type": "COBOL-shell", "command": "./build.sh", "problemMatcher": ["$COBOLErrFormat3"], "group": "build" } - Click
Terminal > Run Build Task again, and select the
cobol task from the widget.
This triggers a build. Check the Terminal panel to see if it has completed and if there were any issues with it.
The executable and debuggable files have been created as well and are visible in the working directory - tictac, tictac.idy, tictac.int, and tictac.o.
Debug your source code
You are now ready to debug your application:
- Click Run > Start Debugging.
- Click
COBOL: (native).
This creates a template launch.json file with two default debug configurations in the .vscode subdirectory. You are going to use the one that launches the application - the one that has "name": "COBOL (native): Launch". You need to change this configuration to launch the tictac executable.
- In the file, replace:
"program": "${workspaceFolder}/<insert-program-name-here>",With:
"program": "${workspaceFolder}/tictac", - Click
Run > Start Debugging again.
Visual Studio Code enters debug mode and the cursor is positioned on the first executable statement in your COBOL program.
- Check the Debug Console and the panels available in the Debug view to see that you're debugging the code on the Linux file system.