

| Overview | Creating and Managing Projects | |
This chapter describes the environment that you will be working in. After reading this chapter you should be able to navigate some of the most commonly used features.
The Revolve interface consists of tools, browsers, and dialogs that are invoked from the Revolve Desktop. Tools and browsers are designed around a series of common window features that make using Revolve both flexible and consistent.
Figure 2-1 shows the interface.

Figure 2-1: The Interface
The Desktop houses all of Revolve's features that enable your system analysis. It is displayed when Revolve is invoked. The menus and tool bars accessible from the Desktop enable you to create and open projects, as well as invoke the necessary features needed to address your analysis. All of the windows, tools, views, browsers, and dialogs used in conjunction with this environment are contained in the Desktop.
Keep in mind that your analysis tasks are not restricted to one interface at a time. Because Revolve's features are contained in the Desktop and function in a common way, your analysis in one tool or browser can be extended by accessing other tools and browsers. See the section on the Speed Menu for more information.
Most of the tools and browsers use an information window to display results based on the criteria specified in the Match edit bar and selected options. Expandable folders are used to display results and information. Relevant project items, depending on the analysis that was performed, appear as parent folders in the same vertical column and at the same hierarchical level. When a parent folder is expanded, additional information is displayed in indented children folders. Note Figure 2-2 below.
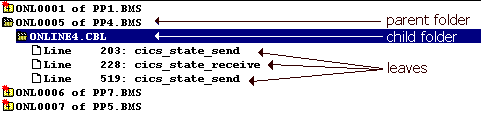
Figure 2-2: The Information Window
The folder format is as follows:
Folders are expanded by double-clicking with the mouse. Also use
![]() ,
, ![]() ,
,
![]() to expand and collapse
folders.
to expand and collapse
folders.
The Match edit bar provides features that load project items into tools or browsers for system analysis. The Match edit field enables you to create search criteria, based on component name, that identifies items in the project database and loads them into the current tool or browser. The following are special characters that you can use to create high-level search criteria:
| Use This: |
To Do This: |
|---|---|
| * | Use this character as a wildcard to find all items with similar names. For example, if WS* is entered into the Match edit field in the Variables browser and Match is clicked, the information window displays all the variables with names that begin with WS. In most cases, if the wildcard character is used alone as a match criteria, the information window fills with all items in the project as they pertain to the specific browser or tool. For example, if you click Match in the Variables browser with only the * entered into the Match edit field, all variables in the project are returned. |
| ? | Use this to construct a pattern where ? stands for a single arbitrary character. For example, WS? identifies all items whose names consist of WS and another character, like WS1 or WSA. |
| | | Use the or bar to enter multiple matching patterns for one query. For example, *month*|*year* returns all items that have either month or year in their names. |
Note: The functionality described above differs in the Text browser, in that any characters entered into the Match edit field will be considered part of the actual text string that you're searching for.
In some cases, a pull-down list box is displayed on the Match edit bar. This enables you to specify how the results in the information window are organized or what types of items are searched for in the project. If you change the selection in this list after Match has been clicked, you need to click Match again to apply the new setting to the information being displayed.
When the Match button is clicked, the specified criteria are applied to the project and the results are displayed in the information window. The number of matches is displayed on the Match edit bar. For example, the text, "64 Variables matching "default*"" is displayed after default* is entered in the field and Match is clicked. Be aware that very complex queries can result in no matches. If you receive a "no match" return for a criteria that you're certain has matches, reduce the number and complexity of your search patterns.
In addition to the Match edit bar, many tools and browsers have
their own Option dialogs. Click ![]() Options on the tool bar of the tool or browser you are using and
customize the settings according to your needs. Options enable you to
modify the project search criteria as well as how items are displayed in
the information window. Often new settings are automatically applied to
the project when you click Ok and the results are instantaneously
returned. However, some browsers require that you click Match
again.
Options on the tool bar of the tool or browser you are using and
customize the settings according to your needs. Options enable you to
modify the project search criteria as well as how items are displayed in
the information window. Often new settings are automatically applied to
the project when you click Ok and the results are instantaneously
returned. However, some browsers require that you click Match
again.
The tool bar contains buttons for the operations you use most commonly. While several buttons are common across all windows, many are related to the tool or browser they are contained in. When you place the cursor on top of a button its name is displayed in floating text.
Going back and forth between using the mouse and the keyboard can become
tedious. To make your analysis easier, features located on the tool bar
are also accessible from your key board. Holding the Ctrl key down
and pressing the ![]() Context
key, displays a pop-up menu with functionality corresponding to the
current windows's tool bar.
Context
key, displays a pop-up menu with functionality corresponding to the
current windows's tool bar.
The speed menu enables you to quickly access other features that are applicable to the selected items. For example, select multiple items displayed in a tool by clicking and dragging the mouse. Then right click and select Information. The selected items are loaded into applicable browsers to extend your analysis.
The speed menu is displayed in two ways:
In addition, the following functions are accessible from the speed menu.
| Select this:
|
To do this:
|
|---|---|
| Select | Make the selected item the scope of analysis. After doing this, the item should be displayed at the bottom of the Desktop. |
| Highlight | Highlight the item's occurrence in the source. |
| Clear | Clear highlighting in the source code for the selected element. |
| Capture Results | Add the selected components to an item in the Capture Results dialog. |
| Go To | View the source code for the selected element in the Source view. |
| Information | Load the selected element into a proper browser. |
| Tools | Load the selected element into tools or views. |
| Browsers | Load the selected element into the Browser of choice. |
You can also copy the selected elements onto the local clipboard by clicking Ctrl-C on the keyboard. This is useful for loading project information into external tools for editing or sending to recipients.
When the ![]() View
Source Code is clicked, the Split Screen Editor is opened within the
current window. It displays the source code for the selected element in
the information window. For more information about the Split Screen
Editor, see the section in the Tools chapter entitled
Integrated
Editor.
View
Source Code is clicked, the Split Screen Editor is opened within the
current window. It displays the source code for the selected element in
the information window. For more information about the Split Screen
Editor, see the section in the Tools chapter entitled
Integrated
Editor.
Click ![]() Print to
print the contents of an open file. The generated hard copy will contain
either a graphical or textual representation of the information displayed
in the open window. Information contained in unexpanded folders will not
be printed. The following options are available in the Print dialog:
Print to
print the contents of an open file. The generated hard copy will contain
either a graphical or textual representation of the information displayed
in the open window. Information contained in unexpanded folders will not
be printed. The following options are available in the Print dialog:
Highlighting marks source code elements in selected colors for quick
reference and easy identification. To highlight project items from any
tool or browser, right click on the item and select Highlight on
the speed menu. All the source code represented by leaves
![]() is highlighted in the
specified color. You can then
is highlighted in the
specified color. You can then ![]() View Source Code or right-click and select Go To to see
the highlighted source code.
View Source Code or right-click and select Go To to see
the highlighted source code.
The User tab, available when you select Utilities/Options, enables you to specify a highlighting color. To remove highlighting for an item, right click the element and select Clear.
When you are viewing your source code files in the editor, you have the
option to toggle items between highlighted and unhighlighted by clicking
![]() Highlight.
Highlight.
The Modification Driver is used to support the transition between source code analysis and implementing modifications. With this feature, you can automatically tag columns, insert text, comments, and blocks of text into selected project source code files. This is useful for incorporating identical modifications to groups of files.
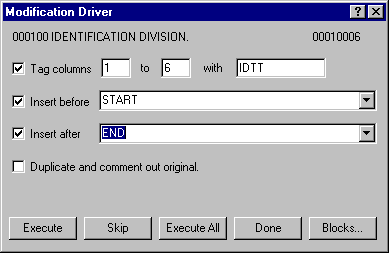
In addition to inserting text strings and tagging columns, the Modification Driver enables you to insert defined blocks into your source files. Click Blocks to open the Modification Driver Code Blocks dialog box. The Block Definition field is where you type or paste in the contents of the code block. Once this is completed and the Block Name is specified, click Add. The block is defined and can be used in the current analysis. If you want to save this block and make it accessible during other analysis tasks, click Save As to save the block to your local system. The Block Name is given an .RVB extension and saved to the directory that you indicate in the Save As dialog box. The Load button enables you to load existing blocks back into the Modification Driver.
To insert the block of code into your source file, check the Insert before or Insert after check boxes and enter the block name in the adjacent field prefaced with %%. For example, to insert the block named SAMPLE.RVB, type %%SAMPLE. Then Execute the Modification Driver for the selected files.
The Capture Results dialog is invoked by clicking
![]() Capture Results.
Capturing results enables you to add selected items to annotations,
subprojects, POP files, and TAG files.
Capture Results.
Capturing results enables you to add selected items to annotations,
subprojects, POP files, and TAG files.
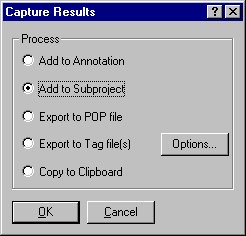
Figure 2-3: Capture Results
Refer to the on line help for more details.
Copyright © 2000 MERANT International Limited. All rights reserved.
This document and the proprietary marks and names
used herein are protected by international law.
| Overview | Creating and Managing Projects | |