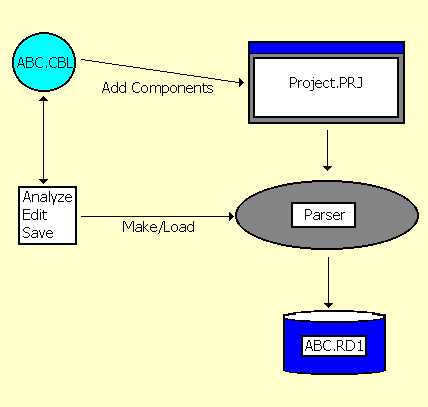
Figure 9-1: The Project Creation Process
This chapter describes how and why to group source files and parse them to create a project, and how to access individual project files and control their status in the project.
A large system application can consist of hundreds, even thousands of source files. However, during system analysis, typical users are only interested in a small number of source files at any one time. To make this process easier, you need to identify the source files that are of interest in your system and use them to create projects. A project is conceptually a refreshable snapshot of a coherent set of source files that encompass the scope of intended analysis. Physically, it consists of a collection of files that, together, constitute a Revolve database. The project will typically need to reference the source files, but the source files are not considered part of the project. Projects are beneficial because:
Projects are the basis of all analysis and application maintenance in Revolve. Before analysis can begin, a new project must be created. To create a new project, you must determine its name, its location on your local system, and the source files that comprise it. Once this data has been collected it is parsed to create a database representation of the source files. Parsing is the process where each source file is processed and compiled into the project database. This database contains extensive information about your system. Specific details, from individual items like MOVE statements to the names of variables, are cataloged and are accessible with the various tools and browsers provided.
When you create a project, it is good practice to create a directory that will contain only the new project's components. If two projects coexist in the same directory and files are shared, then conflicting versions of those files will occur because every time a file is parsed in one project it causes the other project to be inconsistent. Keep your projects separate to ensure your project's source code integrity. If you want multiple users to map to the source in the project, store the source on a network drive rather than a local drive. This also makes backing up of the source easier. All users of Revolve then need to map the network drive to the same letter, as this mapping is used to locate and display the correct source.
For PC-based source files, we further recommend that you create a common directory containing separate directories for each type of source included in that project. For example, COBOL, copybooks, macros and JCL. We recommend that the common directory be placed on the same drive as the project directory.
For mainframe-based source files, we recommend that you use directory names which match the mainframe source libraries so you can easily identify the code via the library you are familiar with. For example, use a top-level directory called Production to hold the production source libraries, and subdirectories named for every source library on the mainframe. If your mainframe source library name is ADA3ZY.PROD.SRCLIB.COBOL, using a directory name of ADA3ZY.PROD.SRCLIB.COBOL to store the source would be the most intuitive to the users. See the section Accessing Files from the Mainframe later in this chapter for details on how to access mainframe files.
If you have just opened Revolve, a wizard will take you through the creation of a new project. If you already have a project open in Revolve, select Project > New, to go to the wizard. The New Project dialog box is displayed. This is where you define the name and location of the new project file. The name that you enter here becomes the name of the .prj file.
The next screen in the wizard lets you change project options. Usually you won't need to do this. However, if you have components or copybooks with the same extension, you will need to add the extension for the copybook by clicking Change project options > Extensions. We recommend you set copybooks to have the extension of either .cop or .cpy, and COBOL programs to use .cbl or .cob.
You add components as part of the project creation process by clicking Add Components on the next screen of the wizard. Remember, a single project can contain up to 32,000 source members including COBOL, JCL jobs, and others depending on language extensions being used. This figure does not include imports (libraries, copybooks, includes, procs, or macros). Use the Add Components dialog box to navigate to the location of the source files, select them, and add.
You can add search directories as part of the Add Components step. This involves tying file types to directory names so Revolve can find referenced files. You will not always want to use search directories.
The list below indicates whether or not to use them when loading import files, examples of which are copybooks, procs, control cards, includes, macros and libraries:
Similarly, if you want to model only the components that are relevant to a specific execution environment, for example a single job stream, we recommend you use Search Directories, so that Revolve build process loads only the components from that search directory invoked either directly or indirectly.
If you have a copybook which has the same name for both Assembler and COBOL, we still recommend you use Search Directories, but define them within Project Manager using Options > Search Directories after highlighting the appropriate directory or component and then add search directories for the file types individually.
Search Directories are required for Assembler's macro files: they cannot be added explicitly. This is because Assembler code is preprocessed to expand imports and macros before the parsing phase. You can add search directories for macros either as part of the creation of a new project, or later using the Options toolbar button within Project Manager.
Project creation is complete when all the source files have been added and parsed. Parsing creates a database file for each source file. Each database file has the same name as the original source file and is given an extension of .rd#. Database files are stored in the directory that contains the .prj file along with system-wide database files. System-wide database files have the same name as the project and are given extensions like .ud#, .rt#, .rl#, .rv#, .rp#, .ra#, .pu#. If any changes are made to the source files, then the project must be parsed again to bring all the database files and source files up to date.
Notice in Figure 9-1 that source component ABC.CBL is added to Project.PRJ with Add Components and parsed. The database file ABC.RD1 is created during the parse. ABC.RD1 is the representation of ABC.CBL that is used in analysis. When you make changes to ABC.CBL, the .prj file must be parsed to incorporate the most recent modifications into ABC.RD1.
Figure 9-1: The Project Creation Process
It is important to remember that after making changes to files during
your analysis, you should perform a Make
![]() on your project to
ensure that all source files are loaded correctly.
on your project to
ensure that all source files are loaded correctly.
Mainframe Access is a suite of Micro Focus tools that enables you to access files residing on a mainframe. Revolve includes the client software for Mainframe Access, so if you have installed the Mainframe Access server software on your mainframe, you can use Revolve projects to access mainframe files as easily as PC files.
Before you can access mainframe files using Mainframe Access, you need to have installed and configured a number of options. You must perform the following operations:
The SourceConnect Access utility lets you define a number of nodes, where a node can be a mainframe or Fileshare server. As Revolve can work with multiple nodes in the same project, you could, for example, implement a project that uses one node for data files and development work, and a second node for your production system (to which you could submit compilation and link actions).
The Import Project function is provided to enable projects built with older versions of Revolve to be migrated for use in the current release. You should create a new project in Revolve and then select Project > Import Project. You are prompted to transfer User Relation information, which includes Complete Project specifications, Search Directories, File types, and Component Parameters, and to confirm that Annotations should be transferred. See the Help topics under the Projects folder in your online help for more information.
You can also import .pop files with the Import Project function. This is useful for integrating information from Mainframe Express.
When a project is loaded, Revolve attempts to resolve all system-wide relations. However, user intervention is occasionally required, especially in cases where direct name matching is not appropriate. These relations are needed to perform system-wide analysis tasks like tracing how a field impacts other fields throughout the project. With the functionality provided in Complete Project you can connect common files, executables, and screens with appropriate files in your system or indicate that a resolution is unavailable.
We recommend that you use the Complete Project features to provide Revolve with any missing information before you begin your analysis. This enables you to tie up any loose ends that might exist and ensure the integrity of your analysis.
The Complete Project window is displayed by selecting Project > Complete. Possible problems are displayed as folder entries in the window. Expand the folders. Anything listed below the folder entry needs to be examined more closely. Specifically, a Fix should be performed.
The primary function of the Complete Project interface is
resolving project inconsistencies or errors. Each folder displayed in the
information window should be expanded to view specific occurrences of problems
by selecting the displayed errors and clicking Fix
![]() . An appropriate Fix
dialog is displayed. When the parent (top line) of the Complete Project entry
is selected and the Fix button is clicked, a dialog is
displayed asking if all pertinent items should be included in the fix. If you
choose No, then each problem will need to be repaired
individually. If you choose Yes the Skip
button is enabled and allows you to move down the list of entries, skipping
those entries which should not be fixed. Refer to the online help for specific
information on specific fixes.
. An appropriate Fix
dialog is displayed. When the parent (top line) of the Complete Project entry
is selected and the Fix button is clicked, a dialog is
displayed asking if all pertinent items should be included in the fix. If you
choose No, then each problem will need to be repaired
individually. If you choose Yes the Skip
button is enabled and allows you to move down the list of entries, skipping
those entries which should not be fixed. Refer to the online help for specific
information on specific fixes.
Once you have incorporated your input to resolve the Complete
Project issues you can review the specific changes you made in the
Review
![]() dialog. The Review dialog lists
system-generated and user-generated resolutions to system-wide problems and
enables you to revoke resolutions.
dialog. The Review dialog lists
system-generated and user-generated resolutions to system-wide problems and
enables you to revoke resolutions.
You might also want to save the fixed information. We recommend that the Administrator run Tools > Scripts > Utilities > Generate a script to build this project from scratch, run the generated script, and save the compiled script in a location accessible by anyone working on the project. The project will be saved with two extensions: .rqs is the source of the script, and .rqc is the compiled source of the script. If you want to invoke this script later, enter the full path and filename for the .rqc file in the Shell of an empty project.
The Project Manager, as the name suggests, is the interface designed to be used for managing your project. It enables you to access your project on the component level according to file type. For example, all components that have been added to a project as COBOL files are displayed in the Project Manager under the cobol folder. Likewise, other folders that are displayed contain corresponding file types. From this vantage point you are able to access individual project files and control their status in the project.
The Project Manager can be activated in three ways: by creating a new
project, by selecting the Manager menu item from the
Project menu, or by clicking Project
Manager ![]() at
the bottom of the desktop.
at
the bottom of the desktop.
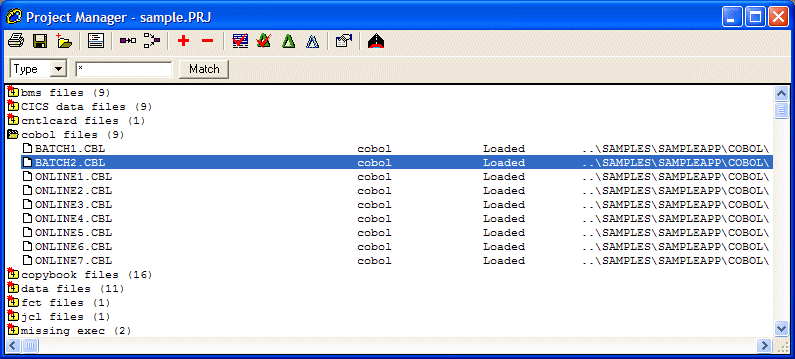
Figure 9-2: Project Manager
The Project Manager's interface is designed around hierarchical folders, where the top level folder indicates file type. When expanded, corresponding project files are displayed.
In addition to viewing component status, the Project Manager
enables you to add or delete components in the open project. The
Add
![]() function displays
the Add Components dialog box, where you locate system files and add them to
the project. The Delete
function displays
the Add Components dialog box, where you locate system files and add them to
the project. The Delete
![]() function deletes the
selected component from the project.
function deletes the
selected component from the project.
After modifications, like adding or deleting components, and editing
source code, are made to a project, check the status of the modified files by
selecting them in the Project Manager and clicking Status
![]() . The
Status function examines the file's time stamp to see when
it was modified in comparison to the project. If time stamps differ, the
modified files will have a status of Out of Date. To load
the selected components, click Load Selected
. The
Status function examines the file's time stamp to see when
it was modified in comparison to the project. If time stamps differ, the
modified files will have a status of Out of Date. To load
the selected components, click Load Selected
![]() . To update the
entire project click Make
. To update the
entire project click Make
![]() . The
Make function examines all project files and updates all
unloaded or out of date components. You can also rebuild the Project Manager data for all views by clicking
. The
Make function examines all project files and updates all
unloaded or out of date components. You can also rebuild the Project Manager data for all views by clicking ![]() .
.
Every system file that you add to a project is assigned specific settings based on its file type. These settings indicate how the file will be handled in your project. There are two classifications of these settings:
Project Level settings are applied to every file as it is added to the
project. These settings are accessed on the Utilities > Options
dialog. The Project Manager enables you to make changes on the
Component Level to Component Parameters and Search Directories. To do this,
select component files in the Project Manager and click
Options
![]() . The changes you
make affect only the selected components.
. The changes you
make affect only the selected components.
For more information on setting Project Level Component Parameters and on specific functionality, see Component Parameters and Search Directories.
Preprocessors are useful for preparing some source files for parsing into a project. To specify a preprocessor for specific components, select the Component Parameters tab from the Project Manager's Options dialog. The components you select are directed through the preprocessor prior to parsing. When your project is parsed, components with preprocessor configuration are preprocessed with the module name specified in the Preprocessor field. After preprocessing is complete, the files are parsed into the project.
We recommend that you store preprocessors in the bin directory where the software is installed. If the preprocessor is not configured correctly, it will produce errors and cause relative source components to have incomplete information. Be aware that parser error messages may result from preprocessor problems. If you do use a preprocessor on a file and it doesn't parse correctly, try removing the prepocessor settings and allowing the Revolve parser to process the file. The parser may be able to handle the file on its own.
See the chapter Customizing the Analysis Environment for a description of settings that customize your analysis environment, like Display Options. Or find out about using the SourceConnect feature to access source code on mainframes.
Copyright © 2006 Micro Focus (IP) Ltd. All rights reserved.