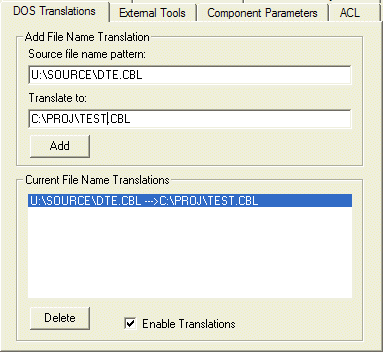
Figure 3-1: The DOS Translations Tab
This chapter describes the utilities that enable project and source file configuration.
The Utilities menu provides you with a variety of options for customizing the analysis environment, including:
The Options submenu item displays numerous tabs that enable you to set specific and general project options according to your analysis needs. This menu item is enabled for general environment settings prior to opening a project. When a project is opened, more tabs are available for project specific options.
Notice that if a project is shared, the options that are ADMIN exclusive are disabled to operators with USER access. For more information on shareable projects, refer to the section entitled Shareable Projects in the Administering Group Working chapter.
The DOS Translations tab is for project-specific settings, and enables you to map DOS drives, directories, and file names to other file names and directories. This feature is useful when a project has been built on a drive that appears to have different logical paths to different users. For example, if a project has been built on one user's workstation where the source files are located on a logical path beginning with u:\source\dte.cbl and those same source files are stored on a second user's workstation on the logical path c:\proj\test.cbl then a file name translation can be used to map the original settings to the secondary user's parameters.
Figure 3-1: The DOS Translations Tab
The External Tools tab is for the general environment. You can integrate tools into Revolve with the External Tools tab. Once a tool has been added into Revolve, it is invoked from the Tools menu or the speed menu. You add a new tool by typing its name in the Tool name entry field, and entering the command line call to the tool in the Command edit box, or clicking the Browse button and selecting an executable program.
Once the tool name and command-line options have been completed, click Add Tool to add the tool. Note that if a new tool is being added with the same name as a tool already incorporated, the new tool replaces the older tool.
The command line can include the parameters for the file name, directory, line, and column of the selected element. These parameters are substituted into the following wildcards:
| Wildcard: | Function: |
|---|---|
| %D | Specifies the directory of the source code file that contains the selected element. |
| %E | Specifies the extension of the source code file that contains the selected element. |
| %F | Specifies the path and name of the source code file that contains the selected element. |
| %N | Specifies the name of the source code file (with extension) that contains the selected element. |
| %S | Specifies the name of the source code file (no extension) that contains the selected element. |
| %X | Specifies the column in the source code where the selected element is located. |
| %Y | Specifies the line number in the source code where the selected element is located. |
To use these parameters, place {} around the portion of the command line that you want to be executed when an item is selected. For example:
notepad.exe {%F}
If no item is selected when the tool is executed, the command-line within the brackets is not executed. To modify any of the tools in the Current Tools list, click its name to display its Tool Name and Command line call. When you have made changes to the tool, click Add Tool to add it again. If you modified the name of the tool, a new tool will be created with the new name. If the tool name remains the same, the older tool will be replaced with your modifications.
To delete a tool from Revolve, select its name from the list and click Delete.
The Component Parameters tab is for project-specific settings, and contains options that determine how files are handled in your project. These options serve as default settings for all components based on type as they are added to the current project. For example, all COBOL files that are added to the project are given parameters based on these settings. If you change COBOL settings, all COBOL files that are already loaded in the project are not affected. The new settings are applied to new COBOL files that you add to the project.
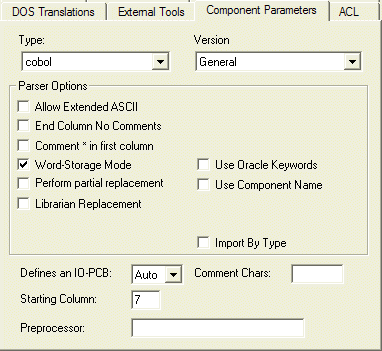
Figure 3-2: The Component Parameters Tab
The following parameters are available, though not all from the same component file type.
The term for the settings available in the Component Parameters tab is Project Level, because these options are applied to all components as they are added to the project. Sometimes it is useful to redefine parameters for components that have already been added to the project. Revolve facilitates this in the Project Manager. For more information see Configuring At the Component Level.
The ACL tab is for project-specific settings. During the initial setup of a project, you can spend a lot of time identifying relevant source code components in an application and downloading the correct files. The Automatic Component Locator or ACL makes this process easier and faster by:
Instead of having to individually add all source components to a project, you can specify a subset of modules, like JCL job members and CICS tables, and let the ACL search for and load all of the required components. The ACL identifies references to components within the subset of modules and accesses defined search directories to locate and load components as they are referenced (that is, COBOL, copybooks, procs, BMS and so on). The ACL then recognizes references within the referenced components and loads the applicable files contained in defined search directories.
The ACL is enabled by default on the ACL tab. It works in conjunction with the Search Directories feature to locate directories containing necessary source components. If you want to use the ACL, you should set up search directories before adding components to a project. The best way to do this is to use the Add Components dialog. Select the directory that contains referenced source components. Set the Type to the type of the referenced components. Then click Add Search. When you add the subset of project modules, the search directory is used to load referenced components. For an example of adding search directories, refer to Creating a Project in the Getting Started book.
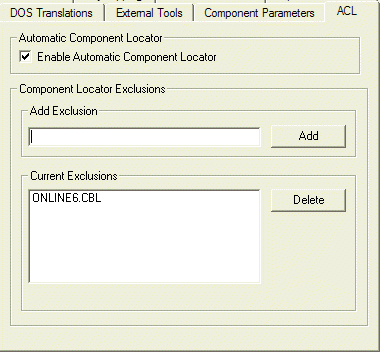
Figure 3-3: The ACL Tab
The ACL is useful when setting up a project, and in maintaining it. When new components are added into a project during development, the ACL adds the new components and parses the new code. To start the loading process select Make on the Project menu or click Make on the Project Manager. Once the Make is complete, click OK in the message box. The ACL adds only components referenced within the current project. That means that online components not called by existing components in the project, such as MFS screens, may need to be added manually.
The Project tab is for project-specific settings, and is where you set up various locations to be used in your project, for public annotations, your database, post-processing script, and shareable project.
The Directories tab is for the general environment and is where you configure general Revolve directory parameters.
The User tab is for the general environment, and provides options for operator specific settings. It is here that you specify a USER ID for yourself to be used in shareable projects and other features like annotations. You can also change the font that is used to display information in tools and browsers. The following options can be used to customize the analysis environment and operator settings.
The Power Keys tab is for the general environment. The keys F1 - F12 are assigned useful functions. With a single keystroke you can perform frequently used commands. The settings for the power keys are displayed in the Defined Power Keys list.
The Power Key Definition window displays the definition of the selected power key and enables you to edit an existing definition or create a new one. Once you're satisfied with your power key definition, click Set to save it and make it accessible.
The General Transformation tab is for the general environment, and enables you to allow or disallow multiple worksheets per project and rebuild the cache files when your project changes. If you are operating with metered code, you can set the option to automatically update the metering charges.
The Extensions tab is for project-specific settings, and enables you to allocate a supported file type to an unrecognized extension. An extension is a three character string that is separated from the file name with a period and identifies the file's type. Revolve references the extensions defined in the Extensions tab when loading files by automatic typing. Automatic typing is performed when automatic is selected in the Add Component dialog's Type field. It signals to the parser that file extensions define file type. For example, when adding the component ONLINE1.CBL, its extension is CBL, which indicates that ONLINE1 is a COBOL file. The parser recognizes the extension .CBL as a COBOL file and loads it into the project accordingly.
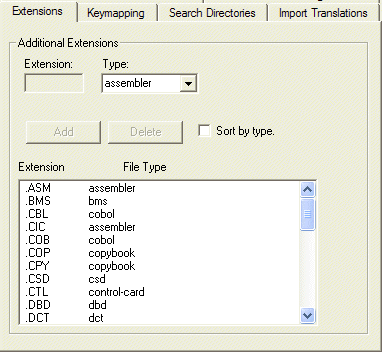
Figure 3-4: The Extensions Tab
A list of file extensions and associated file types is displayed in the Extensions tab. You can define new extensions or delete existing ones. New settings are applied to the current project only and will take effect the next time that you add components.
The Keymapping tab is for the general environment. Keymappings are very useful for customizing the editing environment. They make editing more efficient because common operations and functions are initiated from the keyboard, cutting down on mouse usage.
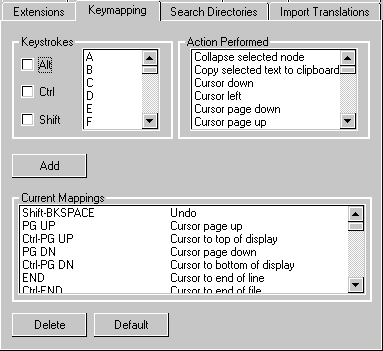
Figure 3-5: The Keymapping Tab
Many common operations are defined by default. They are displayed in the Current Mappings list. You create new mappings by selecting keystrokes and an action to be performed, and clicking Add. They are then added to the current mappings list. Clicking Default removes any new mappings you have created.
The Search Directories tab is for project-specific settings, and displays a list of the directories used when searching for system components and included files during the parsing process. A search directory is an accessible system directory that you identify because it contains components of a certain type that are referenced in project modules.
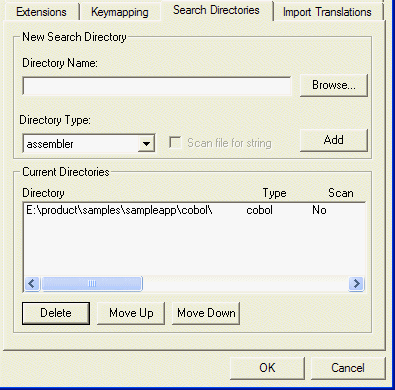
Figure 3-6: The Search Directories Tab
The Automatic Component Locator (ACL) uses search directories to locate and load referenced project components. For example, notice in the figure above, a path has been defined as a search directory for COBOL files. During the parsing process, a JCL references a file named batch1.cbl. When the parser encounters the reference, it deploys the Automatic Component Locator to the search directories defined for COBOL. If batch1.cbl is contained in that path, it is loaded and parsed into the project. This functionality helps you automate some of the project creation process.
We recommend that when adding search directories, you use the Add Components dialog and the Automatic Component Locator. For an example of adding search directories, see Creating a Project in the Getting Started book and see the section in this chapter on ACL.
In addition to accessing the Search Directories tab
from the Utilities > Options menu, you can access it from
the Project Manager with Options
![]() . Note that the
functionality of search directories settings modified from the Project Manager
apply to elements selected in the manager's information window. This enables
you to configure component level search directory settings. See the section
Configuring At the Component
Level in the chapter Creating and Managing
Projects for more information.
. Note that the
functionality of search directories settings modified from the Project Manager
apply to elements selected in the manager's information window. This enables
you to configure component level search directory settings. See the section
Configuring At the Component
Level in the chapter Creating and Managing
Projects for more information.
The Import Translations tab is for project-specific settings, and enables you to define file name translations for copybooks, proclibs, control cards, libraries, and other included files. Translating import names to supported standards is useful in some systems.
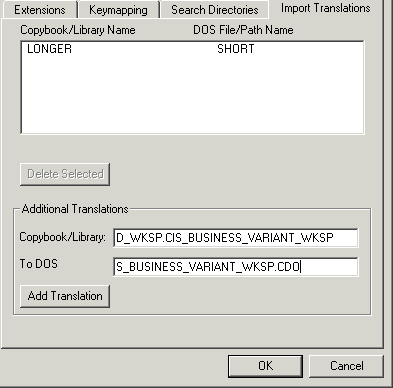
Figure 3-7: The Import Translations Dialog
The Tools/Diagrams Options tabs on the Utilities menu enable you to modify the default settings for various tools and diagrams. Most diagrams and tools that make use of an option dialog are represented here with a corresponding tab. The settings on these tabs are defaults and are used when tools and diagrams are opened.
The Browser Options tabs on the Utilities menu enable you to modify the default settings for several browser Option dialogs. These settings are used when browsers are opened and implemented in analysis.
Copyright © 2006 Micro Focus (IP) Ltd. All rights reserved.