
 | Using Revolve | Tools |  |
This chapter describes how to create and set up a Revolve project for performing analysis on your applications.
When creating a project, it is a good practice to create a directory that will contain only that project's components. A project consists of a single project file (with the extension .prj), many database files (with the extension .rd# - one for each loaded component), and some system-wide data files starting with the project name (with extensions .ud#, .rt#, .rl#, .rv#, .rp#, .ra#, .pu#). When a component is loaded, the database file is automatically placed in the same directory as the project file. Storing these related files in the same directory will ease future maintenance, especially after several projects have been created.
After you have designated a directory for your project select New... from the Project menu. The New Project dialog box is displayed, into which the name of the new project file can be entered. For convenience, the project should be created in the new directory. When a new project has been named and its location defined, the Project Manager window is displayed in the Revolve desktop and you are prompted to add components.
For projects to be shared by many developers, the project's subdirectory should be on a shareable network drive. For more information on creating and maintaining shareable projects see, Shareable Projects.
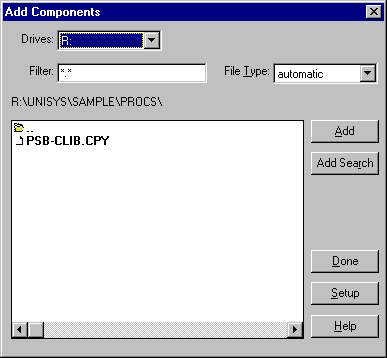
Components are added to a new and active project with the Add
Components dialog. This dialog is opened with the Add Components...
option on the Project menu as well as with the Add Components...button
 , located on the Project Manager.
The Add Components... menu option is only active if the Project
Manager is open. To open the Project Manager choose the Manager...
option from the Project menu or click
  ,
located at the bottom of the Revolve desktop. The Add Components dialog
lets you navigate through your system and explicitly identify the files you
want to add to the project.
Note: If the project is shared, Add Component privileges are exclusive to the administrator.

The Drives field is selected by default when Add Components is displayed. You can enter a drive letter by typing it from your keyboard. Or you can click the pull-down list box to expand the list of currently mapped drives and select the appropriate drive with your mouse. While the Drives field is selected, you can use the up and down arrow keys to move through the list of mapped drives.
To limit the component files that are added by type, use the File Type
field. Click  to expand the types list and select the
exact type: COBOL, JCL, copybook, etc from the list. The automatic setting
initiates Automatic Typing where Revolve automatically
determines component file types based on extensions.
Note: If some component files require special consideration, you can use the Component Parameters dialog to modify individual parameters.
The Filter: field lets you narrow the component search by filtering file names. For example, to locate BMS files only enter *.BMS into the Filter: field. By default it is set to *.*.
To Add files, select items in Add Components and click Add . Add a series of components by left-clicking and selecting with your mouse. Select a component that does not occur in sequence with the series with the control key and your mouse. Add an entire directory by selecting the directory and click Add. If there are subdirectories within the directory you will be prompted to add all subdirectories. Click Done when you have added all the components and are ready to parse and load the Revolve project.
The Add Search button initiates the Automatic Component Locator (ACL). The ACL is accessible from Utilities/Options/Admin.... It allows you to define a subset of components that are used in an application, so that all the source files that are referenced in those components will be loaded.
See also For more information on the ACL see Automatic Component Locator in Utilities.
Note: The 16-bit version of Revolve does not support source code filenames which are longer than eight characters in length, or have extensions of more than three characters. These files must be renamed in order to be added to a project.
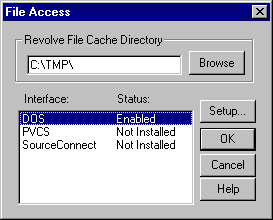
The Setup button on the Add Components dialog provides the user with direct access to the File Access dialog. This dialog is also accessible from the Utilities menu. Revolve provides File Access functionality to work interactively with source files located on mainframes or other locations besides the local PC. The File Access dialog allows administrators to setup Revolve with PVCS or to map drives, directories, and/or file names.

See also For more information about the File Access dialog or setting up DOS, refer to File Access Setup in Utilities.
To determine the types of components being added to the project, Revolve provides an automatic option which will determine the component type by looking at the filename extension. By default the following extensions are predefined:
| Extension:
|
Definition:
|
| .ASM | Assembler |
| .BMS | BMS |
| .CBL | COBOL-General |
| .CIC | Assembler |
| .COB | COBOL-General |
| .COP | Copybook and COBOL Includes |
| .CPY | Copybook and COBOL Includes |
| .CSD | CICS CSD Report |
| .CTL | Control Card |
| .DBD | IMS DBD |
| .DCT | CICS DCT Table |
| .DYL | DYL 280 |
| .ECL | ECL |
| .FCT | CICS FCT Table |
| .GEN | IMS Stage 1 GEN |
| .INC | Includes for PL/I, JCL, and Assembler |
| .JCL | JCL |
| .JOB | JCL |
| .LNK | Link Deck Module |
| .MAC | Assembler Macro |
| .MFS | IMS MFS |
| .MLC | Assembler Program |
| .PCT | CICS PCT Table |
| .PGM | COBOL-General |
| .PLI | PL/I |
| .PPT | CICS PPT Table |
| .PRC | Proclib |
| .PSB | IMS PSB |
| .RCT | CICS RCT Table |
| .SCH | Scheduler |
| .TXT | General-unknown component |
This table can be modified from Utilities/Options/Admin by clicking the Extensions... button on the Administrator Options dialog.
Copyright © 1998 Micro Focus Limited. All rights reserved.
This document and the proprietary marks and names
used herein are protected by international law.
 | Using Revolve | Tools |  |