| Group Working | The Worksheet |
Analysis tools are used to find points of interest (POIs) and add them to, or extract them from, the worksheet. The tools can work with different settings, varying the criteria of the searches. Sets are the method for temporarily holding the results of an analysis.
Note: If you do not see an analysis tool that is described here,
it might be excluded. To access any excluded tools; in the Analysis Tools
palette, click ![]() Options
and then the Tool Palette Editor tab. You can add or remove tools
from the tools palette.
Options
and then the Tool Palette Editor tab. You can add or remove tools
from the tools palette.
After the worksheet has been populated with all POIs from the source code, you will use only a limited number of tools at this stage of the analysis process. Most of the time you will use the supplied tools, although you can also use additional customized tools supplied by your administrator.
Sets are an advanced feature for refining searches of POIs in the worksheet. They are created by some of the analysis tools. The sets provide detailed information on the analysis processes used to bring the POIs into that set.
SmartFind Plus provides tools that find Year 2000 issues in the project's source code. It includes several Revolve features, such as the browsers, that can help you trace and find any additional company-specific or unusual Year 2000 related code. See the Tools chapter.
Analysis tools are available as single-step and composite tools. SmartFind Plus supplies single-step and composite tools. Composite tools are an automatic sequence of single-step and/or other composite tools. It is possible to build your own composite tool. You can hide both types of tools from view in the Tool Palette Editor. This enables you to have only those tools on view that you are using.
Settings are the criteria that each type of tool uses when searching. Tools have default settings which are saved in the tool file. Every analysis tool has a default setting. You can individually customize the settings for the analysis tools, for the current session or permanently by creating a new Settings group using the Configuration Wizard. These tools will help in your analysis of the POIs in the worksheet. If you have to use settings other than the default ones, they should have been supplied by your administrator as a <Settingsname>.dts file.
You can change the active Settings group in the Analysis Tools palette: in the Year 2000 menu select Settings and select the relevant Settings from the drop-down list. The active Settings group is displayed at the bottom of the Analysis Tools palette.
SmartFind Plus supplies a number of tools for refining POIs in the worksheet. There may be other tools created by your administrator. You should have received an explanation of their use from the administrator. A composite tool is a automated sequence of tools with various functions, whilst a single-step tool has only one set of functions. Listed below are the 3 main tools that are of use in this phase of analysis.
| Analysis tool: |
Description: |
|---|---|
| Analyze a statement | A composite tool that produces a set of all data items used in a statement and all the statements that use those data items. You have to drag POIs, from the worksheet or a set, onto the tool in the Analysis Tools palette. |
| Filter set | A single-step tool. Drag a set of mixed points of interest on to this tool to filter out statements, data items, JCL or data files. You can edit the tool to filter individual or a mixture of output types. |
| Worksheet channel | A single-step tool which can be used for extracting, within strictly defined criteria, POIs from worksheet. |
Sets are the method for temporarily holding the results of an analysis. Sets are displayed in a Set View window. Figure 10-1 shows an example view of a set. The POIs in the set are listed in the left-hand pane. The right-hand pane shows a history of how the set reached its current state. The history of a set provides detailed information on the analysis processes used to bring the POIs into that set.
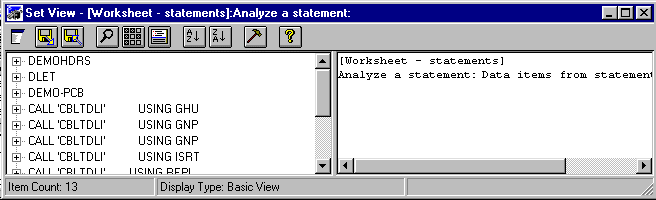
Figure 10-1: Example Set View
SmartFind Plus enables you to create sets from POIs in three main ways:
Each time you run a tool, a fresh set of POIs is produced. This means that you can always reconsider and start again if you run a tool and the resulting set is not what you expected. Remember to delete any unwanted sets. It can cause confusion when there are several sets in the project window.
Note: If you move individual entries of a set, the full history of how that line was found is not moved with it. A full history is only true when you move full sets.
You can add a set or subset to the worksheet or remove one from it. You can also take selected worksheet entries and make them into a set or combine them with an existing set.
SmartFind Plus enables you to adopt a flexible approach to adding sets to the worksheet:
All of the above methods of adding POIs to the worksheet go through the Worksheet channel tool. This enables you to set categories or write notes for the items you are adding.
The result is by default a union of the set or subset and what was in the worksheet. You are told how many POIs are added or removed.
If you add a set or subset to the worksheet, any POIs in the set or subset that are already in the worksheet's removed list, stay in the removed list. They do not get reinstated.
SmartFind Plus enables you to adopt a flexible approach to extracting sets of POIs to the worksheet. Select POIs in the worksheet and drag the selected POIs and:
You can also use the Worksheet channel tool to extract POIs from the worksheet into a set using, for example, categories as a criteria. Double-click on the Worksheet channel tool and select the required extraction criteria.
You can also highlight the POIs in the set that are already in the
worksheet. To do this, use ![]() Options in the Analysis Tools and check Colorize items
that exist in the worksheet on the Set Viewer Options tab.
Options in the Analysis Tools and check Colorize items
that exist in the worksheet on the Set Viewer Options tab.
If you remove a set or subset from the worksheet, any POIs in the set or
subset that match those in the worksheet are removed from the worksheet.
The POIs are not deleted but are moved to the removed list, the same as if
you had used ![]() Remove from list.
Remove from list.
To combine a whole set with another set, pick up the whole set by
pointing to ![]() in the Set View, and dragging it to the target set. If you hover over the
target set before dropping the dragged set onto the target set, a menu
pops up for specifying how to combine the sets. You can also use a
key/drag combination.
in the Set View, and dragging it to the target set. If you hover over the
target set before dropping the dragged set onto the target set, a menu
pops up for specifying how to combine the sets. You can also use a
key/drag combination.
| Set operation: |
Result: |
Cursor: |
Mouse + Key: |
|---|---|---|---|
| Union | Adds the contents of one set to another or to the worksheet. | Drag | |
| Intersect | Removes from the target set any POIs that are not also in the source (dragged) set. The resulting target set contains only the points of interest that are common to both sets. | Ctrl + drag | |
| Subtract | Removes the contents of one set from another or from the worksheet. | Alt + drag |
You can combine a subset with another set using the same set operations as for combining a whole set: intersect, union or subtract.
To combine a subset, you select just the set entries you want and drag those to the target set. You can hover over the target set and choose the required set operation Similarly, you can use a key combination with the mouse.
Note: Manipulating a subset destroys the integrity of the resulting set. The resulting set is no longer considered pure. It is no longer a product of manipulating complete sets using known criteria, and this step cannot be precisely recorded in the history of the set in the right hand pane of the Set view. This means that you cannot reproduce the set automatically, but you have to repeat the manual step if you want this set again.
Sets can be permanent or temporary. If you name a set it will appear in the Named Sets window, whenever you run SmartFind Plus. If you save a set you can reload it, but it will not appear in the Named Sets window. Open sets are listed in the Window menu .
We recommend treating sets as a stage in progressively populating and refining the worksheet:
Named sets are intended to be permanently available for the project.
To name a set, go to the Name tab of ![]() Options in the relevant Set View and specify a name. The
set is stored to disk with the name you specify and the suffix .set.
It is stored in the project directory.
Options in the relevant Set View and specify a name. The
set is stored to disk with the name you specify and the suffix .set.
It is stored in the project directory.
When a set has a name, you can:
A saved set is intended for a temporary storage of a set. A saved set does not have the permanency of a named set.
A set is saved with ![]() Save to File, in the active Set View window. Sets saved
this way are not displayed in the Named Sets window.
Save to File, in the active Set View window. Sets saved
this way are not displayed in the Named Sets window.
You can re-load the set with ![]() ,
Load from File. When you load a saved set, the saved name will not
appear in the window title. If you load a file into the Set View window
of a named set, the named set will temporarily disappear from the Named
Sets window. It has not been deleted, but can be loaded again.
,
Load from File. When you load a saved set, the saved name will not
appear in the window title. If you load a file into the Set View window
of a named set, the named set will temporarily disappear from the Named
Sets window. It has not been deleted, but can be loaded again.
| Group Working | The Worksheet |