| Year 2000 Problems and Solutions | Reporting on the Worksheet |
This chapter describes how to fix date problems using SmartFix. It is relevant only if you are remediating your application. If you are only verifying your application, you can disregard this chapter.
SmartFix collects fix details in the worksheet in order to generate a new set of sources that will handle the century correctly. For each statement of interest, SmartFix inserts code that determines the century of the data items that represent years. These data items are expanded to include the century.
SmartFix examines each POI to determine the COBOL verb, the data items involved, and the statement's scope, such as whether the statement returns a date value that will need attention. SmartFix then generates a code fix that:
The exact code that you require to expand a data item depends, among other things, on the data item's date format (such as yymmdd) and the start year of the 100-year window in which the data item falls (such as 60, which implies 1960-2059). Consequently, you must specify the type of date in each data item of interest before SmartFix can expand the data item. You do this by allocating a year type to each data item of interest.
The year type defines how data items of that type are handled. Many of the year types represents date formats that do not have the century and so need fixing. Associated with each of these year types is a set of macros that expand and contract data items of that type. SmartFix defines a default set of over 130 year types, such as YYMMDD9 (a numeric data item that represents the date as yymmdd), and you can add your own year types or customize the default ones.
The steps for Year 2000 investigation start with loading the application into the Revolve database, finding the POI and gathering them in a worksheet.
The date fixing process is centered on the worksheet. You start here to select the POI to work on and return here to select the next ones. Whenever you are in the worksheet, you can review the whole project, check the status of each fix and produce reports.
The fixing process involves:
Before you can fix the code, each date data item needs to be assigned a year type, which determines how the data item is to be handled. SmartFind Plus assigns year types using predefined assignment rules, but sometimes it is not clear which year type is appropriate and so in these cases no year types are assigned. You need to examine each unassigned data item and assign it a year type appropriate to its logical date format (such as yymmdd), its data type (such as PIC 99 or PIC X(6)), and the 100-year window from which to derive its century (such as 1960-2059). The year type defines, among other things, the macros to use to expand the two-digit years into four-digit years.
Notice that the statement fixes are generated from the year type assignments. This means that the date data items in those statements must have the correct year types before you approve a fix.
You can customize various aspects of the fixes to be generated, such as the formatting and labeling of the code inserts. You can also choose whether to insert the fixes in-line with the program code being fixed, or out of line at the end of the program, and you can put data definitions and out-of-line fixes in copybooks.
When you are ready to determine how to fix the code, you select statements from the worksheet and work through them one by one. SmartFix shows you what the generated code will look like, using the year types allocated and their corresponding macros. You then examine the automatically generated fix. If it is not quite right, you adjust the year types and macros used for each data item, which causes SmartFix to generate a different fix. If the fix is still not right, you can edit it manually.
You do not apply the fixes to the source yet. Instead, you record the details for each fix in the worksheet. You can then change these details, such as the year type macros, as you work through the worksheet and gradually build up a consistent set of fixes, without committing them to the source.
When you have established a complete and consistent set of fixes,
apply the whole set to a copy of the sources, using
![]() Apply Fixes.
Apply Fixes.
Warning: Do not edit the original source code during the fixing process. If you do, you will need to restart the project from the beginning and reparse the projects and repopulate the worksheet.
SmartFix can fix applications automatically and this is a quick remedy to the Year 2000 problem, although you will need to check each fix to confirm it is not a special case that needs adjustment.
SmartFix can automatically fix programs by:
You can specify the comment to give when SmartFix cannot fix a
statement, on the Comments tab of ![]() Options.
Options.
You can also specify the status to give to the statements that SmartFix cannot fix: Auto, Not Fixed or Commented. The main reason for choosing Auto over the other two is that it enables you to change the year type and automatically generate a new fix based on that year type. In this case, any Auto statements are fixed using the new year types, but any Not Fixed or Commented statements are not fixed.
You can also specify the status to give to the statements that SmartFix cannot fix: Auto, Not Fixed or Commented. The main reason for choosing Auto over the other two is that it enables SmartFix to automatically adjust the fix code if you subsequently change the year type or details for a year type before running Apply Fixes.
To automatically fix an application that you have loaded into the project database:
A copy of the source is then produced with the appropriate fixes inserted using the year types assigned in the worksheet and their corresponding macros. The original code for each fixed statement is commented out and the fix is inserted. If a statement does not have any operands with year types, the original statement is left intact and the specified comment is added to the source.
You can customize various aspects of the fixes to be generated, using
![]() Options.
Options.
You can customize the formatting and labeling of the code inserts, at the following tabs of Options:
For full details of each option, click ![]() Help in the top right corner of the Options window and
click the option on which you want help.
Help in the top right corner of the Options window and
click the option on which you want help.
You can customize the types of fixes that are inserted from the Fix Options tab of Options.
You can specify how to handle statements if their data items do not have any fix types allocated. When you add these statements to the worksheet, they are marked as:
You can specify the macro library from which to take the required year types and macros. You can specify one of the supplied Micro Focus libraries or one of your user-defined libraries.
You can choose the type of fix to insert, depending on the types available in the macros you are using. SmartFix supplies the following fix types:
You can specify the fix type in the following places:
![]() Options. On the
Fix Options tab, you can choose the default fix type.
Options. On the
Fix Options tab, you can choose the default fix type.
![]() Edit Year Type,
where you can specify the fix type for the selected year type.
Edit Year Type,
where you can specify the fix type for the selected year type.
![]() SmartFix, where
you can specify the fix type to use for each data item in the Fix type
column of the data item table.
SmartFix, where
you can specify the fix type to use for each data item in the Fix type
column of the data item table.
For full details of each option, click ![]() Help in the top right corner of the Options window and click the
option on which you want help.
Help in the top right corner of the Options window and click the
option on which you want help.
The Data tab of ![]() Options enables you to customize the definitions of the expanded
data items that SmartFix generates. Figure 13-1 shows an example of the
Data Options.
Options enables you to customize the definitions of the expanded
data items that SmartFix generates. Figure 13-1 shows an example of the
Data Options.
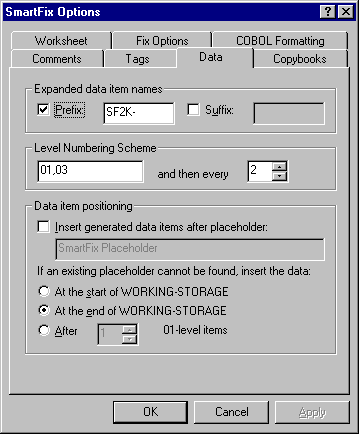
Figure 13-1: SmartFix Options, Data tab
You can specify the prefix or suffix for the names of the expanded data items. You can also specify where to put the data item definitions in the Working-Storage section, such as at the start or end of the Working-Storage section, or after a specified number of level 01 data items.
You also can put the generated data items in a copybook, by specifying this on the Copybooks tab of Options. If you do this, a COPY statement will be added to the specified place in Working Storage, instead of the data items.
For full details of each option, click ![]() Help in the top right corner of the Options window and
click the option on which you want help.
Help in the top right corner of the Options window and
click the option on which you want help.
The Copybooks tab of ![]() Options enables you to use copybooks for the fixes that SmartFix
generates.
Options enables you to use copybooks for the fixes that SmartFix
generates.
You can add any generated data items to a copybook, by default, and similarly you can add any generated out-of-line code to a copybook. You can generate the copybook filenames automatically. If you do, you can:
You can override these for individual programs when you apply the fixes
to the source, using ![]() Apply
Fixes.
Apply
Fixes.
For full details of each option, click ![]() Help in the top right corner of the Options window and click the
option on which you want help.
Help in the top right corner of the Options window and click the
option on which you want help.
Use ![]() SmartFix at
the worksheet to examine the fixes for the selected statements. SmartFix
displays the first fix and the information used to generate it in the
SmartFix window. Figure 13-2 shows the SmartFix window.
SmartFix at
the worksheet to examine the fixes for the selected statements. SmartFix
displays the first fix and the information used to generate it in the
SmartFix window. Figure 13-2 shows the SmartFix window.
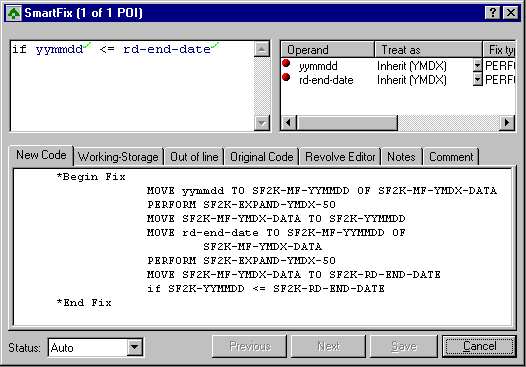
Figure 13-2: SmartFix window
This window has four main parts:
Having inspected the fix that SmartFix generates, you can adjust the fix as follows:
The statement at the top left marks the operands in blue. Any operands that have year types are marked with a green tick or a red cross. Any operands that do not have a year type are not ticked or crossed since they do not need fixing. Figure 13-3 shows an example statement in the SmartFix window
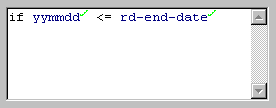
Figure 13-3: Statement in the SmartFix Window
A green tick means that a fix is automatically generated for the operand. A red cross means that a fix is not generated for this operand in this statement. An operand can be ticked in one statement and yet crossed in another, so that a fix is generated for the operand in the ticked statement but not in the crossed one.
When you first examine the fix for this statement, the operands with year types are marked with green ticks, and a fix is automatically generated for them. If you do not want to fix an operand in this statement, perhaps because you know that the operand does not hold a date at this point, you can skip the fix, which marks it with a red cross. To skip a fix, you point to the operand, right click it and then click Leave operand alone.
The operand table at the top right shows each of the operands in the statement and the specification used to generate the fix for each one. Each operand's year type is shown, as well as the action to take before and after the statement. Figure 13-4 shows the operand table.
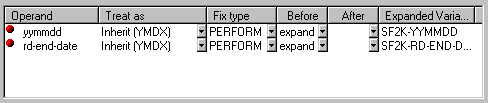
Figure 13-4: Operand Table
You can leave the fix to be generated as shown in the table. Alternatively, you can override any of the following for just an individual operand for this statement:
If you want to use a different year type, because perhaps the operand holds the year in different format here, you can choose a different year type for this occasion. If you subsequently change the year type allocated to the operand in the worksheet, this fix is not updated. This is because this instance of the operand no longer inherits its year type from the worksheet, but uses the year type you have individually chosen for this statement.
The proposed fix is shown on the following tabbed pages:
Make sure that you have finished changing the operand table before you edit the code. If you subsequently change the operand table, the fix is regenerated and your edits are potentially overwritten. SmartFix warns you before overwriting, so that you have the opportunity to backtrack.
If the perform has already been generated for a previous statement, it is not inserted again, but it is shown here for completeness.
The existing code is shown on the following tabbed pages:
The Notes tab highlights issues relating to the suspect statement and its fix. You can display further information and suggestions by clicking the relevant note itself.
The status of a statement and its fix is shown in the worksheet. The
status is updated when you change the fix using ![]() SmartFix.
SmartFix.
A statement can have the following fix statuses:
| Status |
Meaning |
| Not fixed | A fix is not generated for this statement, or SmartFix does not
handle this statement.
The original statement is left intact without any fix or any comment. |
| Commented | The original statement is left intact without any fix, and the comment specified in the Comment tab of Options is added. |
| Auto | A fix is automatically generated, using the macros for the year
types currently assigned to the date data items in the statement.
The code for the original statement is commented out. |
| Fixed | Like Auto status, a fix is automatically generated, using the
macros for the year types currently assigned to the date data items in
the statement. You have not made any changes to the fix that SmartFix
generates by default.
This status indicates that you have examined the statement and have manually changes its status to Fixed to indicate that you approve the fix. The code for the original statement is commented out. |
| Fixed (generated from manual specification) | The fix is generated according to the customized year types,
actions and operand mapping. You manually changed some of these things,
overriding the default behavior. You did not, however, edit the code in
the New Code tab, but left it intact.
The code for the original statement is commented out. |
| Fixed (supplied manually) | Neither a fix nor any Working Storage code is generated. You
entered the whole fix in the New Code tab to be inserted as
in-line code.
The code for the original statement is commented out. |
| Fixed (generated and manually edited) | A fix is automatically generated and you edited the in-line code in
the New Code tab. The Working Storage and any out-of-line code
is been generated according to the information in the operand table.
The code for the original statement is commented out. |
When you have established fixes for all the statements, you apply them in one batch, generating a fixed version of the source files.
Use ![]() Apply Fixes
to generate a copy of the source files and to fix that copy.
Apply Fixes
to generate a copy of the source files and to fix that copy.
Figure 13-5 shows the Apply Fixes window, where the number of fixes to be applied to each program is shown, as well as the location of the fixed version of the sources and any copybooks generated.
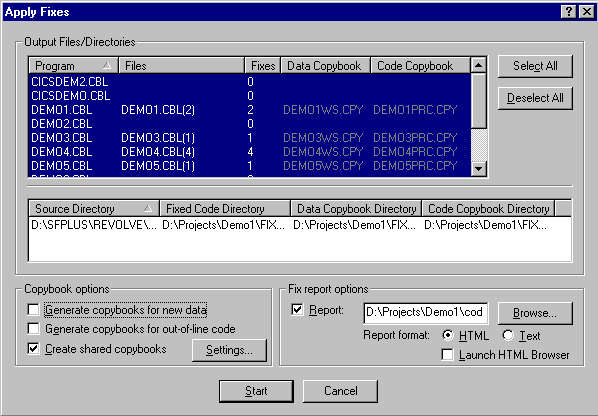
Figure 13-5: Apply Fixes
You can specify the settings for applying the fixes, such as the names and locations of the copybooks that hold different types of fixes. We recommend that you generate a report when you apply the fixes, as this report contains details of any problems found when applying the fixes, together with a summary of the fixes. See the Reports chapter for details.
The settings that you specify for applying the fixes are saved in the worksheet. This means that this information is available for reports on the worksheet.
The fixes to be applied comprise data item definitions and procedure division code. You can put the new data item definitions in copybooks rather than directly in the programs to which they apply. Similarly, you can put any out-of-line perform sections for a program in a copybook. You can also put all the data item definitions together in one shared copybook instead in one copybook for each program.
The fixes to be applied comprise data item definitions and procedure division code. You can use copybooks for:
If you decide to use copybooks, you can generate their filenames
automatically according your file naming conventions. To change these
naming conventions, go to the Copybooks tab of
![]() Options
and specify the required file naming. Alternatively, you can specify
individual copybook names on the Apply Fixes dialog.
Options
and specify the required file naming. Alternatively, you can specify
individual copybook names on the Apply Fixes dialog.
SmartFix takes each of the fixes established in the worksheet and applies them according to their fix statuses:
If when you examined a statement, you chose to inherit year types from the worksheet, the year types currently allocated in the worksheet are used to generate the fixes. However, if you overwrote the inherited year types used in a statement, your year types are used instead of the inherited ones when generating the fixes.
The fix is generated according to your specification in the operand table and any manual edits in the New Code tab. The original code for the statement is commented out and the fix is inserted.
When you run Apply Fixes, you generate new fixed versions of the source files that needed changing.
We recommend that you keep the following files, in case you have problems with your fixed application and need to return to your SmartFind Plus project:
You might need the original files at any of the following stages, when you:
| Year 2000 Problems and Solutions | Reporting on the Worksheet |