

| Creating Projects | The Interface | |
This chapter explains how to manage and configure your projects to maximize your analysis procedures. When you finish this chapter you should have a good understanding of the Project Manager, Shareable Projects, and the Complete Project features.
Projects are controlled primarily from the Project Manager. The Project Manager window displays the list of component files which have been added to the project. It also provides the user with the ability to make modifications to the project's configuration--if the user has the appropriate rights. Certain buttons in the Project Manager may be disabled depending on the rights of the user. For example, if the project is shared, the Add Components and Delete Components buttons will be grayed and unusable to the user but will be focussed and accessible to the administrator.
The Project Manager is activated by creating a new project, by
selecting the Manager menu item from the Project menu, or by
clicking the Project Manager button
 at the bottom of
the Desktop.
at the bottom of
the Desktop.
When existing projects are opened by choosing the Open option from the Project menu, the Project Manager will not appear.

See also For more information about administrative rights refer to Administrator Options and Administrative Mode in Shareable Projects.
The Project Manager has six columns:
Each component of a project has an associated status.
 Options…. The name that
appears in the bottom text box should match the preprocessor .dll filename as it
appears in the \revolve\bin\ directory. If the appropriate preprocessor is
available and the Invalid status still appears, examine the source code
for possible errors.
Options…. The name that
appears in the bottom text box should match the preprocessor .dll filename as it
appears in the \revolve\bin\ directory. If the appropriate preprocessor is
available and the Invalid status still appears, examine the source code
for possible errors.
The following table provides a complete list and description of the options that are available from the Project menu:
Note: Icons in the following table are found on the Project Manager's button bar and access the described functionality.
| Menu Option: |
Definition: |
|---|---|
| New... | Prompts for the name and creates a new project. |
| Open... | Prompts for the name and opens an existing project. |
| Save | Saves the project. Save automatically happens when you close a project or exit Revolve, but periodically saving your project is a good practice. |
| Save As... | Prompts for the name and saves the project with a new name. It also updates the name of the active project. |
| Make User | Converts the database that is being accessed from Administrator the administrator's to the user's and vice versa. |
| Make Shareable... | Prompts for the path and name of a shadow project for making a shareable project (see Shareable Project for more information). |
| Close | Closes the active project. The changes to the project are automatically saved. |
| Delete Project... | Deletes the active project and any related files. |
| Import Project... | Loads the definition of a project from a file. |
| Export Project... | Saves the definition for the active project to user specified format. |
| Manager... | Opens the Project Manager to permit project administration. |
| Complete... | Opens the Complete Project dialog box, which guides the user through a process of identifying and classifying all the missing pieces and unknown information in a project. |
| Load Selected... | Parses (or re-parses) and loads all highlighted components in the Project
Manager. Also located on the Project Manager button bar
 . . |
| Make... | Parses (or re-parses) components which are "Out of Date", "Not
Loaded", or "Error", and loads successfully parsed components.
Also located on the Project Manager button bar
 . . |
| Status... | Compares database times against source-code time stamps and updates the
status in the Program Manager accordingly. Also located on the Project Manager
button bar
 . . |
| Add Components... | Activates the Add Components dialog box, which is used to add new
components to the project. Also located on the Project Manager button bar
 . . |
| Delete Components... | Removes all highlighted components in the Project Manager. Also located on
the Project Manager button bar
 . .
|
| Properties | Lets you set the default Cobol for your project. |
| Exit | Closes everything, saving all changes to the current project. |
It is sometimes necessary to modify the parameters of a component after it has been added to a project. Revolve provides the COBOL Parameters feature to facilitate component level parameter definition. This is different from the Component Parameters functionality available through the Administrator Options dialog (Utilities/Options/Admin...) in that these parameters are applied to existing, selected components (component level), as opposed to effecting all components, new and existing, across the project (project level).
To set component parameters on the component level:
. The
Parameters dialog is displayed specific to the type of the component you
selected. If you selected many components, then the first type that appears in
descending order in the Project Manager is the first parameter dialog
that is displayed.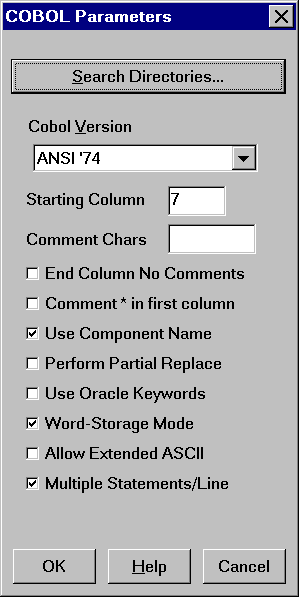
 to expand the list.
Note: Setting up search directories at the component level overrides the default directory settings for the selected components in the Project Manager. This can be useful for import files that have the status Not Found.
The parameters you select and check will be applied to the selected components when you click Ok. If the selected components are of different types, then a corresponding parameter dialog is displayed.
See also Component Parameters or Search Directories, in Utilities for more details on these dialogs.
Sometimes it's necessary to make projects available to multiple users. Revolve lets you configure Shareable Projects. Using a Shareable Project is not the same as using a network version of Revolve where multiple users can use the same copy of Revolve simultaneously. In Shareable Projects, all users have analysis specific privileges, however only the administrator can apply modifications to the project.
Rights specific to an administrator include:
Both single user and shared projects can be password protected to prevent unwanted changes to the project's configuration.
A shareable project is a Revolve project which can be accessed by multiple users across a network at the same time. Once a project is made shareable, multiple users can open the project simultaneously to perform their individual analysis tasks. Only an Administrator has the ability to change the project through adding/deleting components, loading, completing the project, etc.
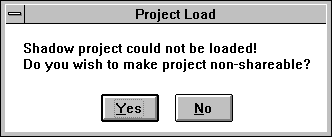
When a project is made shareable a duplicate copy of the project is created, given an extension of .SHA, and stored in a separate directory from the initial project. The copy is referred to as the Shadow Project and allows the administrator to perform updates to the project without interfering with other users.
The first step in making your project shareable is to create a subdirectory that will contain the Shadow Project and its associated databases. This subdirectory does not have to be on a network drive but must be accessible to any user who needs administrative rights to the project. The second step is to open the project that will be shared. From the Project menu choose the Make Shareable... option. This will prompt you for the directory and name of the Shadow Project. Shadow projects have a .SHA extension so as not to confuse them with the .PRJ of standard projects. For the path name, choose the newly created subdirectory from the first step.

After clicking OK, the shadow project is built in the specified directory. Once this is completed, Revolve will reopen the project in Administrative Mode.
Once a project is shareable, only an Administrator has the ability to change the project through adding/removing components, parsing, etc. Functions exclusive to an administrator are listed below.
To gain administrative access to a project, open the project and choose Project/Make Administrator. Another way to access the project as an administrator is to use the -A command-line option when invoking Revolve.
See also Command Line Parameters.
When you are in the project as an administrator, Revolve will include the indicator "(Admin)" in its title bar.
As a Project Administrator, you have access to options not available to other users. Administrators also have access to the Administrator Options dialog where parameters can be set to ensure efficient operation of Revolve. It is also the Administrator's responsibility to maintain the project and assure the integrity of the work that is being performed.
Revolve allows you to protect administrative access to a project with password protection. To add or change the password choose Utilities/Options/Admin and click on the Change Password button. This will prompt you twice for the new password. Just hit enter to require no password.
You will be required to know the password every time administrative access to a project is requested.
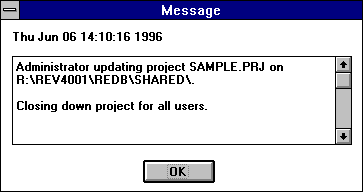
When modifying a project as an administrator through adding/deleting, Making, completing the project, etc., you are modifying the Shadow Project not the main Shareable Project which all the users share over the network. Thus, while a project is being updated by an administrator, other users can continue analysis without interruption. As an administrator, if you are satisfied the Shadow Project is completely up to date, you will need to update the Shareable Project using the Project/Update Shareable menu item or through the updateShared() function. This function requires that all users have closed the Shareable Project. Once the update operation is completed, both the Shareable Project and Shadow Projects will be up to date and in sync. If the administrator tries to update the shareable Project while the project is still open to other users, Revolve will display a project update message stating that other users still have the project open.
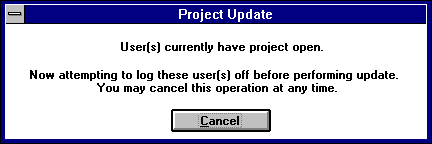
Revolve will use the messaging system to automatically log off any project users. This operation will normally take two to three minutes. Any users with the Shareable Project open will receive a message dialog stating that the project is being closed down.
When you are updating a shareable project Revolve creates a .LCK file in the directory containing the project to prevent other users from accessing it. If the update shareable process is interrupted, this .LCK file will need to be removed to gain access to the shareable project.
If Revolve projects are going to be shared by many users, the Revolve messaging system should be properly configured to enable network communication between the administrator and users. By default, Revolve uses the POST\ directory, where it was initially installed, to post messages. All Revolve users should be able to read and write at the POST\ directory.
A different message POST\ directory may be designated by creating GLOBAL.DEF in Revolve's BIN\ directory. Format the file as follows, where "directory name" is the complete path to the new message post directory:
[Messages]
MessagePath = <directory/file name >
If a specified message directory/file is terminated with a back slash then the message file will be named Revolve.mes. For example, the message file specified with the path J:\Jim\ will be J:\Jim\Revolve.mes.
To restore a project back to a single-user project:
When Revolve is used on a LAN it can support development teams through partitioned projects and databases. In a typical LAN-based project a copy of all system source files is loaded onto the central file server and parsed to create a master database. When programmers modify parts of the system, they make copies of files on their own PC and re-parse them into local databases. Revolve can be configured to treat the resulting partitioned database as a single entity with queries operating transparently across both parts. When both local and remote copies of a database exist, the local version takes precedence.
When system changes are complete, local files may be integrated with those on the master file server and reloaded into the master database.
No specialized server software is required for work group operation. Revolve requires only that the LAN provide shared disk space and standard DOS file locking services.
When you want to modify portions of the code and see those changes reflected in Revolve without interfering with other users, you need to create your own individual project.
The following procedure describes how a typical workstation user can configure Revolve to make his/her own personal project.
By configuring the project in this way, the user can share common files on the server and modify files locally within the same project.
If a file is modified locally, it can be reloaded to ensure that future queries against the file are correct. To reloading perform a Make....
Once the user has completed modifications, the changed files can be integrated into the file server and the Shareable Project updated by the administrator so the changes are accessible to all users. This step should typically be performed overnight or during a period of low activity to prevent disruption to other users.
Ordinarily, moving a project is a case of moving project files and databases from one path to another. With Shareable Projects, however, special considerations must be made. After physically moving the Shareable/Shadow project files, the Shareable Project path must be changed to point to the new location of the project.
Your project has been successfully moved and updated.
When Revolve loads a project it tries to resolve all system-wide relations. However, user intervention is occasionally required, especially in cases where direct name matching is not appropriate. These relations are needed to perform system-wide analysis tasks like tracing how a field impacts other fields throughout the project. With the functionality provided by the Complete Project window you can match up common files, executables, screens, etc. with appropriate files in your system or indicate that a resolution is unavailable. We recommend that you leverage the Complete Project features against your project to tie up the loose ends that may exist and to protect the integrity of your project analysis.
The Complete Project window is displayed by selecting the Complete... option under the Project menu. Possible problems are displayed as folder entries in the window. Expand the folders. Anything listed below the folder entry needs to be examined more closely. Specifically, a fix should be performed.
To fix problems in the project, select the problems or problem types you would like to fix and click the Fix... button. An appropriate Fix dialog will be displayed. When the parent (top line) of the Complete Project entry is selected and the Fix... button is clicked, a dialog will be displayed asking if all pertinent items should be included in the fix. If you choose No each problem will need to be repaired individually. If you choose Yes the Skip button is enabled and allows you to move down the list of entries, skipping those entries which should not be fixed.
An Unused Load Module signifies a program which is not invoked by any other component in the project. Typically the problem occurs in four ways:
A Load Module w/o Source Code signifies a load module which is not associated with any source code. This problem occurs in three ways:
Note: By default, a program's load module name is determined by the PROGRAM-ID in the Identification Division. However, Revolve also allows load module names to be determined directly from the source code's file name. To enable this function, select Admin... from the Utilities/Options menus, click the Component Parameters button, and select the "Use Component Name" checkbox in the Component Parameters dialog (refer to "Component Parameters" in chapter 7 "Utilities").
A Copybook/Proc not found signifies that a copybook or proclib include file could not be found in the project. This problem occurs for three possible reasons:
A Screen without Source Code signifies that a screen used in the project is missing source code. This problem arises in three ways:
A PROGRAM external file not associated with files signifies that a COBOL external file is not being properly associated with a physical data file. This problem occurs for three possible reasons:
An Unresolved System Variable signifies that a variable used to
resolve a system-wide access (calling a program, sending to a screen, etc.)
could not be populated with any values. To fix these problems associate the
variable with the proper value. You may type in the full name directly or type
a match query and use the match button to populate the list of existing
system-wide items. If multiple values need to be entered for a particular
variable use the Variable Data dialog, invoked by pressing the Variable
Data... button
 from the button
bar.
from the button
bar.
A CICS Dataset not associated with files signifies that a CICS dataset is not associated with a physical data file. This problem arises for three possible reasons:
A CICS program not associated with load module signifies that a CICS program can not be related to an existing load module in the system. This problem occurs for two possible reasons:
A CICS transaction not associated with load module signifies that a CICS transaction can not be related to an existing load module in the system. This problem occurs for three possible reasons:
A Component with Errors signifies that a component was not properly loaded. Typically this means a component was added with the wrong type (e.g. Assembler file added as COBOL), or that the parser options were set incorrectly. Use the Project/Delete to remove improperly added components.
Note: The Parsing Problems script, located in the Scripts tool, can be useful to identify and locate components with errors.
An IMS transaction not associated with load module signifies that an IMS transaction can not be related to an existing load module in the system. This problem occurs for three possible reasons:
An IMS program not associated with PSB signifies that an IMS program can not be associated with a PSB. This problem occurs for three possible reasons:
An IMS DBD not associated with files signifies that an IMS DBD can not be associated with a physical data file. This problem occurs for five possible reasons:
An IMS PSB Not Used signifies that there are IMS PSBs that are not associated with COBOL programs. To remedy this problem:
IMS PSBs without source code are caused when the project contains IMS PSBs that are not associated with any source code. This problem can occur in three ways:
IMS DBDs not used signals that the project contains IMS DBDs that are not referenced with IMS PSBs. To remedy this problem:
IMS DBDs without source code alerts the user that the project contains IMS DBDs that are not currently associated with any source code. This problem can occur in three ways:
IMS DBDs not associated with files signifies that the project contains IMS databases which are not associated with physical files. This problem occurs for three possible reasons:
Unused Copybooks alerts the user that copybooks have been added to the project but are not referenced in any of the programs. To remedy this problem:
IMS MFS Message not invoking an IMS transaction signifies IMS MFS Message that could not call or find a transaction. This problem can be remedied by associating the message with an IMS transaction.
Querying against an entire project can be inconvenient when you only need to
access an isolated or small amount of data. To remedy this problem Revolve
incorporates the use of subprojects in its tools and browsers. A
subproject is a collection of individually specified items that are
taken from a project to be analyzed and modified in specific ways. The
 Add to Annotation... button is available on
most tools and browsers and allows you to compile selected components into a
subproject.
Add to Annotation... button is available on
most tools and browsers and allows you to compile selected components into a
subproject.
Subprojects are managed in Complete Project. When you click
 Subprojects... you invoke the Subprojects
window. From this interface you can create new subprojects or edit existing
ones.
Subprojects... you invoke the Subprojects
window. From this interface you can create new subprojects or edit existing
ones.
| Click this: |
To do this: |
|---|---|
 |
Invokes the Print dialog, allowing for the subproject to be printed. |
|
Deletes the selected subproject. |
|
|
Invokes the New Subproject dialog where a new subproject is named and created. |
 |
Deletes selected subproject components. |
 |
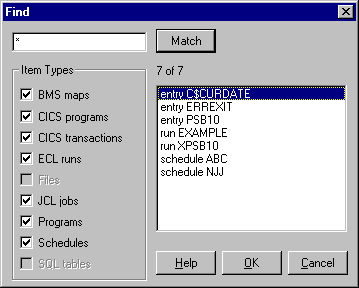
Invokes the Find dialog where you can select project components and add them to the subproject. |
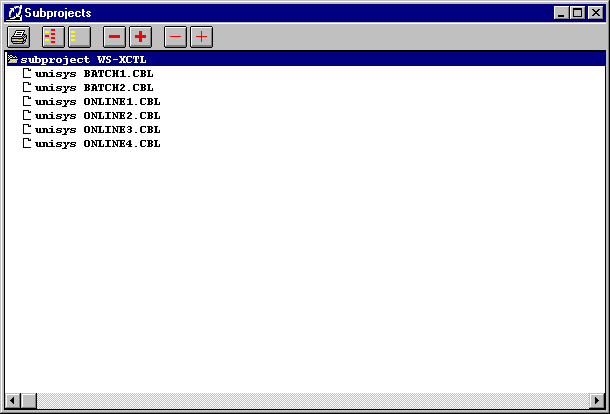
Subprojects are designed to limit the information pool that is analyzed. To illustrate the use of subprojects in analysis, let's create one in sample.prj, the project created in the Revolve Guided Tour.
at the bottom of
the desktop.
Add
to Annotation....
Assign Scope.Other programs are not displayed because the analysis was limited to the subproject SP1. This is a very effective way to limit information and perform streamlined analysis.
The Review... dialog box, displayed by pressing the Review...button
 , provides the
user with a listing of all system-generated and user-generated resolutions to
system-wide problems.
, provides the
user with a listing of all system-generated and user-generated resolutions to
system-wide problems.
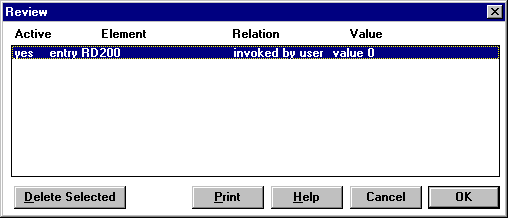
The columns are as follows:
If a mistake was made during a Complete Project fix, the user may delete the incorrect relation by selecting on the relation and clicking on theDelete Selected button. When finished viewing the Review List, clickOK to return to the Complete Project dialog box.
In COBOL and PL/I, statements can invoke a load module or screen, or access
a data file through a variable. To handle this case, Revolve creates multiple
invoke and access relations, one for each value of the variable. Initially these
values are computed by Revolve during the load. The Variable Data...
button displays
this list of values and allows the user to modify these values so that the
proper load modules are invoked and the proper data files are accessed.
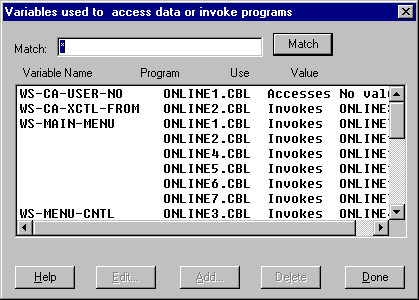
By adding values to a variable with the Add button the user can override the system-defined values (and any improper accesses and invokes). Once a new value has been added to the variable, any system-generated values are ignored and thus removed from the list. The user may further customize the list of user-defined values with the Edit and Delete buttons. To restore the list of system-generated values for a particular variable, all user-defined values for that variable need to be deleted.
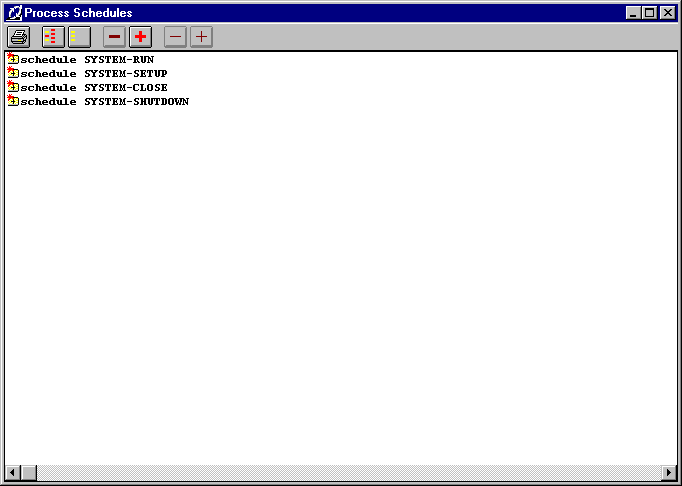
The Process Schedules dialog box, displayed by selecting the Process
Schedules... button
 , is used to
create, modify, and delete scheduling information in Revolve. Schedules are used
to emulate JCL, replace missing JCL, or create high level schedulers in
Revolve. You define schedules by specifying the order in which components in the
project's source code are executed. This information is then used in the System
view to show the correct execution relations for job/program/transaction
execution.
, is used to
create, modify, and delete scheduling information in Revolve. Schedules are used
to emulate JCL, replace missing JCL, or create high level schedulers in
Revolve. You define schedules by specifying the order in which components in the
project's source code are executed. This information is then used in the System
view to show the correct execution relations for job/program/transaction
execution.
To create a new schedule,
.The new schedule appears in the Process Schedules window.
To add elements to the new schedule:
. 
The process that was added is contained in the folder for the new schedule. Processes are organized in descending order from last to first. So, the process that appears directly beneath the parent or top folder is the last step in the schedule. Likewise, the entry at the bottom of the list is the first step or process in the schedule.
If you want to add a new process to the list, select the line that you want the new process to precede and repeat steps 2-6 above. The new process will be inserted beneath the selected one in the Process Schedules window.
The System view will graphically depict this information by ordering the displayed components according to the process definition.
To delete a schedule select the undesired schedule in the information window
and click the Delete Schedule button
. To delete a
process select the undesired item and press the Delete Process
button .
Note: Schedules are stored as .SCH files and can be manually entered
into a project via the Add Components dialog following the process
described in
Creating
Projects. Remember, after the new schedule has been added to the
project, a Make
must be performed to bring the project up to date.
The Import Translations button
 invokes the
Import Translations dialog. If you have a copybook that has invalid DOS
characters, this dialog is helpful for translations of copybook names. This
option is also available in the Administrator Options dialog.
invokes the
Import Translations dialog. If you have a copybook that has invalid DOS
characters, this dialog is helpful for translations of copybook names. This
option is also available in the Administrator Options dialog.
See also For details refer to Import Translations in Utilities.
Through the Execution Indirection window, invoked by the Execution
Indirection button  , a user can setup Revolve to
handle low-level routines which perform invocation or data access based on
passed parameters. For example, Wang COBOL programs commonly use an assembly
routine LINK to call other programs based on the first parameter of the call
statement.
, a user can setup Revolve to
handle low-level routines which perform invocation or data access based on
passed parameters. For example, Wang COBOL programs commonly use an assembly
routine LINK to call other programs based on the first parameter of the call
statement.
CALL LINK USING 'PROGNAME',...
In order for Revolve to recognize this statement as calling program PROGNAME, one must use the Execution Indirection window.
The following is a brief summary of functionality available on the Execution Indirection button bar:
| Click this: |
To do this: |
|---|---|
| The Add Executable... button prompts for the name of the executable and adds it to the project. |
|
The Delete Parameter button deletes the selected parameter indirection definition. |
|
The Add Parameter... button allows the user to set up an indirection through a parameter. |
To add an indirection, choose the desired load module (or create a new one
with the Add Executable button) and click on the Add Parameter... button
. The
Add Parameters dialog will appear and will prompt you for more
information on the indirection.
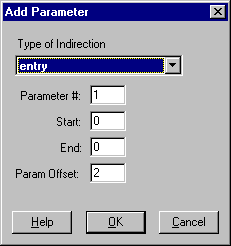
The Type of Indirection pull-down listbox specifies what type of object is being invoked or accessed and allows you to change it to one of the types described below. Parameter # specifies which parameter contains the name of the object being invoked or accessed. Finally, the Start and End fields specify the starting and ending character positions for the object's name. If both start and end contain 0, the whole parameter is used. The Param Offset field adjusts the offsets for IMS PSB's that are passed through entry point calling. The possible types are described below.
Copyright © 1999 MERANT International Limited. All rights reserved.
This document and the proprietary marks and names
used herein are protected by international law.
| Creating Projects | The Interface | |