| SmartFind Wizard | Creating Projects |
This chapter describes Revolve/2000 and how it finds and helps remediate, using the data expansion technique, the Year 2000 data items in an application . Revolve/2000 is not suitable for use in verifying an application.
Revolve/2000 is designed as an aid for a data expansion solution to the year 2000 problem.
Revolve/2000 finds the data items that represent dates in an application, by examining their names. For example, a data item with the word DATE in the name is captured. The date data items are then built into a candidate list.
After you have built the candidate list, there are a variety of ways to display and manipulate it, and to report on your findings. In addition there are tools for fixing the source code, such as the PIC Expander and the Modification Driver.
The basic process for finding and fixing the date-related points in your application is:
Before investigating an application, you need to locate all the application's components. This will be not only program source and copy books, but can include file definitions, screen layouts, job control, etc. You create a project and load the source files into the Revolve database. Revolve will note any missing components, which you then need to locate and load into the database.
The candidate list contains all the potentially date-related points in the application. You build the candidate list using the Candidate Wizard in the Revolve/2000 window.
Tracing through the code to find other data items that are potentially dates due to their association with the candidates already found. For example, where a statement refers to two data items, one of which is known to be a potential date, the other data item might equally be a date. This is the Impact Analysis process.
Building the candidate list takes time. The time taken depends on a number of factors, but most significant is the number of lines of code being examined for candidates. If building the list takes too long, consider breaking your application into smaller projects, of about 200,000 lines of code, and building those smaller projects.
You can display it in different ways and display the source code corresponding to each candidate in a split screen window.
You refine the candidate list by filtering it to see different sets of candidates, and then removing unwanted candidates. Ultimately, the candidate list contains all the genuinely date-related points of interest.
Filtering the candidate list to remove unwanted data items, such as those with names that you know are not dates. If, for example, the candidate list contains all data items with names containing DATE, you might want to filter out all the data items with UPDATE in their names.
To fix the problem, you expand the PICTURE clauses of the
date-related data items to allow for 4-digit years. You need to be
aware of, and fix, any data items that are used for other non-year
purposes, where they might be relying on being truncated to two
digits. You also need to convert any data files to their expanded
form.
Now compile and test the application using your preferred development tool.
If you want to go back and use Revolve/2000 on the edited source, you need to reload the edited source files into the database, since Revolve works on the database representation of the project, not the source files themselves.
You use the ![]() Candidate
Wizard to build the candidate list based on a range of attributes of
the candidates, such as:
Candidate
Wizard to build the candidate list based on a range of attributes of
the candidates, such as:
Choose whether to search for specified text strings in text components of your application. These components are unparsed source code, such as non-COBOL programs, that you loaded into the database as part of your project.
Choose whether to include data items regardless of their names if they are used in ACCEPT ... FROM DATE statements.
You can now use ![]() Display
Filters to filter out unwanted
candidates.
Display
Filters to filter out unwanted
candidates.
When you build a candidate list, you can search for data items based on their names. You can specify the exact names of data items or partial names. For example, you can search for all data items with DATE anywhere in the name by specifying *DATE*, where * represents a match with any character and any number of them, and where the name is not case specific.
After building the candidate list, you can also make exceptions to the name criteria. For example, you might want to exclude *UPDATE, even though you included all data item names with *DATE*. You do this by filtering out the unwanted items.
In addition, you can expand the candidate list to view all the statements where each data item is used. You can filter out data items that you are not interested in, such as data items declared as 88-level conditionals with ALL clauses.
Note that if you give the full name of a data item to include it in the candidate list, it stays in the list regardless of any filters you set.
When building the candidate list, you can include date-related text strings in text components of your project. Text components are unparsed source code, such as non-COBOL programs, that are loaded into the database as part of your project. For example, the following text line is found as matching the text string *DATE*:
today-date = "Nov 5, 2006"
In the same way as specifying data items by name, you specify the text strings you want when you build the candidate list.
Having built the candidate list, you can manipulate it in a number of ways to examine its contents. You can reorganize the list on different bases, such as by data item or by program. You can also access the source code directly from the candidate list, by splitting the screen.
The candidate list is displayed in hierarchical folders, which you can
open and close by double-clicking the folders or clicking the buttons
![]()
![]()
![]()
The top-level folders represent the candidate category that you choose. Each folder might represent a data item, and when you open the folder, you see the lines of code where that data item is used. Alternatively, each folder might represent a program, and when you open the folder you see all the program's candidate data items, each in their own folders, which you can open to see the relevant lines of code. For more on these display hierarchies, see the section Refining the Candidate List.
The candidate list gives details on each candidate. Most of the columns give data item-specific detail, although the source program or copybook is shown for all candidates, where it is known.
Use ![]() Status Bar
to turn on and off the status line at the top, which shows how many
matches there are. The number of matches corresponds to the type of
candidates you are displaying. For example, it might show the number of
programs that contain candidates, or the number of candidate data items.
Status Bar
to turn on and off the status line at the top, which shows how many
matches there are. The number of matches corresponds to the type of
candidates you are displaying. For example, it might show the number of
programs that contain candidates, or the number of candidate data items.
The detail shown for each candidate covers:
See the table below for details of the match flags.
A data item's match flags indicate the criteria and filters that the data item matches. On the one hand, they show why the data item was included in the list, by showing which of the wizard's criteria it matches. On the other hand, the match flags show which data items you can filter out of the list, by virtue of their matching the currently specified filters.
You can choose how to structure the candidate list and on what basis to
sort it, such as in alphabetical order of data item or program, or in
order of the size of the data items. You use ![]() Display Filters to do this, and check the category of element you
want to sort on.
Display Filters to do this, and check the category of element you
want to sort on.
You can sort the candidate list based on:
Candidates other than data items, such as literals, CICS statements and so on are categorized at the end of the list.
Tip: You can display the full line of code in the candidate list, by setting the Real Text display option. To do this, go to the Utilities menu and click Options, then Display, and check Real Text.
Each folder represents one logical date group and contains all the elements that relate to one date field: data items that hold the date, screens that display the date, files and databases that store the date, and so on. Within the group folder, date impacts are grouped by impact type.
Within the folders for each type of impact, all the elements of that type in that date group are displayed, as well as details on how each impacted candidate relates to the group representative.
See the Impact Analysis section in the Tools chapter.
You can access the source code for the candidates directly from the candidate list, by splitting the window in two. The top part shows the candidate list with one of the candidates selected, and the bottom part shows the source code of the selected candidate. This enables you to analyze the code in more detail and to modify it directly.
Use ![]() View
Source Code to display the source for the candidate you have selected
in the candidate list. As you move through the candidate list, selecting
different candidates, the source code keeps in step, so it always reflects
the selected candidate.
View
Source Code to display the source for the candidate you have selected
in the candidate list. As you move through the candidate list, selecting
different candidates, the source code keeps in step, so it always reflects
the selected candidate.
Tips: Some of the useful features of the split screen editor include:
If you edit the source and want to process it again, the edited source files need to be loaded into the database, and if you are using SmartFind Plus, the new lines also need to be metered.
See the Split screen editor section in the Tools chapter.
You can save the candidate list at any stage, and also the criteria you used to build it. You can reload either of these later when you want to continue working on them.
As well as saving complete candidate lists separately, you can save selected candidates in a worksheet together with other candidates you have previously saved there. You then have one central point to work from for fixing, tracking status, reporting and so on. You can add to the worksheet at any time.
The following options are available:
| Click this:
|
To do this:
|
|---|---|
Add to Worksheet |
Saves the selected data items and statements in the SmartFind Plus worksheet, together with any already there. The worksheet has the .mdb extension and is automatically saved when you leave SmartFind Plus. |
Save to File |
Saves the candidate list to a text file, for which you can choose the filename and location. The candidate list is saved expanded or compressed to the same extent as it is currently displayed. |
Save Date Research |
Saves the candidate list and the criteria you used to include candidates in the list together with the filters you used for excluding candidates and the individual candidates that you removed. Also any impact information you collected from an Impact Analysis is saved. All this research is saved in a file with a .rev extension. |
Save Date Criteria |
Saves the criteria you used to include candidates in the candidate list, together with the filters you used for excluding candidates. The criteria is saved in a file with a .cri extension. |
Load from File |
Reloads the specified date research file (.rev) that you previously saved, or the specified the date criteria file (.cri) that you previously saved. |
After building the candidate list, you examine it in detail to identify the points that are genuinely date related. You can refine the candidate list, filtering the list and removing individual candidates.
After finding candidates that match the wizard's criteria, you can add data items that are potentially date related because the code associates them with a candidate. For example, where a statement refers to two data items, one of which is known to be a potential date, the other data item might equally be a date. Situations where this occurs include moves, conditionals, parameter passing, group definitions and so on.
To find these associated data items, use Impact Tracing, and the resulting items are added to the candidate list. See the Impact Analysis section in the Tools chapter.
Impact Analysis is an essential part of finding all the date-related items if you have found them based on their names, such as when you use Revolve/2000.
The ![]() Display Filters
enable you to filter out candidates that you don't want to see in the
candidate list for now. The candidate list itself stays intact and the
filtered out candidates are hidden from view, until you change the filters
again.
Display Filters
enable you to filter out candidates that you don't want to see in the
candidate list for now. The candidate list itself stays intact and the
filtered out candidates are hidden from view, until you change the filters
again.
This enables you to specify exceptions to the original criteria you used for including candidates in the list. For example, if you originally included all items with *DATE* in the name, you can make an exception of *UPDATE* by specifying it as a filter. All data items with *UPDATE* in the name are then hidden in the candidate list.
You can filter out candidates in a number of ways, according to their:
You can also use the filters to flag data items. You specify the filter details as if you wanted to filter out these items, and then you disable the relevant filter. In this case, any data item that matches a filter is shown as wanted and is also flagged with the corresponding match flag. For example, a data item that is declared as an 88-level conditional with the ALL clause is flagged with an 8 match flag. See the Match flags section for details of the flags.
Note that any data items with the M match flag are not filtered out. These are data items whose names you specified exactly without wildcards when you originally built the candidate list.
You can verify that the data items you filtered out really are unwanted,
by clicking ![]() Display
Filters, Data item filters and then Show filtered data
items.
Display
Filters, Data item filters and then Show filtered data
items.
The filtered data items are each flagged according to the filter they match, in the Match flags column, with a P for a name pattern match, F for a format filter, and so on.
You can search for individual candidates or a set of them by specifying the candidate's name or a partial name in the Match edit box. The name you specify is applied to the top-level folders in the candidate list, which could represent programs, data items, impact groups and so on, depending on how you have organized the candidate list.
You can remove candidates that you do not want, by selecting them in the
candidate list and clicking ![]() Remove from list. For example, the candidate list might include
all the data item names containing DATE, but you might not want the data
item named DATE-INDEX because it represents a subscript data item instead
of a date field.
Remove from list. For example, the candidate list might include
all the data item names containing DATE, but you might not want the data
item named DATE-INDEX because it represents a subscript data item instead
of a date field.
Any data items you remove are then considered as exceptions to the name
criteria, and are added to the list of data item names to filter out. When
you filter the list from now on, the data items you removed stay filtered
out, unless you change the filters. You can see the removed data items
together with the filtered data items, by using Show filtered data
items, from ![]() Display Filters.
Display Filters.
Note that if you remove a data item that occurs in several programs, it is listed once for each program. If you want to remove all occurrences of the data item, you need to select the data item in all the programs. Otherwise, you select just the occurrences you want to remove.
When you have found the points in the code that cause a year 2000 problem, you can use the following tools to fix the code and help while working on the year 2000 problem:
The PIC Expander automates the expansion of data item PICTURE clauses for date data expansion. This tool is suitable for implementing the data expansion method of year 2000 conversion.
To use the PIC Expander, you select one or more data items in the
candidate list and click ![]() PIC Expander. Figure 16-1 shows an example PIC Expander window.
PIC Expander. Figure 16-1 shows an example PIC Expander window.

Figure 16-1: PIC Expander
The PIC Expander uses a table of PICTURE translations and replaces the PICTURE clauses of the selected data items with the corresponding PICTURE clauses in the table. You can set up the translation table either before or while you are using the PIC Expander.
As well as stepping through each data item individually, you can globally replace all the selected data items. If a data item doesn't have a translation in the table, the PIC Expander stops so that you can provide one or skip on to the next and continue globally replacing.
See the Help for details, by looking up PIC Expander in the index.
Note that the PIC Expander does not work with the SPF editor.
At any stage in your year 2000 analysis, you can produce reports on the project's current status.
Click ![]() Reports
to list the various reports and report data files you can produce for the
current project. These fall into the following categories:
Reports
to list the various reports and report data files you can produce for the
current project. These fall into the following categories:
This summarizes the date data items, giving the total number defined, and the number of times each one is referenced and modified in the procedure division. This gives a high-level assessment of the year 2000 impact across a project.
This generates an estimate of the effort and cost for the year 2000 conversion process. You specify various metrics, such as the hourly programmer cost and rate of work. The report estimates the various costs and times required for different levels of conversion, basing the estimate on the number of date impacts and the complexity of each program.
This lists all the suspect data items giving the data item name, the picture clause, the program or copy book that contains the data item and the size of the data item (in bytes).
See the section Generating Text Reports for more details.
Alternatively, you can export the details as comma-delimited report files for use with a third-party reporting tool.
The comma-delimited files contain plain text with the elements of data separated by commas, rather than containing data ready formatted for printing. You can import these files into any spreadsheet or reporting tool that can interpret comma-delimited files.
You can export comma-delimited year 2000 data in the following forms:
This summarizes the total lines of code, the total points of interest and the total suspect data items. There are three summary reports:
This exported report, moddetl.dat produces one report with details on each program in the project. The reports list each suspect usage of a data item and the reason it is suspect.
See the section Displaying Exported Data for more details.
You can export the details as import or tag files for use with Mainframe Express in the following forms:
This exported file, projectname.pop, contains a list of the programs that contain suspect lines. If you have Micro Focus Mainframe Express, you can use this file to import the suspect programs into an Advanced Organizer project.
This exported file, suspect-program.poi, contains a list of the suspect lines, the points of interest, in each program. If you have loaded a suspect program into Animator V2 in Micro Focus Workbench/2000, you can use this file to highlight the suspect lines and tag them with POI in the margin.
See the Mainframe Express help for how to import these files into Workbench/2000.
You can generate a number of text reports using Revolve/2000. These are detailed below.
This report indicates the overall impact of a Year 2000 conversion process. It is useful for calculating the complexity and scope of the problem as it applies to a specific application and set of date data items.
Indicates the source code component for which the report line is generated.
Indicates the type of component specified in the Member column, either Program or Import. Note that programs are main source code members, which can include imported files, copybooks or includes.
Columns within this category contain information about the declarations of date data items or impacted elements:
Total number of declarations of data items found, both those within the copybooks used and those within the source code program itself.
Total number of declarations of data items found that are located within an imported file, and not directly within a program.
Total number of declarations of data items found that are located within a program and not part of an imported file. Members of type Import always have 0 in this column as they are considered copybook files themselves.
The figure in Data Fields is the sum of Copybooks and Hard Coded.
Columns within this category contain information about the modifications or references of date data items, including data items pulled in by impact tracing:
(Date References) The total number of references to data items found. A reference is any use in procedural code where the data contained by a data item is used in program logic but will not be modified, such as:
MOVE DATE-1 TO DATE-2
where DATE-1 is a reference. Note that this number includes any REDEFINES as references of the redefined data item.
(Date Modifications) The total number of modifications to data items found. A modification is a use of a data item where the data it contains might be changed, such as:
MOVE DATE-1 TO DATE-2
where DATE-2 is a modification.
The sum of Date Mods and Date Refs.
Total number of date references and date modifications which are contained within any file imported by the current member. Typically these will be usages of data items within a procedural copybook.
Total number of date references and date modifications which are contained within a program and not part of an imported file.
Columns which define values useful for calculating the complexity of year 2000 conversion processes:
Category describing the method used to calculate the number of lines of source code for the member. Expanded lines includes any lines contained within the member directly or any imported file such as copybooks or includes. For example, a 100-line COBOL program which includes 2 copybooks: one with 20 lines and the second with 30, has an expanded line count of 150.
Number of lines of source code within the member INCLUDING copybooks and includes.
Percentage of lines of code, including copybooks, contained by the member which may need to be modified during a Year 2000 conversion. The calculation performed is:
Lines of Code containing date definitions or usages / expanded source code lines * 100.
This calculation accounts for statements which contain 2 or more usages located on the same line of source code, such as:
MOVE DATE-1 TO DATE-2
which is counted as only one line in the above calculation.
Category describing the method used to calculate the number of lines of source code for the member. Direct lines are any lines contained within the source member itself but outside and outside of any imported file such as copybooks or includes. For example, a 100-line COBOL program which includes 2 copybooks: one with 20 lines and the second with 30, has a direct line count of only 100.
Number of Lines of source code within the member NOT including lines contained within imported files.
Percentage of lines of code within the member itself, which may need to be modified during a year 2000 conversion. The calculation performed is:
Direct lines of Code containing date definitions or usages (see above) / direct source code lines * 100.
This calculation accounts for statements which contain 2 or more usages located on the same line of source code, such as:
MOVE DATE-1 TO DATE-2
which is counted as only one line in the above calculation. Therefore, this calculation may not be directly generated by merely adding the date declarations + date usages / lines of code since it contains more detailed information.
This report is useful for estimating the complexity of a project and the programmer hours that will be necessary for reviewing and making modifications. Estimations are based on your inputs:
This is the number of date definitions and usages that can be assessed in one programmer hour.
This specifies the hourly dollar cost of programmer resources.
This specifies the ratio (test:modify) of testing effort to modification effort. For example, if 2 hours of modifications require 5 hours of testing, then the ratio is 5:2.
The number of changes to be made is the sum of date definitions and logical usages. This is divided by the number of impacts per programmer hour that you have specified to give the modification effort for a 100% structured program. Also taken into account is the complexity of the program, based on the McCabe metric for program structure. Basically, there is an inverse relationship between percent structuredness and effort so a 50% structured program has its effort multiplied by 2, a 25% structured program has its effort multiplied by 4 and so on. Effort for testing is calculated using the modification effort and the test to modify ratio that you have entered.
Once your input is complete, three reports are generated.
The first report displays the implementation estimations.
COBOL code excluding copybooks
Date data item declarations directly within a COBOL program
Usage of date definitions within procedure divisions
Percentage of the lines of code that are impacted and need to be modified.
Extended cyclomatic McCabe metric.
Essential McCabe metric.
Percentage structuredness McCabe metric.
These show the hours and cost for code modification, testing, and totals.
The second portion of the report, the program exception list, generates a list of programs not impacted at all or impacted only through copybooks.
The third portion of the report, the import impact list, identifies copybooks that are impacted either in the Data Division or Procedural Division.
Running this report generates a list, which can be imported into spreadsheets or other tools, of all the elements contained in a project. For each element the report lists:
The name of the element (data item).
The picture clause, if applicable.
The member (copybook or COBOL program) that contains the element.
The size, in bytes, of the element.
The points of interest reports and the metering reports are exported as plain text files with comma-delimited information, rather than formatted files for printing. This enables you to import these reports into any third-party reporting tool that can interpret comma-delimited files. This tool can then use the imported data to populate a template or skeleton report and the resulting report can be tailored, viewed or printed in whatever way(s) the tool allows.
We supply aids for handling the reports in specific tools. These report handlers set up the headings, the columns and so on, and also provide buttons or macros or some device for displaying the various reports.
We provide default database skeletons and template reports for the following commonly used third-party reporting tools:
plus a default data source that you can use with ODBC-enabled applications.
These default example files are provided to get you started and are suitable for use with one project. If you have more than one project, you should copy the default templates and tailor them for each project.
You can also view the exported data files in a text editor, such as Notepad.
For Microsoft Excel, we supply two spreadsheets, research.xls for the points of interest reports, and metering.xls for the two metering reports. These spreadsheets are available by default in the directory \sfplus\revolve\reports\excel.
These spreadsheets contain macros which, when you click a button, load the report data and display the report properly formatted.
The macros expect the exported comma-delimited data files to have the default filenames and to be in the same directory as the spreadsheets. (You can edit the macros to use different names and locations, see the on-line help file for details on how to do this.)
To display the report data for a project, we recommend you take the following steps:
For Microsoft Access, we supply an Access database, sf2000.mdb, containing a number of predefined macros that make it easy for you to import your year 2000 data into an Access table and then to use that table to generate a formatted report.
The database is installed, by default, in the directory \sfplus\revolve\reports\msaccess but before you can use it to import data or generate a report, you must have exported the report data by running the appropriate point of interest or metering report.
Once you have exported your year 2000 data, start Access and open the sf2000.mdb database to display the dialog shown below:

Figure 16-2: Access Reports Dialog
From here you can import your year 2000 data into an Access table by checking Import File (under Actions) and then selecting the appropriate Data Source. The table below shows, for each data source, the export report file that the data is imported from (the default names of these files are given) and the Access table that the data is imported into:
| Data Source |
Export Report File |
Access Table |
|---|---|---|
| Program Detail | moddetl.dat | PgmDetail |
| Program Summary | module.dat | Programs |
| Project Summary | project.dat | Project |
| Source Summary | srcfile.dat | Source |
| Metering Report | factory.rpt | Metering Control |
| Metering Transactions | factory.aud | Metering Transactions |
Once you have selected a data source you will be prompted to select the file that the data is to be imported from:
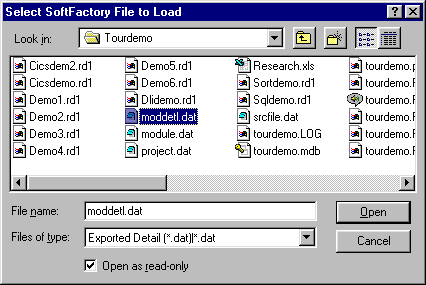
Figure 16-3: Select an Export Report File
Select the appropriate export report file to import the data into the Access table.
Once you have imported the data into the Access table you can create a report by checking Run Report and selecting the appropriate Data Source.
You can combine these basic functions by checking Import File and Run Report before you select your data source.
For example, suppose you want to create a Program Detail Report (this shows for each program in a project, the program name, the name of each suspect data item, the line number in the program that the data item occurs on and why it is suspect). To do this:
See the on-line help file for detailed instructions on importing data into Access and creating reports.
You can delete all the data in a table by checking Over Lay Data before you select a data source or you can overwrite the data in a table by checking Over Lay Data and Import File before you select a data source. If you select to delete data you will be prompted twice before the query is run: once to warn you that the query will delete data from the table and then to warn you how many rows of data you are about to delete. You can press OK or Cancel in response to either of these prompts. If Over Lay Data is unchecked and you import data, any new data will be added to the existing data.
If you select Additional Reports the Action check boxes are ignored and it is assumed that the appropriate tables have already been loaded with data (using the Import function).
Pressing the Additional Reports button displays a list box of all the available reports (those supplied by MERANT and any that you have written yourself), for example:
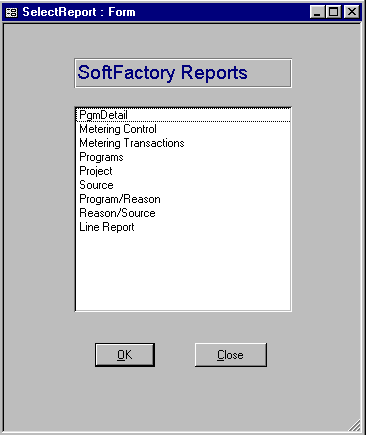
Figure 16-4: Additional Reports
You can run a report by double-clicking on its entry in the list (or single-clicking then pressing OK). The report is run against the current contents of the Access table. The reports supplied by MERANT, and the Access table that they are run against, are as follows:
| MERANT Report |
Access Table |
|---|---|
| PgmDetail | PgmDetail |
| Metering Control | Metering Control |
| Metering Transactions | Metering Transactions |
| Programs | Programs |
| Project | Project |
| Source | Source |
| Line Report | PgmDetail and Source |
| Program/Reason | PgmDetail |
| Reason/Source | PgmDetail |
Reports are displayed in the standard Access preview report window from which you can either print or discard them.
You can run as many reports as you like in one session. When you have finished, press Close to return to the main dialog.
For Crystal Reports, we supply one report template for each report. By default, these are available in the directory sfplus\revolve\reports\crw:
The templates contain the layout information for the reports, so that they display the reports properly formatted. To display one of the reports, you open the required template in Crystal Reports, and the report is displayed as designed.
As well as the layout information, the templates also contain predefined information on filenames and locations. The templates expect:
See the on-line help file for details on how to set this up. You might also need to set up the ODBC data source to point to another directory or even add extra ODBC data sources, depending on how you decide to organize your reports.
You can use different names and locations for the exported report data but you will have to update the templates accordingly from within Crystal Reports. See the on-line help file for details on how to do this.
To display the report data for a project, we recommend you take the following steps:
If you want to export report data to a different directory (for example, when you change to another project or when you export metering reports into the same directory as the metering control file), you will need to change the ODBC data source to point to the new directory, the directory containing the exported report data. You will also need to copy the schema.ini file into the new directory. See the on-line help file for details on how to do this.
You can use any ODBC-enabled application to display your report data if you have set up an appropriate ODBC data source.
Note: We can only give a very brief overview here of the steps required to set up an ODBC-enabled application. If you are not familiar with ODBC, you should consult your ODBC documentation for further details.
As a very brief outline, you are dealing with these components:
This is merely an entry in the list of data sources available on your machine. You create this entry, using the ODBC Administrator, you give it the name we require, SF2000 Reports, and you specify various other details, such as the ODBC driver to use, and the directory. This data source is then available from any of your ODBC-enabled tools, such as a spreadsheet or reporting tool.
This file contains the table definitions for the exported report files and is required when you use the Microsoft Text Driver. It is available by default from sfplus\revolve\reports\odbc. Each report file has an entry in schema.ini that gives the column names and data types of the file contents. You have to copy schema.ini to the same directory as the report files, and make sure that the ODBC data source is pointing to that directory too.
So, in summary, you have to:
See your on-line help file for detailed instructions on how to do these things.
| SmartFind Wizard | Creating Projects |