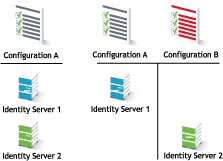
After you install an Identity Server, you must create a cluster configuration to configure Identity Server. When you create a cluster, ensure that the servers are installed on the same operating system. Even if you have only one Identity Server, you must assign it to a cluster configuration to configure it. If you have multiple Identity Servers, you can create multiple configurations and assign different Identity Servers to them as shown in Figure 2-2.
Figure 2-2 Identity Server Configurations
A cluster of Identity Servers must reside behind a Layer 4 (L4) switch. Clients access the virtual IP address of the cluster presented on the L4 switch, and the L4 switch alleviates server load by balancing traffic across the cluster. If Identity Server is on the same machine as an Administration Console, and second Identity Server is on the same machine as a secondary Administration Console, ensure that you are familiar with Installing Secondary Administration Console before proceeding.
Whenever a user accesses the virtual IP address (port 8080) assigned to the L4 switch, the system routes the user to one of Identity Servers in the cluster, as traffic necessitates.
The system automatically enables clustering when multiple Identity Servers exist in a group. If only one Identity Server exists in a group, clustering is disabled.
IMPORTANT:You must not use a DNS round robin setup instead of an L4 switch for load balancing. The DNS solution works only as long as all members of the cluster are working and in a good state. If one of them goes down and traffic is still sent to that member, the entire cluster is compromised and all devices using the cluster start generating errors.
This section describes how to set up and manage a cluster of Identity Servers:
A user’s authentication remains on the real (authentication) server cluster member that originally handled the user’s authentication. If this server malfunctions, all users whose authentication data resides on this cluster member must re-authenticate unless you have enabled session failover. For more information about this feature, see Configuring Session Failover.
Requests that require user authentication information are processed on this server. When the system identifies a server as not being the real server, the HTTP request is forwarded to the appropriate cluster member, which processes the request and returns it to the requesting server.
If your L4 switch can perform both SSL and non-SSL health checks, you must configure the L4 switch only for the services that you are using in your Access Manager configuration. For example, if you configure the SSL service and the non-SSL service on the L4 and the base URL of your Identity Server configuration is using HTTP rather than HTTPS, the health check for the SSL service fails. The L4 switch then assumes that all Identity Servers in the cluster are down. Therefore, ensure that you enable only the services that are also enabled on Identity Server.
When you configure a Radware Alteon (formerly Alteon) switch for clustering, direct communication between real servers must be enabled. If direct access mode is not enabled when one of the real servers tries to proxy another real server, the connection fails and times out.
To enable direct communication on the Radware Alteon:
Go to cfg > slb > adv > direct.
Specify e to enable direct access mode.
With some L4 switches, you must configure only the services that you are using. For example, if you configure the SSL service for the L4 switch and you have not configured SSL in Access Manager, then the HTTP service on the L4 switch does not work. If the health check for the SSL service fails, the L4 switch assumes that all the services configured to use the same virtual IP are down.
An L4 server is installed. You can use the same server for Identity Server clustering and Access Gateway clustering, provided that you use different virtual IPs. The LB algorithm can be anything (hash/sticky bit), defined at the Real server level.
Persistence (sticky) sessions enabled on the L4 server. Define this at the virtual server level.
An Identity Server configuration created for the cluster. You assign all Identity Servers to this configuration. See Configuring Identity Servers Clusters for information about creating an Identity Server configuration. See Creating a Cluster Configuration for information about assigning Identity Servers to configurations.
The base URL DNS name of this configuration must resolve via DNS to the IP address of the L4 virtual IP address. The L4 balances the load between Identity Servers in the cluster.
Ensure that the L4 administration server using port 8080 has the following ports open:
8443 (secure Administration Console)
7801 (TCP)
636 (for secure LDAP)
389 (for clear LDAP, loopback address)
524 (network control protocol on the L4 machine for server communication)
The identity provider ports must also be open:
8080 (non-secure login)
8443 (secure login)
1443 (server communication)
If you are using introductions (see Creating a Cluster Configuration), you must configure the L4 switch to load balance on ports 8445 (identity provider) and 8446 (identity consumer).
When you assign multiple Identity Servers to the same configuration, you need to install a load balancer that supports either Layer 4 or Layer 7. This device is referred to as an L4 switch here. The L4 switch allows the work load to be balanced among the machines.
Whether you have one machine or multiple machines in a cluster, the Access Manager configuration process is the same.
In this Section
Identity Server functions as an identity provider. You can configure it to run as an identity consumer (also known as a service provider) by using federation protocols.
In an Identity Server configuration, specify the following information:
The DNS name for Identity Server or clustered server site.
Certificates for Identity Server.
Organizational and contact information for the server that is published in the metadata of Liberty and SAML protocols.
LDAP directories (user stores) to authenticate users, and trusted root for secure communication between Identity Server and a user store.
Perform the following steps to create an Identity Server cluster:
Click Devices > Identity Servers .
Under the Servers tab, select Identity Server, and then click New Cluster.
Specify a name for the cluster configuration.
If you did not select the server in the previous step, you can now select required servers. For information about assigning servers to a configuration, see Assigning an Identity Server to a Cluster Configuration.
Click OK.
Specify the following details:
Field |
Description |
---|---|
Name |
Specify a name for the cluster. This field is populated with the name you provided in the New Cluster dialog box. You can change this name here, if necessary. IMPORTANT:Determine your settings for the base URL, protocol, and domain. After you configure trust relationships between providers, changing these settings invalidates the trust model and requires a reimport of the provider’s metadata. Modifying the base URL also invalidates the trust between Embedded Service Provider (ESP) of Access Manager devices. To re-establish the trust after modifying the base URL, you must restart ESP on each device. |
Base URL |
Specify the application path for Identity Server. Identity Server protocols rely on this base URL to generate URL endpoints for each protocol.
|
SSL Certificate |
Displays the currently assigned SSL certificate. Identity Server comes with a test-connector certificate that you must replace to use SSL in your production environment. You can replace the test certificate now or after you configure Identity Server. You must restart Tomcat whenever you assign an Identity Server to a configuration and whenever you update a certificate key store. See Managing the Keys, Certificates, and Trust Stores. For information about how to replace the test-connector certificate, see Section 20.0, Enabling SSL Communication. |
To configure session limits, specify the following details:
Field |
Description |
---|---|
LDAP Access |
Specify the maximum number of LDAP connections Identity Server can create to access the configuration store. You can adjust this value for system performance. |
Default Timeout |
Specify the session timeout you want assigned as a default value when you create a contract. This value is also assigned to a session when Identity Server cannot associate a contract with the authenticated session. During federation, if the authentication request uses a type rather than a contract, Identity Server cannot always associate a contract with the request. |
Limit User Sessions |
Specify whether user sessions are limited. If selected, you can specify the maximum number of concurrent sessions a user is allowed to authenticate. To limit user sessions, consider the session timeout value (the default is 60 minutes). If the user closes the browser without logging out (or an error causes the browser to close), the session is not cleared until the session timeout expires. If the user session limit is reached and those sessions have not been cleared with a logout, the user cannot log in again until the session timeout expires for one of the sessions. When you enable this option, it affects performance in a cluster with multiple Identity Servers. When a user is limited to a specific number of sessions, Identity Servers must check with the other servers before establishing a new session. |
Deleting Previous User Sessions |
You can configure Identity Server to delete the previous user sessions if the number of open sessions reaches the maximum limit of allowed sessions that you have specified in Limit User Sessions. Set the DELETE OLD SESSIONS OF USER option to true and restart Identity Server. For information about configuring this option, see Configuring Identity Server Global Options. Previous sessions are cleared across Identity Server clusters only when a fresh authentication request comes in. When Identity Server deletes previous user sessions, it sends a logout request to the service provider through the SOAP back channel. For example, a user is accessing a protected resource from a machine and wants to access the same protected resource from another device. Identity Server will not give access to the user if the Limit User Sessions has reached a maximum limit. Identity Server must terminate the old session of the user so that the user can access the new session seamlessly. |
Allow multiple browser session logout |
Specify whether a user with more than one session to the server is presented with an option to log out of all sessions. If you do not select this option, only the current session can be logged out. Deselect this option in instances where multiple users log in as guests. Then, when one user logs out, none of the other guests are logged out. When you enable this option, restart all ESP that use this Identity Server configuration. |
To configure TCP timeouts, specify the following details:
Field |
Description |
---|---|
LDAP |
Specify the duration that an LDAP request to the user store can take before timing out. |
Proxy |
Specify the duration that a request to another cluster member can take before timing out. When a member of a cluster receives a request from a user who has authenticated with another cluster member, the member sends a request to the authenticating member for information about the user. |
Request |
Specify the duration that an HTTP request to an application can take before timing out. |
Select the required protocols.
IMPORTANT:Enable only the required protocols. If you are using Access Gateway, enable Liberty. Else, the trusted relationship of Access Gateway and Embedded Service Provider with Identity Server is disabled, and authentication fails.
Liberty: Uses a structured version of SAML to exchange authentication and data between trusted identity providers and service providers and provides the framework for user federation.
SAML 1.1: Uses XML for exchanging authentication and data between trusted identity providers and service providers.
SAML 2.0: Uses XML for exchanging encrypted authentication and data between trusted identity providers and service providers and provides the framework for user federation.
WS Federation: Allows disparate security mechanisms to exchange information about identities, attributes, and authentication.
WS-Trust: Allows secure communication and integration between services by using security tokens.
OAuth & OpenID Connect: Allows Identity Server to act as an authorization server to issue access token to a client application based on user’s grant.
Click Next.
Specify the following details:
Name: The name of the organization.
Display Name: The display name for the organization.
URL: The organization’s URL for contact purposes.
Company, First Name, Last Name, Email, Telephone, and Contact Type are optional fields.
IMPORTANT:The information you specify on this page is published in the metadata for Liberty 1.2 and SAML. The metadata is traded with federation partners and supplies various information regarding contact and organization information located at Identity Server.
Click Next to configure the user store.
You must reference your own user store and auto-import the SSL certificate. See Section 2.2, Configuring Identity User Stores for information about this procedure.
After you configure a user store, the system displays the new configuration on the Servers page.
The status icons for the configuration and Identity Server must turn green. It might take several seconds for Identity Server to start and for the system to display a green icon. If it does not, it is likely that Identity Server is not communicating with the user store you set up. Ensure that you have entered the user store information correctly, and that you imported the SSL certificate to the user store. (Edit > Local > [User Store Name].)
After you create a configuration, you must assign an Identity Server to it. For clustering, you can assign more than one Identity Server to the configuration. See Configuring a Cluster with Multiple Identity Servers. A configuration uses any shared settings you have specified, such as attribute sets, user matching expressions, and custom attributes that are defined for the server.
Click Devices > Identity Servers.
On the Servers page, select the server’s check box.
Click Actions > Assign to Cluster.
Select the configuration’s check box, then click Assign.
Restart Tomcat. The status icon for Identity Server must turn green. It might take several seconds for Identity Server to start and for the system to display the green icon.
To add capacity and to enable system failover, you can cluster a group of Identity Servers and configure them in a cluster configuration to act as a single server. You can also configure the cluster to support session failover, so that users do not need to re-authenticate when an Identity Server goes down.
A cluster of Identity Servers must reside behind an L4 switch. Clients access the virtual IP (VIP) address of the cluster presented on the L4 switch, and the L4 switch alleviates server load by balancing traffic across the cluster. Whenever a user accesses the virtual IP address assigned to the L4 switch, the system routes the user to one of Identity Servers in the cluster, as traffic necessitates.
To set up a cluster, complete the following tasks:
Install an L4 switch. You can use the same switch for Identity Server clustering and Access Gateway clustering, provided that you use different virtual IPs. The LB algorithm can be anything (hash/sticky bit), defined at the Real server level. For configuration tips, see Section 11.2, Configuration Tips for the L4 Switch.
Enable persistence (sticky) sessions on the L4 switch. You can define this at the virtual server level.
Create an Identity Server configuration for the cluster and assign all Identity Servers to this configuration.
See Creating a Cluster Configuration to create an Identity Server configuration.
See Assigning an Identity Server to a Cluster Configuration to assign Identity Servers to configurations.
Ensure that the DNS name of the base URL of the cluster configuration resolves via DNS to the IP address of the L4 virtual IP address. The L4 switch balances the load between Identity Servers in a cluster.
Ensure that the L4 administration server using port 8080 has the following TCP ports open:
8443 (secure Administration Console)
7801 (for back-channel communication with cluster members).
636 (for secure LDAP)
389 (for clear LDAP)
524 (network control protocol on the L4 switch for server communication)
The identity provider ports must also be open:
8080 (non-secure login)
8443 (secure login)
1443 (server communication)
If you are using introductions (see Configuring General Provider Settings), you must configure the L4 switch to load balance on ports 8445 (identity provider) and 8446 (identity consumer).
Enable session failover so users do not need to re-authenticate when an Identity Server goes down. See Configuring Session Failover.
Modify the name of the cluster or edit communication details. See Editing Cluster Details.
When you set up an Identity Server cluster and add more than one Identity Server to the cluster, you have set up fault tolerance. This ensures that if one of Identity Servers goes down, users still have access to your site because the other Identity Server can be used for authentication. However, it does not provide session failover. If a user has authenticated to the failed Identity Server, the user is prompted to authenticate and the session information is lost.
When you enable session failover and an Identity Server goes down, the user’s session information is preserved. Another peer server in the cluster re-creates the authoritative session information in the background. The user is not required to log in again and experiences no interruption of services.
An Identity Server cluster with two or more Identity Servers.
Sufficient memory on Identity Servers to store additional authentication information. When an Identity Server is selected to be a failover peer, Identity Server stores about 1 KB of session information for each user authenticated on the other machine.
Sufficient network bandwidth for the increased login traffic. Identity Server sends the session information to all Identity Servers that have been selected to be its failover peers.
All trusted Embedded Services Providers are configured to send the attributes used in Form Fill and Identity Injection policies at authentication. If you use any attributes other than the standard credential attributes in your contracts, send these attributes also. To send attributes, click Devices > Identity Servers > Edit > Liberty > [Name of Service Provider] > Attributes.
Click Devices > Identity Servers > [Identity Server cluster].
Click IDP Failover Peer Server Count, then select the number of failover peers for each Identity Server.
To disable this feature, select 0.
To enable this feature, select one or two less than the number of servers in your cluster. For example, if you have four servers in your clusters and you want to allow for one server being down for maintenance, select 3 (4-1=3). If you want to allow for the possibility of two servers being down, select 2 (4-2=2).
If you have eight or more servers in your cluster, the formula 8-2=6 gives each server 6 peers. In a larger cluster, you must limit the number of peers to 2 or 3. If you select too many peers, your machines require more memory to hold the session data and slow down your network with the additional traffic for the session information.
Click OK.
The failover peers for Identity Server are selected according to their proximity. Access Manager sorts the members of the cluster by their IP addresses and ranks them according to how close their IP addresses are to the server who needs to be assigned as failover peers. It selects the closest peers for the assignment. For example, if a cluster member exists on the same subnet, that member is selected to be a failover peer before a peer that exists on a different subnet.
Click Devices > Identity Servers > [name of the cluster configuration].
The Cluster Details page contains the following tabs:
Details: To modify the cluster name or its settings, click Edit, then continue with Step 2.
Health: Click to view the health of the cluster.
Alerts: Click to view the alerts generated by members of the cluster.
Statistics: Click to view the statistics of the cluster members.
Modify the following details as required:
Field |
Description |
---|---|
Cluster Communication Backchannel |
Specify a communications channel over which the cluster members maintain the integrity of the cluster. For example, this TCP channel is used to detect new cluster members as they join the cluster, and to detect members that leave the cluster. A small percentage of this TCP traffic is used to help cluster members determine which cluster member can handle a request more efficiently. This back channel must not be confused with the IP address/port over which cluster members provide proxy requests to peer cluster members.
|
Level Four Switch Port Translation |
Configure the L4 switch to translate the port of the incoming request to a new port when the request is sent to a cluster member. Because the cluster members communicate with each other over the same IP address/port as the L4 switch, the cluster implementation needs to know what that port is. The translated port is the port on the cluster members where other cluster members can contact it. This is the IP address and port where cluster members provide proxy requests to other cluster members.
|
IDP Failover Peer Server Count |
For configuration information, see Configuring Session Failover. |
Click OK and then update Identity Server when prompted.
Removing an Identity Server from a configuration disassociates Identity Server from the cluster configuration. The configuration, however, remains intact and can be reassigned later or assigned to another server.
Click Devices > Identity Servers.
Select the server, then click Stop. Wait for the Health indicator to turn red.
Select the server and then choose Actions > Remove from Cluster.
For information about deleting an Identity Server, see Managing a Cluster of Identity Servers.
IMPORTANT:When a cluster contains only two Identity Servers, introduce a new Identity Server to the cluster before removing the other Identity Server.
You must enable a protocol and configure it before users can use the protocol for authentication. For security purposes, you must enable only the required protocols that you will use for authentication.
Click Devices > Identity Servers > Edit.
In the Enabled Protocols section, select the required protocols to enable.
To disable a protocol, deselect it.
Click OK.
(Conditional) If you have enabled a protocol, update Identity Server.
(Conditional) If you have disabled a protocol, stop and start Identity Server.
Select Identity Server and click Stop.
When the health turns red, select Identity Server, and click Start.
Repeat the process for each Identity Server in the cluster.
When you configure an Identity Server, you must carefully determine your settings for the base URL, protocol, and domain. Changing the base URL invalidates the trust model and requires a re-import of the provider’s metadata, and a restart of the affected Embedded Service Providers. It also changes the ID of the provider and the URLs that others use for access.
When you change the base URL of Identity Server, you invalidate the following trusted relationships:
The trusted relationships that Identity Server has established with each Access Manager device that has been configured to use Identity Server for authentication
The trusted relationship that each Access Manager device has established with Identity Server when Identity Server configuration was selected.
The trusted relationships that Identity Server has established with other service providers.
The sessions of any logged-in users are destroyed and no user can log in and access protected resources until the trust relationships are reestablished.
Perform the following steps to modify the base URL and reestablish trust relationships:
Click Devices > Identity Servers > Edit.
Change the protocol, domain, port, and application settings, as necessary.
Click OK.
On the Identity Servers page, click Update.
This re-creates the trusted Identity Server configuration to use the new base URL and metadata.
Restart Tomcat on each Identity Server in the configuration:
Specify one of the following commands:
/etc/init.d/novell-idp restart
systemctl restart -idp
For the Docker deployment, perform the following steps:
Run the kubectl get pods command to view the Access Manager pods.
Go to the Identity Server pod by running the kubectl exec --namespace <name-of-the-namespace> -it pod/<name-of-the-identity-server-pod> -- sh command.
Run the /etc/init.d/novell-idp restart or systemctl restart -idp command.
For each Access Manager device configured to trust the configuration of this modified base URL, you must update the device so that the Embedded Service Provider trusts the new Identity Server configuration:
Click Access Gateways, then click Update for any servers with a Status of Update.
For each service provider you have configured to trust the configuration of this modified base URL, you must send them the new metadata and have them re-import it.
For information about setting up SSL and changing an Identity Server from HTTP to HTTPS, see Section 20.0, Enabling SSL Communication.
(Access Manager 5.0 Service Pack 2 and later)
The Identity Server authentication APIs are login APIs for user authentications. Using these APIs, you can build your own end-to-end login experience replacing the built-in user portal login experience.
The following are the available authentication APIs:
API |
Description |
---|---|
End-user authentication API |
End-users can authenticate using this endpoint. |
Get authentication status |
Use this API to check the authentication status when a user has performed multi-factor authentication (smartphone, voice call). |
Exchange session token for session cookie |
Use this API to create the JSESSIONID cookie for the session and redirect the browser to the target URL. |
Log out the user from Identity Server |
Use this API to log out a user from Identity Server. |
Fetch all the configured contracts |
Use this API to retrieve all contracts configured in Access Manager. |
The authentication request and response are in the JSON format. Access Manager also provides an option to configure user attributes that you want in the response sent by the authentication API. If you do not configure any attributes, the response contains given_name, family_name, and email by default. For information about how to configure attributes for the authentication API response, see Configuring User Attributes.
For more information about these APIs, see Identity Server Authentication API.
You can use the Authentication APIs in the following scenarios:
End-to-End Login Experience:You can build your own end-to-end user login experience instead of the standard login experience provided by Access Manager.
Login Page Customization: You can use these APIs for high-level customization of the login page and user portal.
Mobile Application Authentication: You can use these APIs to authenticate users with Access Manager through mobile applications.
Primary Authentication: You can use these APIs to verify the credentials of end-users using one of the following methods:
Name/Password - Basic (com.novell.nidp.authentication.local.PasswordClass)
Name/Password - Form (com.novell.nidp.authentication.local.BasicClass)
Secure Name/Password - Basic (com.novell.nidp.authentication.local.ProtectedBasicClass)
Secure Name/Password - Form (com.novell.nidp.authentication.local.ProtectedPasswordClass)
Multi-Factor Authentication:When Access Manager is integrated with Advanced Authentication through the plug-in approach (using Smartphone class or Voice Call class), the APIs support multi-factor authentication for the following methods:
Smartphone (com.authasas.aucore.nam.method.smartphone.SmartphoneClass)
Voice Call (com.authasas.aucore.nam.method.voicecall.VoiceCallClass)
After successful user authentication using authentication APIs, the response contains the user-specific attributes that are configured on the Authentication API page.
If you do not configure any attributes, the response contains given_name, family_name, and email attributes by default.
Perform the following steps to configure user attributes:
Click Devices > Identity Servers > Edit > Authentication API.
In Attribute Set, select the required attribute set.
For information about attribute set, see Configuring Attribute Sets.
Select the required attributes from the Available Attributes list and move them to Selected Attributes.
Click Save > Close.
Configure rate limits for authentication requests: In the Identity Server tomcat.conf file, restrict the number of requests per second by setting the appropriate value for the number of requests in the com.novell.authn.threshold.maxrequestsallowed parameter. The default value is 500. That means 500 requests per second are allowed for these APIs.
For information about how to modify a file, see Modifying Configurations.
Global options are applicable for all Identity Servers in a cluster.
Perform the following steps to configure Identity Server global options:
Click Devices > Identity Servers > Edit > Options > New.
Set the following properties based on your requirement:
Property |
Value |
---|---|
ALLOW AUTH POLICY EXECUTION |
Select false to disable Identity Server to execute authorization policies. The default value is true. For example, see Executing an Authorization-based Role Policy During SAML 2.0 Service Provider Initiated Request. |
ALLOW GRACE LOGIN FOR EXPIRING PASSWORD (Access Manager 5.0 Service Pack 1 and later) |
When the value is set to true, users get grace logins when their password is about to expire. By default, the property is set to true on all Identity Server clusters. Select false if you do not want users to get a grace login for an expiring password. In case of Active Directory, this option works when the pwdlastset attribute has a zero value (pwdlastset=0) in the user store. This means users must change their password at the next login. If you set this option to false, the user will not be redirected to Password Management Servlet (if configured). |
CHECK ACTIVE CLUSTER MEMBERS FOR PROXY (Access Manager 5.0 Service Pack 1 and later) |
Select true to enable verifying whether the incoming cluster cookie for Identity Server refers to an active node of the cluster. By default, this option is set to false. |
CLUSTER COOKIE DOMAIN |
Set this property to change the domain attribute of Identity Server cluster cookie. For example, see Configuring X.509 Authentication to Display the Access Manager Error Message. |
CLUSTER COOKIE PATH |
Set this property to change the Path attribute for Identity Server cluster cookie. The default value is /nidp. For example, see Configuring X.509 Authentication to Display the Access Manager Error Message. |
CRL REFRESH INTERVAL DAYS (Access Manager 5.0 Service Pack 1 and later) |
Access Manager caches the Certificate Revocation Lists (CRL) used in X.509 Authentication. Specify the duration in days after that you want the CRL to be refreshed in the CRL cache. |
DECODE RELAY STATE PARAM |
Select true to enable the relay state URL decoding. The default value is false. |
DELETE OLD SESSIONS OF USER |
Select true to enable Identity Server to delete the previous user sessions if the number of open sessions reaches the maximum limit of allowed sessions that you have specified in Limit User Sessions. The default value is false. |
HTTP ONLY CLUSTER COOKIE |
Select false to disable the HTTPOnly flags for Identity Server cluster cookies. The default value is true. For example, see Enabling Secure or HTTPOnly Flags for Cluster Cookies. |
HTTP POPULATE LOGINNAME FROM SAML AUTH REQUEST |
Select true to auto-populate the email ID on the Identity Server login page for a SAML 2.0 authentication. The default value is false. For more information, see Auto-Populating the Username on the Identity Server Login Page. |
HTTP POPULATE PARSED LOGINNAME FROM SAML AUTH REQUEST |
Select true to auto-populate the username instead of the entire email ID on the Identity Server login page for a SAML 2.0 authentication. For example, to populate steve.smith instead of steve.smith@example.com. The default value is false. For more information, see Auto-Populating the Username on the Identity Server Login Page. |
HTTP POPULATE LOGINNAME FROM WSFED AUTH REQUEST |
Select true to auto-populate the email ID on the Identity Server login page for a WS-Fed authentication request. The default value is false. |
HTTP POPULATE PARSED LOGINNAME FROM WSFED AUTH REQUEST |
Select true to auto-populate the username instead of the entire email ID on the Identity Server login page for a WS-Fed authentication. For example, to populate steve.smith instead of steve.smith@example.com. The default value is false. |
IS SAML2 POST INFLATE |
Select true to enable Identity Server to receive deflated SAML 2.0 POST messages from its trusted providers. The default value is false. You can configure post binding to be sent as a compressed option by configuring this property. For example, see the note in Step 4. |
IS SAML2 POST SIGN RESPONSE |
Select true to enable the identity provider to sign the entire SAML 2.0 response for all service providers. |
SAML2 ISSUER FORMAT |
Select true to add the Format attribute in saml:Issuer element. Add /opt/novell/nids/lib/webapp/WEB-INF/classes/nidpconfig.properties file on each Identity Server in the cluster. |
SAML2 ISSUER NAME QUALIFIER |
Select true to add the Name Qualifier attribute in saml:Issuer element.Add /opt/novell/nids/lib/webapp/WEB-INF/classes/nidpconfig.properties file on each Identity Server in the cluster. |
LOGIN CSRF CHECK |
Select true to enable Cross-Site Request Forgery (CSRF) check for the Password Class and TOTP Class. This is applicable for Access Manager default pages. If you have modified any page, you must add the CSRF token to the page. To add the CSRF token, add the following: JAVA: <% String sid = request.getParameter("sid")!=null ? request.getParameter(NIDPConstants.SID) : (String)request.getAttribute(NIDPConstants.SID); NIDPSessionData sData = NIDPContext.getNIDPContext().getSession(request).getSessionData(sid); boolean csrfCheckRequired = NIDPEdirConfigUtil.isConfigured(NIDPConfigKeys.LOGIN_CSRF_CHECK.name()) ? NIDPEdirConfigUtil.getValueAsBoolean(NIDPConfigKeys.LOGIN_CSRF_CHECK.name()) : false; %> HTML: <% if (csrfCheckRequired) { %> <input type="hidden" name="AntiCSRFToken" value=" <%=sData.getAntiCSRFToken()%>"> <% } %> |
OAUTH TOKENS IN BINARY FORMAT |
Select true to send tokens in the binary format. By default, the value is set to false and tokens are sent in the JWT format. It is recommended to not use this property unless you have an existing client application that cannot manage a token larger than the existing binary token. NOTE:: When set to true, few features, such as token encryption using resource server keys and token revocation, will not be available. |
RENAME SESSION ID |
Select false to prevent changing the session ID automatically. The default value is true. |
SAML1X ATTRIBUTE MATCH BY NAME |
Select true to perform a strict check on the name space of the attributes received in the assertion. For example, see SAML 1.1 Service Provider Re-requests for Authentication. |
SAML2 ATTRIBUTE CONSUMING INDEX |
This option can be used to identify globally the value of AttributeConsumingServiceIndex of SAML 2 authentication requests. If SAML2 ATTRIBUTE CONSUMING INDEX is not configured in SAML 2.0 options, Access Manager considers the SAML2 ATTRIBUTE CONSUMING INDEX configuration in Identity Server global options. If you require to assign the property values for multiple entries, you can use comma (,) as separator. Provide the value in the format specified in the following example: For protected resource URL: https://www.example.com:446/test/Test/test.php->2 In this example, the “2” is assigned to AttributeConsumingServiceIndex of SAML 2 authentication request coming from the protected resource. For default value: default->10 If the SAML 2 authentication request comes from the protected resource that is not configured, the default value 10 is assigned to AttributeConsumingServiceIndex. For multiple protected resource URLs: https://www.example.com:446/test/Test/test.php->2,https://www.example.com:446/test/Test/view.php->3 |
SECURE CLUSTER COOKIE |
Select false to disable the secure flags for cluster cookies. The default value is true. For example, see Enabling Secure or HTTPOnly Flags for Cluster Cookies. |
STS CHANGE ISSUER |
Specify the value in this format: SPentityID:UPNDomain -> new IssuerID. For example, urn:federation:MicrosoftOnline:support.namnetiq.in -> https://namnetiq.in/nidp/wsfed/ In case of multiple children domains, add each parent domain and child domain separated by a comma. For example, if namnetiq.in is the parent domain and support.namnetiq.in and engineering.namnetiq.in are children domains, specify the following entries: urn:federation:MicrosoftOnline:namnetiq.in -> https://namnetiq.in/nidp/wsfed/, urn:federation:MicrosoftOnline:support.namnetiq.in -> https://namnetiq.in/nidp/wsfed/, urn:federation:MicrosoftOnline:engineering.namnetiq.in -> https://namnetiq.com/nidp/wsfed/ For example, see Configuring Federation for Multiple Domains. |
STS OFFICE365 MULTI DOMAIN SUPPORT AUTO |
Select true to enable users to access Office 365 services by using the Issuer URI specific to the domain they belong to. The default value is false. For example, see Creating Multiple Domains in Office 365 and Establishing Federation with Access Manager. |
USE DEVICE ID IN URN COOKIE (Access Manager 5.0 Service Pack 1 and later) |
In an Access Manager environment with multiple Identity Servers and Access Gateways, a cluster cookie (UrnNovellNidpClusterMemberId) is automatically set for the serving node of the cluster. When requests come to Identity Server or Embedded Service Provider (ESP), this cookie is used by all nodes of the cluster to perform the proxying, if necessary. For higher security, enable this property to use hashing for the cookie value.
To set up this property only for ESP, see |
WSF SERVICES LIST |
The default value is full. For example, see Blocking Access to the WSDL Services Page. |
WSFED ASSERTION VALIDITY |
Specify the assertion validity time in second for WS Federation Provider (SP) to accommodate clock skew between the service provider and SAML identity provider. The default value is 1800 seconds. For example, see Assertion Validity Window. NOTE:You can set the WSFED assertion validity time for each WS-Federation Service Provider where the default is 300. |
WSTRUST AUTHORIZATION ALLOWED ACTAS VALUES |
Specify the user names who can perform ActAs operations. Allowed user names are the user accounts that the intermediate web service provider uses to authenticate with STS when sending a request with ActAs elements. You can specify more than one user name separated by a comma. For example, see Adding Policy for ActAs and OnBehalfOf. |
WSTRUST AUTHORIZATION ALLOWED ONBEHALF VALUES |
Specify the user names who can perform OnBehalfOf operations. Allowed user names are the user accounts that the intermediate web service provider uses to authenticate with STS when sending a request with OnBehalfOf elements. You can specify more than one user name separated by a comma. For example, see Adding Policy for ActAs and OnBehalfOf. |
WSTRUST AUTHORIZATION ALLOWED VALUES |
Specify the user names who can perform both ActAs and OnBehalfOf operations. You can specify more than one user name separated by a comma. For example, see Adding Policy for ActAs and OnBehalfOf. |
SESSION ASSURANCE USER AGENT EXCLUDE LIST |
Specify the user-agent string for that you want to disable the session validation. For example, see Disabling Advanced Session Assurance for Identity Server. |
SESSION ASSURANCE USER AGENT REGEX EXCLUDE LIST |
Specify the user-agent REGEX for that you want to disable the session validation. For example, see Disabling Advanced Session Assurance for Identity Server. |
SESSION ASSURANCE URL EXCLUDE LIST |
Specify the URL for that you want to disable the session validation. For example, see Disabling Advanced Session Assurance for Identity Server. |
SESSION ASSURANCE URL REGEX EXCLUDE LIST |
Specify the URL REGEX for that you want to disable the session validation. For example, see Disabling Advanced Session Assurance for Identity Server. |
SESSION ASSURANCE IDC COOKIE GRACEPERIOD |
Specify the time in second till which Identity Server will accept the old IDC cookie after issuing a new cookie. The default value is 15 second. |
OTHER |
Specify Property Name and Property Value if you want to configure any other property. |
NAM_DFP_KEYS_ENFORCE_STRICT |
Click OTHER to configure this property. When Advanced Session Assurance is enabled, specify true to send session keys only the first time when the device information is fetched. Specify false to send session keys each time the device information is fetched. The default value is false. |
ENCODE_TARGET_URL_QUERY |
Click OTHER to configure this property. When this option is set to true, the target URL query (SAML Request) is URL encoded. This option is set to true by default. When you set this option to false, the following will happen after authentication:
|
NMAS_SAML_SIGN_METHODDIGEST_SHA256 |
Click OTHER to configure this property. Set this option to true while using the NMAS SAML method. When set to true, it uses SHA265 algorithm for SAML 2 assertion. If this property is not configured or the value is set to false, SHA1 algorithm is used. The default value is false. |
persist_caches_on_reconfigure |
Click OTHER to configure this property. After you update a configuration or reconfigure it, the user session details and read attributes get deleted from the cache. Set this option to true to retain the details after a configuration update. |
OAUTH_CLAIMS_TO_USE_LDAP_ATTR_FORMAT |
Click OTHER to configure this property. Set this option to true to configure the OAuth claims data type according to the schema data type of the LDAP attribute. If the LDAP attribute data type is single-valued, the claims data is returned as a string. If the LDAP attribute data type is multi-valued, the claims data is returned as a string array irrespective of the value count. For example, let us assume that a client application uses the Authorization Code flow and sends the access token to the userinfo endpoint. Then you can choose the format of the token's attribute data type that will be returned. The following is an example of attributes when this property is not configured or set to false: "family_name": "Lastname" The following is an example of attributes when this property is set to true: "family_name": [ "Lastname" ] This option is set to false by default. |
OAUTH_REDIRECT_URL_EXACT_MATCH |
Click OTHER to configure this property. Set this option to true. When set to true, it validates query parameters in the redirect URI registered with the OAuth client applications. |
OAUTH_PARAMETERS_ENCODE_BASE64 |
Click OTHER to configure this property. Set this option to true. When set to true, and state parameter is passed with “&” and redirect URI as URL encoded values in the request, the state parameter parses the “&” and gets decoded state value. |
ENCODE_AUTHZ_STATE_PARAMETER |
Click OTHER to configure this property. Set this option to true. When set to true, and state parameter is passed with JSON value as URL encoded values in the request, the same state encoded JSON state value is received in the response. |
OIDC_PROTOCOL_COMPLIANCE |
Click OTHER to configure this property. Set this option to true. When set to true, the attribute values in the token is received as Boolean. The following is an example of attributes when this property is set to true: email_verifed : true |
Click OK > Apply.