Creating the Identity Injection Policy for a Custom Header
The following policy injects the user’s roles and DN into a custom header. The index.php page reads this information and uses it to display the user’s name. If the user is assigned the sales_role, is displayed on the main page.
-
Click > , then click > > > > .
-
Click > .
-
In the section, click , then fill in the following:
Name: Specify .
Type: Select .
-
In the section, click > .
-
To inject the user’s name, fill in the following values:
Custom Header Name: Specify .
Value: Select . The is selected automatically for you.
-
To inject the user’s roles, click > , then fill in the following values for the second custom header:
Custom Header Name: Specify .
Value: Select .
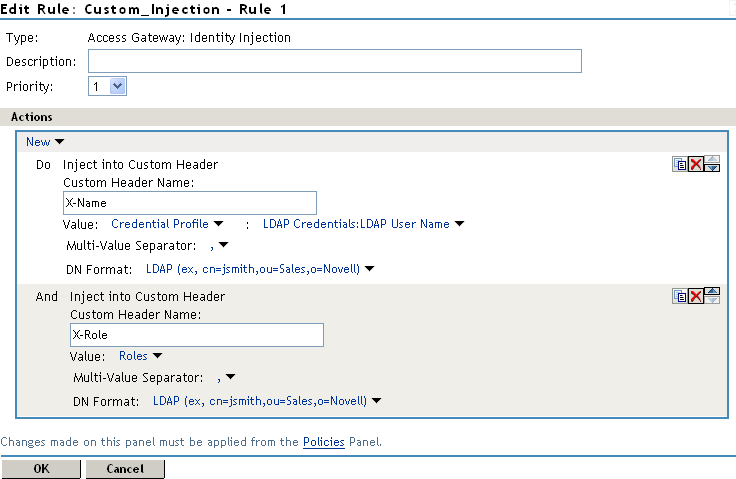
Your policy must look similar to the following:
-
Click twice, then click .
-
Click .
-
In the section, select , then click .
-
Click .
-
Click > , then click > .
-
To test Tom’s access rights, complete the following steps:
-
Open a new browser, then enter the URL of the Digital Airlines website you created.
In this example, it is am3bc.provo.novell.com.
-
When prompted for user ID and password from Access Manager, log in with Tom’s credentials.
The page appears with a message at the top, and appears in the lower right corner of the page.
Access 1 or 2 and authenticate the users Tom and admin using common password novell.

-
Click , and the page appears.
If the does not appear, Tom was not assigned the sales_role:
-
Verify that the role policy is enabled for Identity Server by clicking > , and confirm that Identity Server is listed in the column for the policy.
-
On the page, confirm that Access Gateway is listed in the column for the Identity Injection policy.
-
Discover whether there was an error in the Role policy evaluation. Click > and download the catalina.out file for Identity Server. Search for the name of the role policy and determine whether the role was successfully assigned.
-
Determine whether there was an error in Identity Injection policy evaluation. Click > and download the catalina.out file for Access Gateway. Search for the name of the Identity Injection policy and determine whether its values were successfully injected.
For more information about troubleshooting policies, see Section 33.6, Troubleshooting Access Manager Policies.
-
-
Close all sessions of the browser.
-
-
To test that the sales_role is required for the to appear, complete the following steps:
-
Open a new browser, then enter the URL of the Digital Airlines website you created.
In this example, it is am3bc.provo.novell.com.
-
Log in as the admin user. The page must have a at the top of the page, but must not appear.
-
To the URL, add /sales, and the page appears.
This illustrates that although the link is hidden, the page is not protected.
-
Close all sessions of the browser.
-
-
Continue with Assigning an Authorization Policy to Protect a Resource.