2.5.1 Configuring a Reverse Proxy
You can protect your web services by creating a reverse proxy. A reverse proxy acts as the front end to your web servers in your DMZ or on your intranet. It off-loads frequent requests, thereby freeing up bandwidth and web server connections. It also increases security because the IP addresses and DNS names of your web servers are hidden from the Internet. A reverse proxy can be configured to protect one or more proxy services.
To create a reverse proxy, you must create at least one proxy service with a protected resource. You must supply a name for each of these components. Reverse proxy names and proxy service names must be unique to Access Gateway because they are configured for global services such as IP addresses and TCP ports. For example, if you have a reverse proxy named products and another reverse proxy named library, only one of these reverse proxies can have a proxy service named corporate.
Protected resource names need to be unique to the proxy service, but they don’t need to be unique to Access Gateway because they are always accessed through their proxy service. For example, if you have a proxy service named account and a proxy service named sales, they both can have a protected resource named public.
|
What You Need To Know |
Example |
Your Value |
|
|---|---|---|---|
|
Name of Identity Server cluster |
idp-corporate |
_______________________ |
|
|
DNS name of Access Gateway |
mytest.com |
______________________ |
|
|
Web server information |
|
|
|
|
IP address |
10.15.70.21 |
______________________ |
|
|
DNS name |
mywebserver.com |
______________________ |
|
|
Names you need to create |
|
|
|
|
Reverse proxy name |
mycompany |
________________________ |
|
Proxy service name |
company |
________________________ |
|
Protected resource name |
public |
________________________ |
This first reverse proxy is used for authentication. You need to configure the proxy service to use the DNS name of Access Gateway as its , and the web server and the resource on that web server need to point to the page you want displayed to the users when they first access your website. You can use Access Gateway configuration options to allow this first page to be a public site with no authentication required until the users access the links on the page, or you can require authentication on this first page.
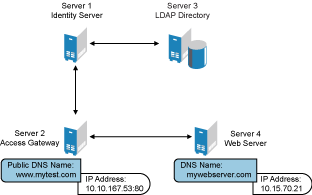
Figure 2-3 Basic Configuration
Complete the following steps to first configure a protected resource as a public resource and then to modify the configuration to require authentication:
-
Click > , > .
-
In , select the configuration you have assigned to Identity Server.
This sets up the trust relationship between Access Gateway and Identity Server that is used for authentication.
-
In , click , specify a display name for the reverse proxy, then click .
-
Enable a listening address.
Listening Address(es): A list of available IP addresses. If the server has only one IP address, only one is displayed and it is automatically selected. If the server has multiple addresses, you can select one or more IP addresses to enable. You must enable at least one address.
TCP Listen Options: Options for configuring how requests are handled. You cannot set up listening options until you create a proxy service.
-
Ignore the SSL configuration options.
This basic configuration does not set up SSL. See Enabling SSL Communication.
-
Configure a listening port.
Non-Secure Port: Select 80 that is the default port for HTTP.
Secure Port: This is the HTTPS listening port. This port is unused and cannot be configured until you enable SSL.
-
In , click .
-
Specify the following details:
Field
Description
Proxy Service Name
A display name for the proxy service.
Published DNS Name
The DNS name you want the public to use to access your site. For this first proxy server, the DNS name must resolve to Access Gateway IP address that you selected as the listening address. For example, in Figure 2-3, this name would be www.mytest.com.
Web Server IP Address
The IP address of your web server. This is the web server with content that you want to share with authorized users and protect from others. In Figure 2-3, this is Server 4, whose IP address is 10.15.70.21.
Host Header
The name you want to send in the HTTP header to the web server. This can either be the published DNS Name (the option) or the DNS name of the web Server ().
Web Server Host Name
The DNS name that Access Gateway must forward to the web server. This option is not available if you select for the option. The name you use depends upon how you have set up the web server. If your web server has been configured to verify that the host name in the header matches its name, you need to specify that name here. In Figure 2-3, the Web Server Host Name is mywebserver.com.
-
Click .
-
Continue with Section 2.5.2, Configuring a Public Protected Resource.