Responding to an Incident

The following sections explain how to use the feature when a user reports a problem:

Creating a Logging Ticket

These steps are performed by an Identity Server administrator when a user reports a problem:

  1. Log in to Identity Server by using the credentials of an administrator.

    If the base URL of Identity Server is https://idp.amlab.net:8443/nidp, enter the following URL:

    https://idp.amlab.net:8443/nidp/app
  2. (Optional) If you do not see the Administrator tab (legacy UI) or the Logging Ticket... menu item (latest UI), then you must execute the app/login?id=IDPAdmin URL to enable the Logging Ticked functionality.

    The id specified in the URL must match the ID you specified for Identity Server Administrator Contract. See Step 4.c of Creating Administrator Class, Method, and Contract.

  3. To create a ticket for the user, click the Administrator tab.

    1. Click New.

    2. Specify the following:

      Ticket: Specify a name for ticket.

      You must share this name with the user who reported the problem.

      Ticket Good For: Select a time limit for the ticket, from one minute through one year.

      When selecting a time limit, consider the following:

      • When a ticket expires, logging is automatically stopped. If you know that user is experiencing a problem that prevents the user from logging out, you might want to create a ticket with a short time limit.

      • If the user does not log out (just closes the browser window or the problem closes it), the session remains in the list of logged sessions. After 10 minutes of inactivity, the session is closed and the lock on the log file is cleared. As long as the log file is locked, no other application can read the file.

      Ticket Log Level: Select the level of information to log, from severe-only messages to debug.

      Log to Console: Select to log the messages to the user’s file and to the console.

      • If you have set up logging for session-based logging (see Enabling Basic Logging), then this allows you see the messages in the catalina.out file.

      • If you have enabled Component File Logger Levels, selecting this option can create duplicate entries in the catalina.out file.

    3. Click Create.

  4. Create a URL that uses the following format:

    https://<base_URL>/nidp/app/login?id=<LogSession>

    Replace <base_URL> with the base URL of your Identity Server, including the port. Ensure that the port agrees with the HTTP scheme (either http or https).

    Replace <LogSession> with the ID you specified for the authentication card when defining the Logging Session contract.

    IMPORTANT:The is the ID of the authentication card of the Logging Session contract (see Step 4.c of Creating Logging Session Class, Method, and Contract). It is not the name of the ticket you just created.

    If the base URL of Identity Server is https://idp.amlab.net:8443/nidp and the ID for the authentication card is LogSession, create the following URL:

    https://idp.amlab.net:8443/nidp/app/login?id=LogSession
  5. Send the URL of the LogSession card and the name of the ticket to the user.

Enabling a Logging Session

These steps are performed by the user. The URL needs to be sent to the user, with the ID and ticket values that were specified in Creating a Logging Ticket.

  1. Open a browser and enter the log session URL sent by the help desk.

    If the URL does not display a page that prompts for the ticket name, check the value of the id string. The id must be set to the ID of the authentication card of the Logging Session contract.

    Instead of sending the user a URL, you can enable the Show Card option for the Logging Session card. When you do this, all users can see it. You need to decide if this is acceptable.

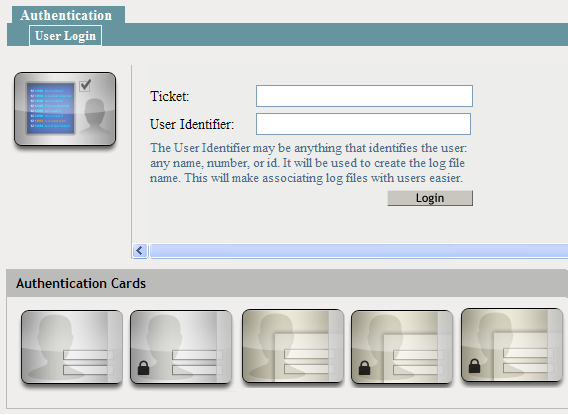
    When the Show Card option is enabled, the login page looks similar to the following:

  2. When prompted, enter the following:

    Ticket: Specify the ticket name that the help desk sent.

    User Identifier: Specify a value that the help desk associates with you as a user. The identifier must be less than 33 characters and contain only alphanumeric characters.

  3. Click Login.

    This login creates the logging session.

  4. Enter your name and password, then click Login.

    This login authenticates you to Identity Server.

  5. In the same browser window, enter the URL of the resource that is causing the problem.

  6. Perform any other actions necessary to create the problem behavior.

  7. Log out and send your user identifier to the help desk.

Viewing the Log File

These steps are performed by someone who has had Access Manager training and understands the significance of the messages in the log files. This can be an IDP Administrator or a specialist.

  1. On Identity Server, change to the Identity Server log directory.

    /var/opt/novell/nam/logs/idp/nidplogs

  2. Open the file that begins with the user identifier to which a session ID is appended.

    If the user does not log out (just closes the browser window or the problem closes it), the session remains in the list of logged sessions. After 10 minutes of inactivity, the session is closed and the lock on the logging file is cleared. As long as the file is locked, no other application can read the file.

    When a ticket expires, logging is stopped automatically. If you know that user is experiencing a problem that prevents the user from logging out, you might want to create a ticket with a short time limit.

  3. (Conditional) If the user was experiencing a problem with an ESP, change to the Identity Server log directory on the Access Gateway server:

    /opt/novell/nam/webapps/nesp/WEB-INF/logs

  4. Open the file with the same user identifier and session ID.

  5. After solving the problem, delete the file from each Identity Server in the cluster and each Access Gateway in the cluster.