7. Diff, Merge, Patch, and the Change Palette : The AccuRev Merge Tool

The AccuRev Merge Tool
This topic describes AccuRev's own 3-way merge tool. You can also configure the GUI to use another text-file-merge tool.
Merge Tab Layout
By default, the Merge tool displays the two contributors' contents in side-by-side panes with the contents of the contributors' closest common ancestor in a third pane between them.
Note: Using a toolbar button, you can arrange the contributors' panes vertically, or toggle the visibility of the pane containing the closest common ancestor.
The file in your workspace is always on the right. Above them, the Merge tool displays the merged version. The contributor panes and closest common ancestor pane are synchronized: scrolling any one of them causes the others to scroll, too.
Special cases:
Color-Coding of the Contributor Versions
Like the Diff tool, the Merge tool partitions the contributor versions' contents, displaying unchanged sections with a white background and change sections with colored backgrounds. The color-coding scheme is a bit different, because the Merge tool has the more complex job of distinguishing conflicting changes from non-conflicting ones. In addition, the color-coding scheme depends on which navigation mode you're working in.
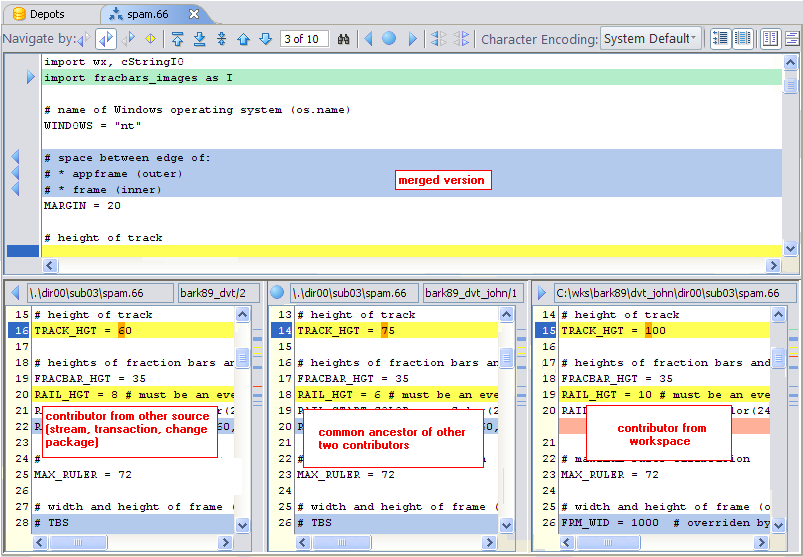
For a conflicting change, the blocks in all contributors are colored yellow, no matter what the navigation mode is.
Example 1: In My changes navigation mode, non-conflicting additions that come from your version are colored green; non-conflicting additions that come from the other contributor are colored gray. In Their changes navigation mode, the color-coding of non-conflicting additions would be reversed.
Example 2: In Conflicts navigation mode, all conflicting changes are colored yellow; all other change sections are colored gray.
Color-Coding of the Merged Version
The merged version is displayed with color-coding, too. Each colored block is a location where a change has been incorporated from one of the contributors into the merged version. When it starts, the Merge tool performs as much merging as it can automatically, applying all of the non-conflicting changes to the merged version. The text is always colored gray. Annotations in the left margin indicate the origin of the change:
The Merge tool cannot resolve conflicts automatically, so the location of each conflict is initially indicated in the merged version by a blank yellow block. As you make selections to resolve the conflicts, the blank yellow blocks get filled in with the selected text and are annotated:
In all cases, the text of a resolved conflict is colored blue.
Resolving Conflicts
You can think of the Merge tool as a special-purpose text editor: it combines the contents of two files, producing a third file as the result. Like any text editor, the Merge tool provides you with a set of editing and navigation functions; you have a lot of flexibility in choosing which functions to use, and in which order.
But the Merge tool does enforce this requirement: you must resolve all the conflicting changes between the contributor versions before you can complete a merge operation. Thus, Merge tool usage follows this basic pattern:
These operations (except for manual editing) are controlled by Merge toolbar buttons, as described in the following sections.
Navigating the Display and the Change Sections
Some of the Merge tool's navigation facilities are the same as the Diff tool's:
If the Their changes mode button is selected, the navigation buttons traverse just the change sections in which the left-hand (or upper) contributor differs from the closest common ancestor.
If the All the changes mode button is selected, the navigation buttons traverse all the change sections.
If the My changes mode button is selected, the navigation buttons traverse just the change sections in which the right-hand (or lower) contributor differs from the closest common ancestor.
If the Conflicts mode button is selected, the navigation buttons traverse just the sections with conflicting changes.
At any given time, one of the change sections is currently selected. The line numbers in both contributor panes are highlighted to indicate the selection.
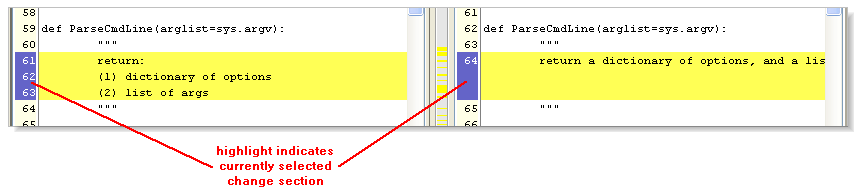
Whenever you use one of these buttons (except for Search) to jump to a particular change section, the Merge tool remembers it as the current change. Selecting a particular change section by left-clicking it in either contributor pane makes it the current change.
The Change Section Counter
As you navigate among the change sections, a counter in the Merge toolbar tracks your location, taking into account which navigation mode is selected.
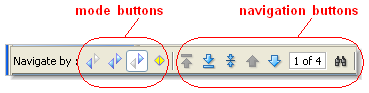
For example, "2 of 4" might mean "you are currently in My changes mode, and you are currently at the 2nd of 4 such changes".
The counter typically changes as you switch navigation modes.
In some cases, the first number may be "0". This occurs when:
Searching for Text
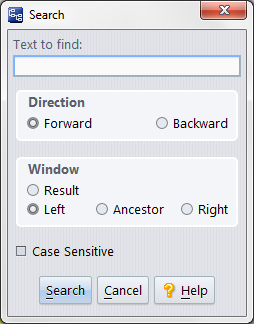
In addition to navigating among the change/conflict sections, you can search for any text string in any pane, using the Search toolbar button (keyboard shortcut: Ctrl-S).
You can also invoke this command from the context menu that appears when you right-click anywhere in either contributor pane.
Selecting a Section from a Contributor (or Multiple Contributors)
Sometimes, the Merge tool can construct a merged version without any help from you. This occurs if all the change sections are non-conflicting. The Merge tool just applies all the changes to the merged version and announces that it's done. This section describes the more interesting case: the contributors have one or more conflicts, which you must resolve.
The Merge tool automatically jumps to the first conflict. That is, it scrolls to the first yellow-highlighted change section in the contributors, and the corresponding blank yellow block in the merged version. It's up to you to decide which of the changes is to be incorporated into the merged version. You indicate your decision using the conflict-resolution toolbar buttons.
Click the Take common ancestor change toolbar button to incorporate the original block from the closest common ancestor.
Click the Take my change toolbar button to incorporate the changed block from the right-hand (or lower) contributor (file in your workspace).
Click the Take their change toolbar button to incorporate the changed block from the left-hand (or upper) contributor (file you are merging with).
1.
2.
3.
You can remove any block that you added to the merged version by clicking the corresponding button again to turn it “off”.
Note: You cannot remove an inserted block once you've performed a manual edit because doing a manual edit resets all the conflict-resolution buttons to the “off” state.
The following two conflict-resolution buttons make large-scale changes -- use them carefully! They both effectively override the Merge tool's automatic inclusion of non-conflicting changes into the merged version.
The Revert all of my changes button makes the merged version the same as the left-hand (or upper) contributor version.
The Use only my changes button makes the merged version the same as the right-hand (or lower) contributor version.
When you click one or more conflict-resolution buttons to resolve a conflict, the selected block(s) appear in the merged version and the highlight changes from yellow (unresolved) to blue (resolved). This also decrements the change section counter in the Merge toolbar.
Use the Next navigation button to scroll down to the next conflict. (It may take more than one click if your are not in Conflicts navigation mode.) Again, use one of the "take change" buttons to select the text from the left contributor or the right contributor (or both of them).
You don't have to resolve the conflicts in order. You can jump around as much as you want among the change sections, or scroll through unchanged sections to look up information the affects your merge decisions.
Changing Your Mind
You can change your merge decisions as much as you want. For example, you can navigate to a particular change section where you had selected Take their change and change it to Take my change by first clicking to remove their change and then clicking to insert your change.
Note: You cannot “undo” a block once you've performed a manual edit because doing a manual edit resets all the conflict-resolution buttons to the “off” state.
If you want to discard all your merge work, close the Merge tab to abandon the merge session entirely.
A confirmation dialog box appears, making it less likely that you'll discard your merge work accidentally.
Manual Editing
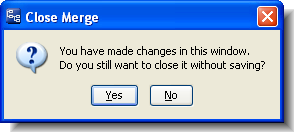
At any time during a Merge tool session, you can manually edit the contents of the merged version. Just click anywhere in the pane containing the merged version, and type. The Delete and Backspace keys work as expected. Using context (right-click) menus or the GUI main menu, you can Cut, Copy, and Paste sections of text that you've highlighted with the mouse. You can also use the common keyboard shortcuts: Ctrl-C or Ctrl-Ins to copy, Ctrl-V or Shift-Ins to paste.
Warning: If you make changes manually within a conflict section that you've resolved with one of the conflict-resolution buttons, all the conflict resolution buttons are reset to the “off” state, and it is no longer possible to remove a block by clicking on the corresponding button. Also, your manual changes will be overwritten if you return to that section and click any conflict-resolution button.
Joining Change Sections
Sometimes, there is a block of lines in a contributor version that you consider to be a single change section, but that the Merge tool decides are two separate sections. You can combine the two change sections:
1.
Right-click in the contributor section, and choose Join Sections from the context menu.
2.
The Merge tool joins the sections, then readjusts its analysis of the contributors' change sections. Typically, this changes the number of conflict sections.
Saving the Merged Version
When you resolve the last remaining conflict by clicking one of the conflict-resolution buttons, the Conflicts counter goes to "0 of 0" and the Merge tool displays this message window:
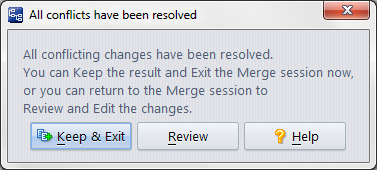
Clicking Keep & Exit ends the merge session immediately, closing the Merge tab. AccuRev overwrites the file in your workspace with the merged version. Then, it a Keeps a new version in your workspace stream, to preserve the merge results. The overlap status of the file is removed, so that you can now Promote the new version to the backing stream.
Clicking Review continues the merge session. This enables you to review your work, change some of your merge decisions, and perform manual edits. At any time, you can click the Keep button in the Merge toolbar to complete the merge process.
You can also cancel the entire merge during a review pass by closing the Merge tab without performing a Keep.
Notes About Merge Behavior
As of AccuRev Release 4.9, the merge command is now smarter about simple (rebase) merges, resulting in simplified display of merge lines in the Version Browser, and simplified change packages. For example, assume two developers are working in parallel on the same element, with a common ancestor, and there are only regular versions (that is, no patches, merges, or reversions) between the current versions and the common ancestor. When these are merged, the resulting version of the merge is rebased to point to the merged version.
In these cases you will not see a red merge line in the Version Browser. Instead, the comment section of the merged file will contain an entry similar to: “merged, rebased to <version>”. In other words, if a merge results in a change that you would have received if you had simply done an update, it is not displayed as a merge. See the screenshots under Notes:.
Commands Available in a Merge Tab
Navigation Mode Radio Buttons
Their changes
When this radio button is selected, the navigation buttons take you to the change sections in which the left-hand (or upper) contributor differs from the closest common ancestor.
All the changes
When this radio button is selected, the navigation buttons take you to all the change sections.
My changes
When this radio button is selected, the navigation buttons take you to the change sections in which the right-hand (or lower) contributor differs from the closest common ancestor.
Conflicts
When this radio button is selected, the navigation buttons take you to all the sections that contain conflicting changes.
Navigation Buttons
First change/conflict
Go to, and select, the first change section (or unresolved conflict section)
Last change/conflict
Go to, and select, the last change section (or unresolved conflict section)
Center current change/conflict
Scroll the contributor panes (if necessary), to make the currently selected change section visible.
Previous change/conflict
Go to, and select, the preceding change section (or unresolved conflict section)
Next change/conflict
Go to, and select, the next change section (or unresolved conflict section)
Change section counter
Display only, not a button. See The Change Section Counter.
Search
Bring up a dialog to define a search in one of the panes for a specified text string.
Conflict Resolution Buttons
Invoking a "Take ... change" operation replaces a previously chosen change section at that location. It also wipes out any manual edits you may have performed in that change section.
Take their change
Copy the currently selected change section in the left (or upper) contributor pane to the results pane.
Take common ancestor
Copy the original block from the closest common ancestor to the results pane.
Take my change
Copy the currently selected change section in the right (or lower) contributor pane to the results pane.
Revert all my changes
Make the merged version the same as the left-hand (or upper) contributor version.
Use only my changes
Make the merged version the same as the right-hand (or lower) contributor version.
The "Keep merge results" Button
Keep results and close
Preserve the current contents of the merge results pane as a new version of the element, using the Keep command. (The Keep dialog box does not appear.) The Merge tab for this file then closes automatically.
Character Encoding Fields
The Merge view has two fields related to character encoding, Character Encoding and BOM:
Character Encoding: A drop-down list that lets you specify the character encoding of the file being merged. This field has two effects:
And it is rendered like this when the Character Encoding is set to Unicode (UTF-8):
BOM: A BOM (Byte Order Mark) is part of the Unicode standard used to indicate the endianness of a text file, and which Unicode encoding is in use (UTF-8, UTF-16, or UTF-32. for example). The BOM drop-down is displayed only when you are merging Unicode files, as shown here:
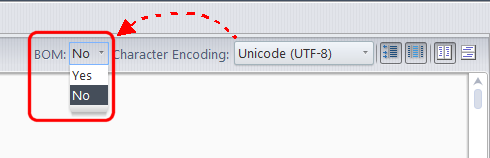
This can happen because the native encoding is Unicode, or if you use the Character Encoding field to explicitly set a Unicode encoding.
When the BOM field is set to Yes, the output file of the merge will be written with a leading BOM indicator from the Unicode standard. When the BOM field is set to No, the output file will be written without the leading BOM. If either contributor to the merge has a BOM in it, the BOM field defaults to Yes; otherwise it defaults to No.
In most cases, you should not write the Byte Order Mark to the output, unless you have a specific need for it (because the file is used externally by a tool that requires the BOM).
Pane Selection Buttons
Show results of edits
Toggle the visibility of the merged version pane. This enables you to see more data in the two contributor panes.
Show HTML result
(Appears for file with .htm or .html suffix only) Toggle switch: display the context of the merged version as plain text, or render the contents as HTML.
Show Ancestor Panel
Toggle switch: display/hide the closest common ancestor pane.
Horizontal Layout
(default) Places the "other" contributor pane to the left of the "workspace" contributor pane.
Vertical Layout
Places the "other" contributor pane above the "workspace" contributor pane.

Micro Focus