 previous
 next
next

This example shows how to set up a transform that can be applied to an install on a command line. To automatically deploy the transform in an installation that uses the Reflection Setup program, see Apply a Transform to Your Installation.
To create a transform that adds a desktop shortcut and disables the Change button
From your administrative installation point, open the Installation Customization Tool from a shortcut or by typing the following command line:
<path_to_setup> \setup.exe /admin
Select , and then click .
From the navigation pane, click and then select .
The following optional steps describe how to create a Reflection Workspace shortcut to the user’s desktop and remove the button from the Windows list.
From the navigation pane, click .
In the lower-right corner, click .
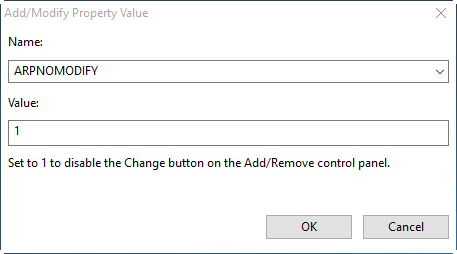
In the dialog box, for select ARPNOMODIFY and for enter 1. This step removes the button.
From the navigation pane, click .
Under , select and click .
In the dialog box, in the field, select and click . This step creates a desktop shortcut.
From the menu, save the transform on the administrative installation point as myCustomInstall.mst.