This chapter contains the following sections:
You can generate an entire application or you can generate selected
programs and screens of an application. When you generate an application, the
APS Generator and APS Precompiler translate APS specifications into a complete
structured COBOL application. APS then passes the source to your COBOL compiler
and link edit program to produce a load module.
Tailor generation
You tailor how APS generates an application using options and job
submission modes. Options are available for controlling both the Generator and
Precompiler, as well as target specific options.
When APS generates an application, it:
- Ensures that each component of the application exists.
- Generates screen symbols for each screen for use by the Precompiler.
- Generates
screen source for use by the DC environment.
- Rearranges the specifications programs into proper COBOL program
organization.
- Includes externally-defined information that the program references,
such as copylibs and user-defined macros at the appropriate COBOL program
locations.
- Processes all database and data communications calls and user-defined
macros, translating all source to COBOL source.
- Translates all APS Report Writer source to COBOL source.
- Writes a
temporary error message file and merges it with the COBOL compiler error
message file. The combined error message file presents messages sorted by
program line number with both types of messages appearing where appropriate.
APS
stores generated and precompiled COBOL program source and screen output in the
following data sets in your user Project and Group, depending on the DC target
specified:
DC Target
|
Generated Screen, Mapset Output File
|
Generated Program Output File
|
|
CICS |
GENBMS
|
COBCIC |
|
IMS |
GENMFS
|
COBIMS |
|
ISPF Dialog |
GENDLG
GEN5DLG (Mod 5)
|
COBDLG |
|
ISPF prototype |
GENPANEL
GEN5PANL(Mod 5)
|
COBISPF |
|
MVS (batch) |
Not applicable
|
COBMVS |
Define development environment
Before you generate an application, you must set options to define the
development environment appropriately. You set options for:
- Project and Group
- APS Generator
- APS Precompiler
- IDMS
- SQL Bind and Translate
APS sets option default values for these options according to your
installation configuration.
To access the APS Options menu, from the APS Main Menu enter option 0 in
the Command field. Alternatively, from any APS screen, enter opt in the Command
field.
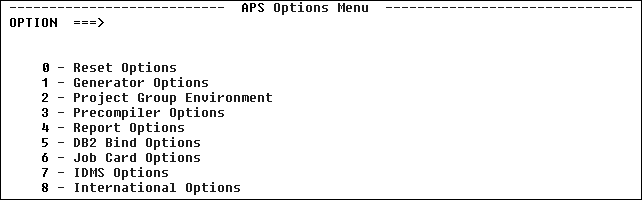
Figure 7-1: APS Options Menu
Specify to APS the Project and Group location of your application and
where you want APS to generate the Project and Group DDIFILE data set. If you
use the APS Data Element Facility or the APS/ENDEVOR interface, specify their
locations as well. To do so, follow these steps:
- Access the Project Group Environment screen. To do so, from the APS
Options Menu, enter option 2 in the Option field. Alternatively, from any APS
screen enter opt 2 in the Command field. The Project Group Environment screen
displays.
- Complete the fields on the Project Group Environment screen as
follows:
Field
|
Description
|
|
Project |
The name of the Project. For example, myproj. Must be 1-8
alphanumeric characters; the first character must be alphabetic.
|
|
Group |
The name of the Group. For example, mygrp. Must be 1-8
alphanumeric characters; the first character must be alphabetic.
|
|
DDIFILE |
The location of the Project and Group's DDIFILE data set; do
not specify the name DDIFILE. Default: The Project and Group path specified
above. For example, myproj.group.
|
|
Data Element Library Prefix |
Optional.
The location of the Data Element Facility APSDE data set; do not specify the
name APSDE. For example, apspg.project1.group1. For information on the Data
Element Facility, see Administrator's Guide chapter Managing Data
Elements.
|
Set the APS Generator options appropriately for your environment. To do
so, follow these steps:
- Access the Generator Options screen. To do so, from the APS Options
Menu enter option 2 in the Option field. Alternatively, from any APS screen
enter opt 2 in the Command field. The Generator Options screen displays.

Figure 7-2: Generator Options Screen
- Set options appropriate for your environment as described below.
Option
|
Description and Values
|
|
Target OS |
Operating system.
|
|
DC |
Data communications target. For valid DB/DC combinations see
the "DB/DC Target Combinations" topic in the APS Reference.
|
|
DB |
Database target. For valid DB/DC combinations see the
"DB/DC Target Combinations" topic in the APS Reference.
|
|
SQL |
SQL target.
|
|
Job Class |
Specify any job class valid at your site and known to the APS
generators.
|
|
Msg Class |
Site-specific.
|
|
Listgen |
|
Yes |
Generates listing of generated code. See the APS Error
Messages manual for a sample. |
|
No |
Default. |
|
|
COBOL |
|
Yes |
Saves generated COBOL program source in the library or
data set appropriate for your DC target. For the complete list of libraries and
data sets. |
|
No |
Default. |
|
|
Object |
|
Yes |
Saves generated object code in appropriate library.
|
|
No |
Default. |
|
|
MFS/BMS |
|
Yes |
Saves generated BMS or MFS mapsets in the GENBMS or
GENMFS libraries. |
|
No |
Default. |
|
|
GENSRC |
|
Yes |
Saves generated source code in the GENSRC PDS or data
set. |
|
No |
Default. |
|
|
User Help |
|
Yes |
Enables generation of APS User Help Facility source
files. |
|
No |
Default. |
|
|
Job Dest |
Site-specific.
|
|
CARDIN Member |
Specify the CNTL library APSDBDC member.
|
|
Generate COBOL II |
|
Yes |
Generates
COBOL II source code. |
|
No |
Default. |
|
|
COBOL Compiler |
|
1 |
OS/VS COBOL (Generate COBOL II = No) |
|
2 |
COBOL II |
|
3 |
COBOL for MVS |
|
|
CICS Release |
Specify the CICS release at your site.
|
|
IMS Release |
Specify the IMS release at your site.
|
|
SUPRA |
|
Yes |
Passes SUPRA procedural statements through APS
unchanged. |
|
No |
Processes SUPRA procedural statements. |
|
|
APS Parm |
Overrides the APS Parm field on the Precompiler Options
screen. Displays all options whose default values you have overridden in the
Precompiler Options screen. You can temporarily override these values simply by
overtyping them in this field, but changes made here are not saved; they remain
in effect only until you exit APS.
|
|
COBOL Parm |
Specify parameters or directives for COBOL compiler. See the
COBOL Language Operating Guide for valid values.
|
Set the APS Precompiler options appropriately for your requirements or
preferences. To do so, follow these steps:
- Access the Precompiler Options screen
Access the
Precompiler Options screen. To do so, from the APS Options Menu enter option 3
in the Option field. Alternatively, from any APS screen enter opt 3 in the
Command field. The Precompiler Options screen displays.
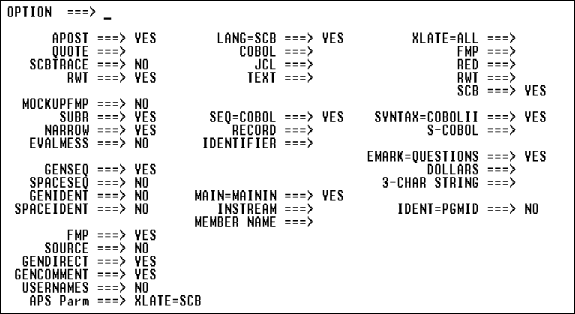
Figure 7-3: APS Precompiler Options
Screen
- Set options appropriate for your environment as described below.
Option
|
Description and Values
|
|
Apost |
Overrides Quote.
|
Yes |
Default. Lets you use the apostrophe character to
delimit non-numeric literals in your input source. |
|
|
Quote |
Overrides Apost.
|
Yes |
Lets you use the single quote character to delimit
non-numeric literals in your input source. |
|
No |
Default. |
|
|
SCBtrace |
|
Yes |
Activates
the SAGE-TRACE-FLAG debugging facility. |
|
|
RWT |
|
Yes |
Default. Generates COBOL code from APS Report Writer
statements. Specify with COBOL II compiler. |
|
No |
Passes
Report Writer statements directly to the COBOL compiler.
Note: For
very large Report Writer programs, enter rwt=bigrwt in the APS Parm field on
the Generator Options screen.
|
|
|
Lang |
Indicates which type of source to process and which columns to
process.
|
SCB=yes |
Default. Processes APS specifications (S-COBOL) in
columns 8-72; the symbol &07 in your code forces a character into column
7.
|
|
COBOL=yes |
Processes COBOL source in columns 1-72.
|
|
JCL=yes |
Processes JCL in columns 1-72. Useful for
text-processing JCL and for controlling columns 1-6 of S-COBOL
|
|
Text=yes |
Processes any source in columns 1-80. All columns are
considered text; no sequence numbers are generated. Automatically sets
XLATE=FMP. To override XLATE=FMP, enter XLATE=value in the APS Parm
field. |
|
|
Evalmess |
|
Yes |
Generates messages that list evaluation bracket
resolutions. Usually results in long listings. |
|
No |
Default. |
|
|
Seq |
Specifies the type of sequence numbers that APS generates. See
also, Genident, Spaceident, Ident.
|
COBOL=yes |
Generates COBOL-style numbers in columns 1-6.
|
|
Record=yes |
Generates new numbers in columns 73-80, incrementing by
100 for each input record and by two for each generated record.
|
|
Identifier=yes |
Generates line numbers in columns 73-80; columns 73-74
contain 0. |
|
|
Syntax |
Specifies which compiler to use.
|
COBOLII=yes |
Generate COBOL-II syntax.
|
|
S-COBOL=yes |
Generate S-COBOL syntax. |
|
|
Emark |
Generates a three-character string marking error and warning
messages in the message report.
|
Questions=yes |
Default. Generates ???.
|
|
Dollars=yes |
Generates $$$.
|
|
3-Char String=string |
Generates the string you specify.
|
|
|
Genseq |
Overrides Spaceseq.
|
Yes |
Default. Generates sequence numbers in columns 1-6 for
blank or out-of-sequence lines of source code and when new lines are generated.
|
|
|
Spaceseq |
Overrides Genseq.
|
Yes |
Generates spaces in columns 1-6; incompatible with
Lang=Text. |
|
|
Genident |
See also, Spaceident, Ident, Seq.
|
Yes |
Generates sequence numbers in columns 73-80 for blank
or out of sequence source code lines and when new lines are generated. |
|
No |
Default. Generates the last known contents of columns
73-80 when new lines are generated and passes identifiers as they exist in
GENSRC. |
|
|
Spaceident |
See also, Genident, Ident, Seq.
|
Yes |
Generates spaces in columns 73-80. Incompatible with
Lang=Text. |
|
|
Main |
Specifies location of the main input source.
|
MAININ=yes |
Default. Reads from file named by external name MAININ.
Use this default unless using your own JCL.
|
|
Instream=yes |
Reads source instream with the JCL that you provide.
|
|
Member Name=membername |
Reads from the PDS or file name or source statement
library designated by the external name SCELIB. |
|
|
Ident |
See also, Genident, Spaceident, Seq.
|
Yes |
Generates the internal program name in columns 73-80.
|
|
No |
Default. |
|
|
FMP |
|
Yes |
Default. Processes APS macros and user-defined
Customization Facility macros. |
|
No |
Use only with your own JCL skeleton. |
|
|
Source |
|
Yes |
Prints the main input source program, specified in the
MAIN option, after the message report. |
|
No |
Default. |
|
|
Gendirect |
|
Yes |
Allows generatation of nested IF statements in the
COBOL source. |
|
|
Gencomment |
|
Yes |
Generates replaced source statements as comments in the
COBOL source. |
|
No |
Default. |
|
|
Usernames |
|
Yes |
Generates the following prefix for APS-generated
paragraphs: paraname- |
|
No |
Default. Generates the following prefix for APS
generated paragraphs: G--
Note: To generate any other prefix, enter the
following in the APS Parm field on this screen:
usernames=prefix
|
|
|
APS Parm |
Displays all Precompiler options whose default values you
override. These values also display in the APS Parm field on the Generator
Options screen. APS saves the values you change on the APS Parm field on the
Precompiler Option screen. APS does not save values that you change in the APS
Parm field on the Generator Options screen.
|
Specify Bind and Translate options. To do so, follow these steps:
- Access the SQL Bind and Translate Options screen. To do so, from the
APS Options Menu enter option 5 in the Command field. Alternatively, from any
APS screen enter opt 5 in the Command or Option field. The APS Bind Options
screen displays.
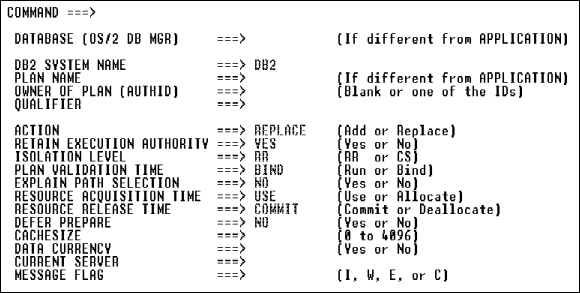
Figure 7-4: DB2 Bind Options Screen
- Select Bind and translate options appropriate for your environment as
described below.
Field
|
Description and Values
|
|
DB2 System Name |
Specify the appropriate name for your site. Default: DB2.
|
|
Plan Name |
Specify the plan name you use when you Bind an application. If
you leave this field blank, the default depends upon your use of the BIND
command in the Application Painter.
|
|
Owner of Plan (Authid) |
Leave this field blank or specify a primary or secondary
authorization ID of the BIND.
|
|
Qualifier |
Leave this field blank or specify the implicit qualifier for
the unqualified table names, views, indexes, and aliases contained in the plan.
|
|
Action |
Specify the bind action to be executed. Valid values:
add or replace.
|
|
Retain Execution Authority |
Specify Yes if you specified REPLACE in the BIND ACTION
field. Otherwise specify No.
|
|
Isolation Level |
Valid values: rr or cs.
|
|
Plan Validation Time |
Valid values: run or bind.
|
|
Explain Path Selection |
|
Yes |
Activates the DB2 EXPLAIN function. |
|
No |
Does not activate the function. |
|
|
Resource Acquisition Time |
Valid values: use or allocate. If you enter
ALLOCATE, you must enter DEALLOCATE in the Resource Release Time field.
|
|
Resource Release Time |
Valid values: commit or deallocate. The value
you enter in this field depends on the value you entered in the Resource
Acquisition Time field.
|
|
Defer Prepare |
|
Yes |
Generates the keyword DEFER(PREPARE), which defers the
prepare statement referring to a remote object. |
|
No |
Default. |
|
|
Cache Size |
Specify the size (in bytes) of the authorization cache to be
acquired in the EDMPOOL for the plan. Valid values: 0 to 4096.
|
|
Data Currency |
|
Yes |
Data currency is required for ambiguous cursors.
|
|
No |
Data currency is not required for ambiguous
cursors. |
|
|
Current Server |
Leave this field blank or specify a connection to a location
before the plan runs.
|
|
Message Flag |
Specify which messages display. Valid values: I, W, E,
C, or blank.
|
You can create up to five job cards - named J1 through J5 - with varying
job names, account information, classes, and other attributes. To do so, follow
these steps:
- Access the Job Control Cards screen. To do so, from the APS Options
Menu enter option 6 in the Option field. Alternatively, from any APS screen
enter opt 6 in the Command or Option field. The Job Control Cards screen
displays.
- Modify the cards as desired.
Specify IDMS options as follows:
- Access the IDMS Options screen. To do so, from the APS Options Menu
enter option 7 in the Option field. Alternatively, from any APS screen enter
opt 7 in the Command or Option field. The IDMS Options screen displays.
- Specify IDMS options appropriate for your environment as described
below.
Option
|
Description and Values
|
|
Dictionary Name |
Specify the dictionary name.
|
|
Central Version or Local |
Specify the compile environment. APS generates a SYSTRNL with
a unique DSN whose high level qualifier is your user ID.
|
cv |
Default. Central Version.
|
|
local |
When you specify local, also enter a volume in the IDMS
Local Jrnl Disk Vol field.
|
|
dummy |
When you specify dummy, APS generates a SYSTRNL DD
DUMMY |
|
|
IDMS Local Jrnl Disk Vol |
Local compile disk volume for journal.
|
|
Dictionary Update |
|
Yes |
Log program compile information to the dictionary.
|
|
No |
Default. Do not log program compile information.
|
|
|
IDMS DMLC Output to PDS |
|
Yes |
Write DMLC compile statements to a PDS. If you enter
yes, you must allocate a &DSN..IDMSOUT PDS prior to compilation. |
|
No |
Default. Do not write DMLC compile statements to a
PDS. |
|
|
IDMS Loadlib Qualifier |
Specify full qualifiers for IDMS..LOADLIB.
|
|
IDMS SYSCTL DSN |
Optional. Specify DSN of IDMS dictionary.
|
|
CV Node Name |
Specify name of central version DDS (Distributed Database
System) node under which loadlib program is compiled.
|
|
DMLIST (List Generation) |
|
Yes |
Generate list. |
|
No |
Default. |
|
|
Generate DB-BIND in Pgm |
|
Yes |
Do not suppress the generation of the DB-BIND
macro. |
|
No |
Suppress the generation of the DB-BIND macro. You must
manually code the DB-BIND macro in your program. |
|
|
IDMS Password |
N/A
|
|
IDMS 12.0 SYSIDMS DSN |
Specify the name of the IDMS 12.0 dataset.
|
|
Include IDMSLIB |
Specify the appropriate dataset name for CICS, MVS or other
environments.
|
You can reset the profile variables of a Project and Group to their
original installation values. For information on original installation values,
see the Installation Guide chapter Installing APS for
z/OS.
This option automatically resets all of the following types of profile
variables:
- All APS Profiles Variables
- All APS library prefixes and DSNs
- Generator Options screen options
- IDMS Options screen options
- Job Control Cards screen options
- Precompiler Options screen options
- DB2 Bind options
Reset all of the above options as follows:
- Access the APS Options menu. To do so, from the APS Main Menu enter
option 0 in the Command field. Alternatively, from any APS screen, enter opt in
the Command or Option field. The APS Options menu displays.
- Select option 0. APS immediately resets the options and displays a
message informing you that the profile pool has been reset.
You can generate your entire application all at once or you can generate
selected programs and screens individually. To do so, follow these steps:
- Ensure that your last session ended normally
Ensure
that you exited your previous APS session normally; if you exited abnormally
and then submit a generation job, the job will fail. In this case, exit APS
normally, re-start APS, and resubmit the job.
- Set generation options
Ensure that your generation
options are set appropriately, as described in Setting
Generator Options.
- Display the Application Painter and enter ap in the Type field and
the application name in the Member field.
- Generate application
To generate your entire
application, enter gen in the Command field.
- Generate programs or screens individually
Alternatively, to generate one or more programs or screens individually, enter
g next to those program or screen names, as shown in Generating
Programs and Screens Individually. To generate all screens, enter
generate sc all in the Command field, or enter g next to all screens; to
generate all programs, enter generate pg all in the Command field, or enter g
next to all programs.
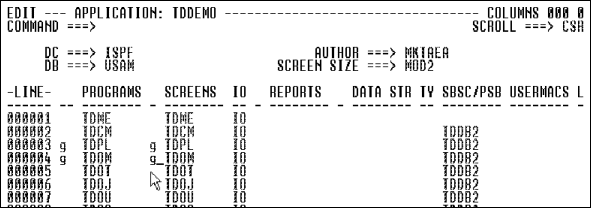
Figure 7-5: Generating Programs
and Screens Individually
- Check job results
Check the result of the jobs in
SDSF by selecting Services Job Queue.
- Override BMS mapset names
In addition to generating
APS screen symbols, APS generates a BMS mapset for each CICS screen, and
assigns a default name to each mapset. To override a BMS mapset name, see
Paint Character Screens.
- Generate
BMS multiple-map mapsets in APS
To generate a BMS multiple-map
mapset that includes some or all screens of your application, do one of the
following:
- To include all screens in a multiple-map mapset, enter gen ms
mapsetname in the Command field. This name overrides each screen's default
mapset name, which is displayed on the Screen Generation Parameters screen. For
more information on default mapset names, see Setting
Parameters for Generation.
- To include selected screens in a multiple-map mapset, use the APS
BMS Multiple-Map Mapset screen to specify the screens and generate the mapset.
To display this screen, select option 4, Utilities from the APS Main Menu, and
then select option 1, Non-Painted APSSRC/GENSRC Compilation. The APS
Precompiler screen displays. On it, select option 3, Generate BMS Multiple-Map
Mapset.
Important: After you generate a multiple-map mapset using APS, you
must compile, link, and generate the BMS source in your CICS environment.
Run
from APS
The APS Prototype Execution facility allows you to execute and test
applications. This facility provides 2 environments (IMS and CICS)in which you
can debug and execute an application and test all data communication and
database functions.
Execute CICS and IMS applications
You can execute CICS and IMS DC applications using the APS Prototype
Execution facility, which emulates the basic functions of the mainframe CICS
and IMS environments. To use this facility, you must specify the DC target ISPF
when you generate your application. Using this facility, you can test all data
communication and database functions and access all database environments
except IMS.
Use the following execution facilities to execute fully functional
applications that access your databases:
Application
|
APS for z/OS Execution Facility
|
|
CICS |
APS Prototype Execution (DC target = ISPF)
|
|
IMS DC |
APS Prototype Execution (DC target = ISPF)
|
|
MVS (batch) |
N/A
|
|
ISPF Dialog |
N/A
|
To execute and test your application using the APS Prototype Execution
Facility, follow these steps:
- From
the APS Main Menu, enter option 3 in the Command field. The APS Prototype
Execution screen displays.
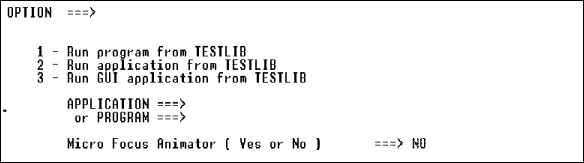
Figure 7-6: APS Prototype Execution
Screen
- Select the appropriate option to display your program or application,
and execute it.
Copyright © 2002 Micro Focus International Limited. All rights reserved.
This document and the proprietary marks and names
used herein are protected by international law.