Figure 4-1: Application Screen with Text and I/O Fields
This chapter contains the following sections:
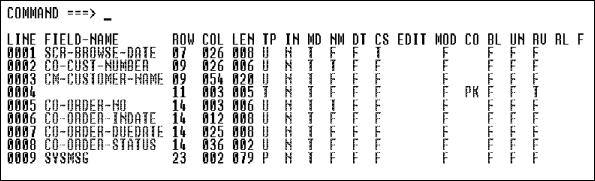
The APS Screen Painter lets you paint character-based screens that are intuitive and easy to use. You first paint text, input/output fields, and then blocks of fields that accept multiple record occurrences. You then specify field names, field attribute and edit criteria, and generation parameters. The APS Generators retrieve this screen information from the Application Dictionary to produce native screen source code.
A character screen consists of fields and blocks of fields that you paint on a blank screen. You paint two types of fields in the APS Screen Painter:
Application Screen with Text and I/O Fields shows a sample application screen with I/O fields and text fields.
Figure 4-1: Application Screen with Text and
I/O Fields
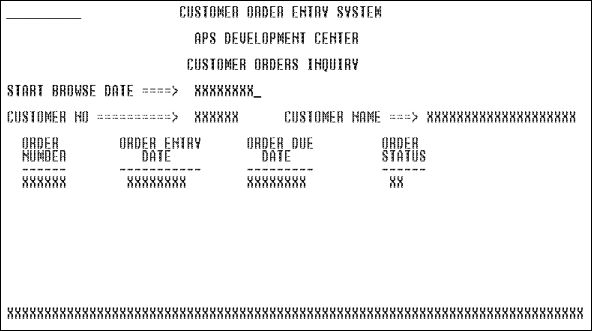
Your screens can also include repeated record blocks that accept or display multiple occurrences of one or more records. With a simple command, you can repeat a block of one or more source row as many times as necessary. A repeated record block generates a table in Working-Storage.
Sample Application Screen with a Repeated Record Block shows a repeated record block created from the row of I/O fields in Application Screen with Text and I/O Fields.
Figure 4-2: Sample Application Screen with a
Repeated Record Block
When you create a record block, you do not need to paint and assign characteristics to each field individually--all fields reflect the characteristics of the source row. For example, changing the length of the Order Number field changes the length of all fields in the column.
The APS Screen Painter provides editing and design options to help you paint the screen. For example, you can specify where the Command field automatically appears on your screen, and can determine whether your text displays in upper case, lower case, or both.
Additionally, the Screen Painter has an extensive help facility that you can access from your screen by pressing PF1.
APS lets you assign field attributes, such as field protection, brightness, cursor positioning, and color, to both I/O and text fields. The APS Screen Painter supports full and extended 3270 attribute capabilities, including:
APS assigns default attribute values to each field for you. Alternatively, you can quickly override the default by entering the values you want, as illustrated in Field Attributes Screen.
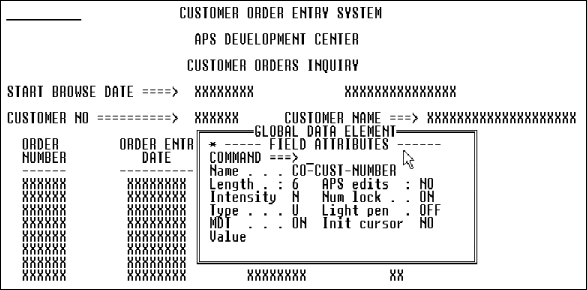
Figure 4-3: Field Attributes Screen
Field edits let you define the display and storage characteristics for I/O fields. Field edits can validate input data and format that data for storage and output. You can assign characteristics, such as an internal picture, output picture, edit mask, or date format. Or, you can test for specific values or a range of values.The internal data representation specifies storage characteristics for data in a field. Input and output data representations let you specify the type of data that users can enter or that a field can display. For example, an input data representation for a field may permit a user to enter numbers from 1 to 1,000; an output data representation may require that data display a dollar sign, decimal point, and two places following the decimal point.
You can also code your own edit routines and apply them to multiple screens across any number of application systems. APS field edits ensure that entries match specified definitions. Some fields, however, require specialized testing. For example, if a field has alternate formats, no single field edit can confirm the validity of all possible entries. In such a case, you can write an application edit that verifies all legal entries. Or, you can select a predefined edit from a centralized application edit listing.
Field Selection Screen for Screen Field Editing shows the available edit categories.
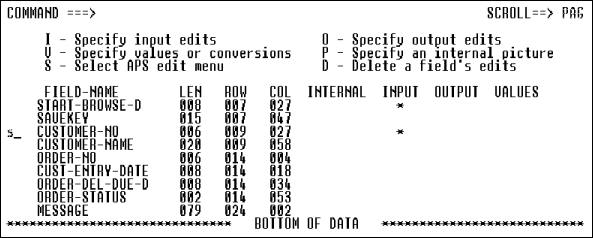
Figure 4-4: Field Selection Screen for Screen
Field Editing
You can select global I/O fields, complete with definitions, attributes, text prompts, and edits, from the APS Data Element Facility. At generation time, APS picks up the definitions in the Data Element Facility.
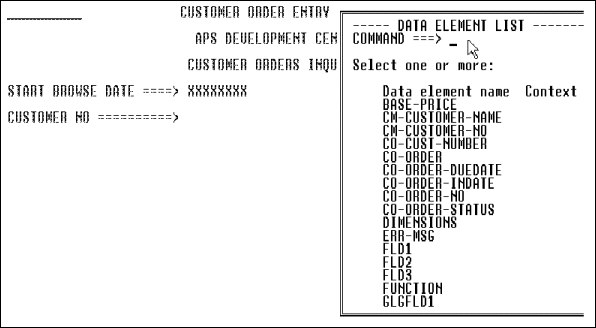
Figure 4-5: Data Element Facility Listing of
I/O Fields
If you modify a global field on your screen, it becomes a local field. APS then stores the field definition as part of your screen member. The local screen field does not change when the original global field in the Data Element Facility changes.
Depending on how your site or project standard implements the Data Element Facility, you can do some or all of the following:
Before you paint your screens, check with your APS Administrator or Project Leader to determine which of these methods you can use to create and modify I/O fields. The procedures in this chapter cover all methods.
After you paint several application screens, you can use the APS Scenario Painter to create and run an application model, with or without data. Your end users can view a typical production sequence of screens, enter data into I/O fields, and pass entries between the screens. You do not need to assign field attributes and edits or generate your screens before running screen flow scenario prototypes.
To create a scenario prototype, you list the screens in your application in the order you want to view them. For example, if you run the scenario in Screen Listing in Scenario Painter, the Customer Order Main Menu displays first, followed by the Customer Record Maintenance screen--just as if an end user requested the screen from the menu. The remaining screens display in sequence and the prototype returns to the menu to exit the application.
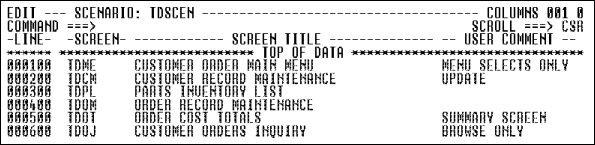
Figure 4-6: Screen Listing in Scenario
Painter
As you run the prototype, you can make changes to correct errors and meet new user requirements by:
During the prototype, you can enter data in screen fields and pass the data to other screens. In Entering Sample Input Data, the prototype displays the second screen of an 11-screen scenario with user-entered data. When you enter data during a prototype session, you can save it, and reuse it to simulate the movement of data. All data you enter automatically becomes available to other screens that contain identically named fields.
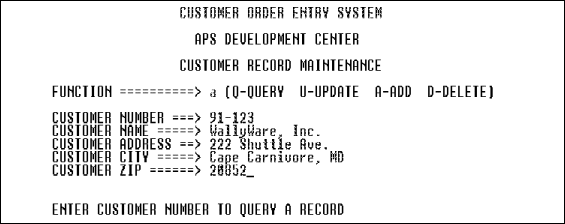
Figure 4-7: Entering Sample Input Data
The APS Screen Generator takes your designs from the APS Screen Painter and generates native map definitions. When you are ready to generate, you specify parameters that tailor your screen for the CICS, DDS, IMS DC, ISPF Dialog, or ISPF prototyping target environment.
For any environment, you can:
For the CICS environment, you can also:
For the IMS environment, you can also:
For the ISPF Dialog environment, you can also:
Paint an application screen following the steps below. After step 1, you can perform some or all of the steps in any order.
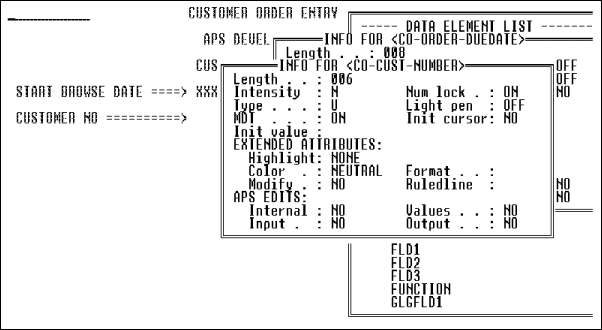
Figure 4-8: Data Element Facility
Information Screen
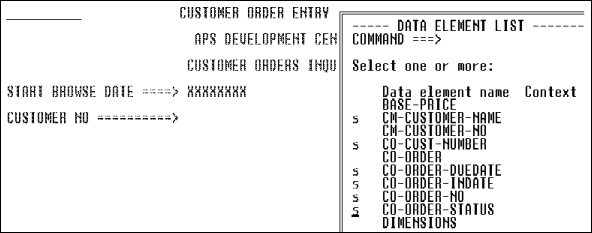
Figure 4-9: Selecting Fields from the Data
Element List
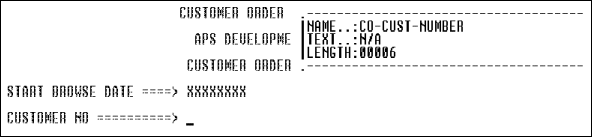
Figure 4-10: Field Selected from the Data
Element List
|
PF3 |
Cancel any selected fields not yet placed on the screen. |
|
PF5 |
Display first field. |
|
PF6 |
Display last field. |
|
PF7 |
Display previous field. |
|
PF8 |
Display next field. |
|
PF10 |
Move information screen counter-clockwise. |
|
PF11 |
Move information screen clockwise. |
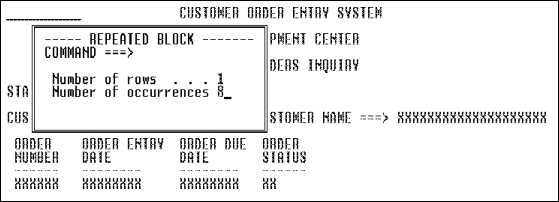
Figure 4-11: Creating a Repeated
Record Block
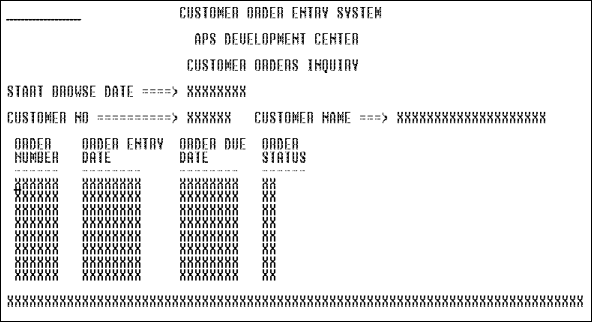
Figure 4-12: Repeated Record
Block
Field Attributes Screen - Single Field Display illustrates the Field Attributes screen for a single field.
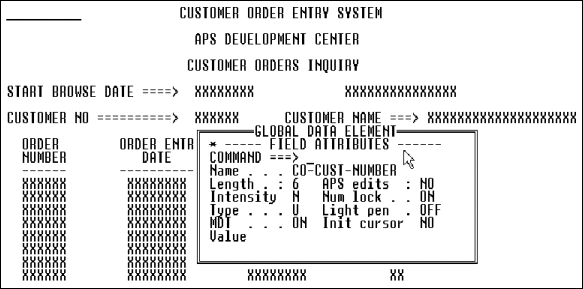
Figure 4-13: Field Attributes
Screen--Single Field Display
| Attribute |
Description and Values |
||||||||||||||
|---|---|---|---|---|---|---|---|---|---|---|---|---|---|---|---|
|
Name |
I/O field name; maximum 16 characters. Text fields do not have names because programs do not reference them. Hints:
|
||||||||||||||
|
Length |
Display field only; to change field length, move the cursor to the Xs designating the field and type in your changes. You can space over or delete the Xs representing the field, or extend the field with more Xs. |
||||||||||||||
|
|||||||||||||||
|
Type |
|
||||||||||||||
|
MDT |
Applies to IMS and CICS only. The modified data tag tells the terminal when to return field data. When this tag is True (T) for a field, the terminal always sends back data; when False (F), the terminal returns data only if the data changes.
Note: Set all fields to True when using Field Edits. |
||||||||||||||
|
Value |
Initial value for screen field; maximum is field length or 27 characters, whichever is less. |
||||||||||||||
|
APS edits |
Display field indicating if any field edits were assigned to the screen field. |
||||||||||||||
|
|||||||||||||||
|
|||||||||||||||
|
Init cursor |
|
||||||||||||||
|
|||||||||||||||
|
Highlight |
These are mutually exclusive fields that specify the intended attributes for highlighting a field:
Valid values are:
Because the fields are mutually exclusive, you can set only one field to True. The other two fields must be set to False. |
||||||||||||||
|
Modify |
|
||||||||||||||
|
Format |
For KANJI use only. Format field characters for a double-byte character set (DBCS) terminal as follows:
|
||||||||||||||
|
Ruledline |
For KANJI use only. Place lines around the field on a DBCS terminal, as follows:
|
Note: For more information on field attributes, see the "Attributes, Screen Fields" topic in the APS Reference.
See Painting Field Edits for information.
| Command |
Description |
|---|---|
|
bottom |
Move Command field to the bottom left corner of the screen. |
|
caps off |
Restore text to upper/lower case as entered. |
|
caps on |
Convert text to upper case. |
|
keys off |
Do not display APS-assigned PF key definitions. |
|
keys on |
Display APS-assigned PF key definitions at the bottom of the screen. |
|
nulls off |
Fill rows with spaces. |
|
nulls on |
Clear rows so you can insert data. |
|
top |
Move the Command field to the top left corner of the screen. |
The Screen Generator generates two ampersands for every one you paint. Once the screen is online, ISPF deletes the extra ampersands.
Assign screen field edits following the steps below:
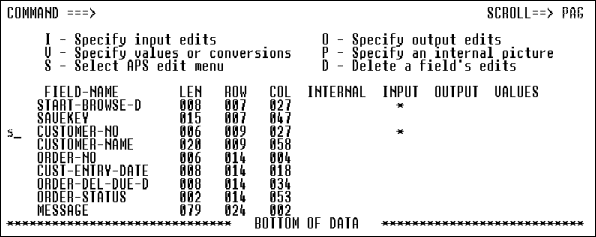
Figure 4-15: Field Selection Screen
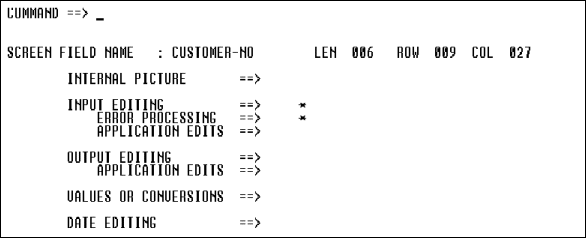
Figure 4-16: Edit Selection Screen
From either screen you can select several fields at one time; they process one after another. When the applicable screen displays, enter values as appropriate; to do so, refer to the topic listed for the category. Select an option as follows:
| Option |
Description |
|---|---|
|
Edit Selection |
Display the Edit Selection screen to see a summary of edits for that field and transfer to other edit specification screens. This is available only from the Field Selection screen. |
|
Internal Picture |
Display the Internal Picture screen to specify the internal storage format. See "Related Topics" below later for further information. |
|
Input Editing |
Display the Character Input or Numeric Input screen, depending on whether the internal picture specification is character or numeric. The internal picture default type is character. Assign input field edits on these screens. See "Related Topics" below for further information. |
|
Error Processing |
Display the Error Processing screen to specify error messages and attributes to display when the data for the field fails input edits. See "Related Topics" below for further information. |
|
Application Edits |
Display the Application Editing screen to create your own edit routine to process input data. See the "Application Field Edit Routines" topic in the APS Reference. |
|
Output Editing |
Display the Character Input or Numeric Input screen, depending on whether the internal picture specification is character or numeric. The internal picture default type is character. Assign output field edits on these screens. See the "Field Edits" topic in the APS Reference for more information. |
|
Application Edits |
Display the Application Editing screen to create your own edit routine to process output data. See the "Application Field Edit Routines" topic in the APS Reference for more information. |
|
Values Or Conversions |
Display the Values or Conversion screen to specify a valid value or range of values for input data, or conversion values for either input or output data. See the "Values, Conversion Values, and Value Ranges" topic in the APS Reference for more information. |
|
Special Edits |
Display the Special Edits screen to assign date or time specifications. This option is available only from the Edit Selection window. See the "Date and Time Field Edits" topic in the APS Reference for more information. |
|
Input and output editing |
Display the Character Input or Numeric Input screen, based on the internal picture specification, followed by the Character Output or Numeric Output screen. To do this, enter io next to a field on the Field Selection screen. See the "Field Edits" topic in the APS Reference for more information. |
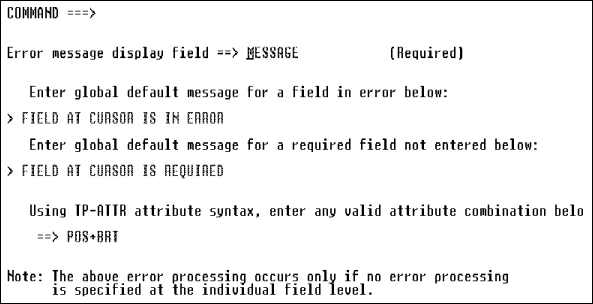
Figure 4-17: Parm Screen
You can enter a field-specific error message by selecting the Error Processing prompt on most field edit screens; see the "Error Processing Messages" topic in the APS Reference for information. These messages override the global screen messages assigned in this step.
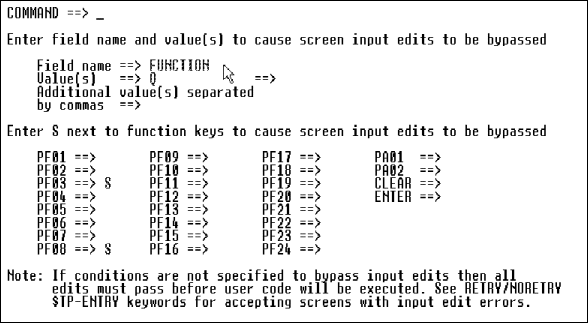
Figure 4-18: Second Parm Screen
|
Field Name |
Specify any field on the screen, including a field in a repeated block, to bypass. |
|
Value(s) |
Specify the value or values that let end users bypass input edits. Valid COBOL reserved words are spaces, low-values, and high-values. |
|
Additional Value(s) |
Enter as many additional bypass values that can fit on the line; separate each value with a comma. |
|
Program Function Keys |
Type s in the selection field to indicate which PF keys the end user can press to bypass the input edits. |
Before you generate your screens, you can review their design and flow with the end user in the APS Scenario Painter. Define a sequence of screens, called a scenario, enter data in those screens, and display the screens to the end user following the steps below. After step 1, you can perform most of the steps in any order.
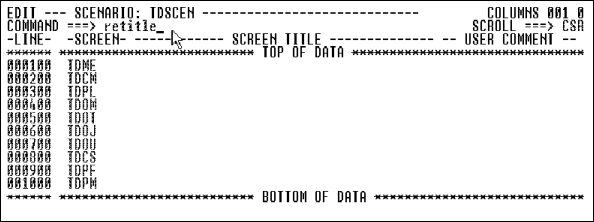
Figure 4-19: Initial Application
Prototype Definition
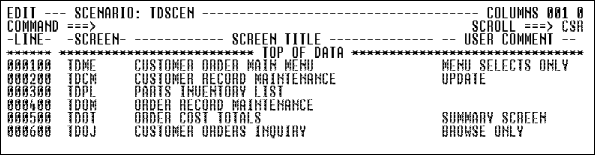
Figure 4-20: Scenario Prototype
Definition
The first screen in the scenario definition displays.
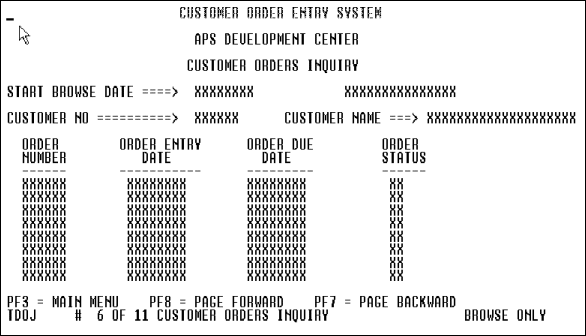
Figure 4-21: Prototype
Information
In Prototype Information, the information line states:
|
TDOJ |
Screen name assigned in Application Painter |
|
6 |
Sequence number of screen in scenario from prototype definition |
|
11 |
Total screens in scenario from prototype definition |
|
CUSTOMER ORDERS INQUIRY |
Screen title painted in Screen Painter |
|
BROWSE ONLY |
User comment entered in Scenario Painter |
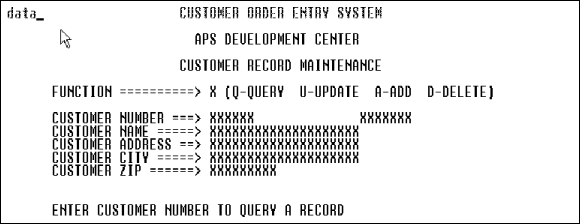
Figure 4-22: Entering the Data
Command
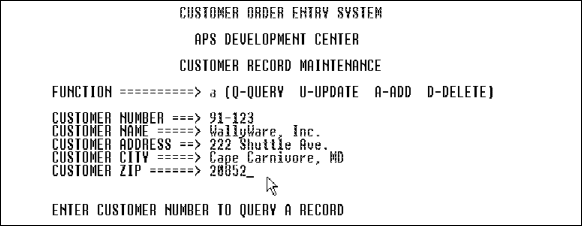
Figure 4-23: Sample Input Data
This data automatically appears in other screens that contain identically named fields.
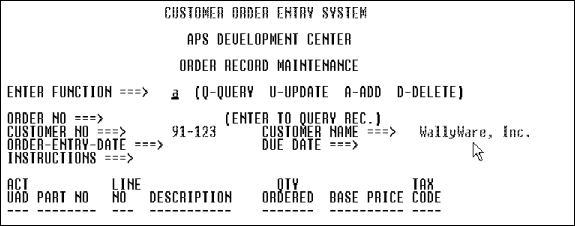
Figure 4-24: Passing Data in the
Prototype
|
Command |
Description |
|---|---|
|
data |
The previous two steps and Entering the Data Command, Sample Input Data, and Passing Data in the Prototype illustrate this option. This option erases the Xs designating I/O fields and activates each field according to attributes assigned in the Screen Painter. You can now enter data in any field; this data automatically displays in identically named fields on other screens. |
|
dataoff |
Turn off data simulation and display the screen in its painted format. |
|
read |
Display the data saved by the most recently executed SAVE command and execute the DATA command. You can now enter or modify data in any field. |
|
save |
Store the current data entered in this scenario for use in future prototyping sessions. |
| Command |
Description |
|---|---|
|
start, first |
Display the first screen in the prototype. When you press Enter, the second screen displays, and so on. |
|
last |
Display the last screen in the prototype. |
|
end, can, quit |
Terminate the prototype and return to the invoking screen. |
|
number |
Display the screen in the position specified in the prototype definition. |
|
+increment |
Display the screen before (+) or after (-) the current screen, according to the prototype definition. |
|
screenname |
Display the first occurrence of the specified screen in the prototype definition. |
|
+screenname |
Display the first occurrence of the screen specified after (+) or before (-) the current screen. |
Once you create a screen, you can easily change its layout. To do so, follow the procedures below.
Delete screen fields and rows as follows:
Modify a repeated record block by following these steps:
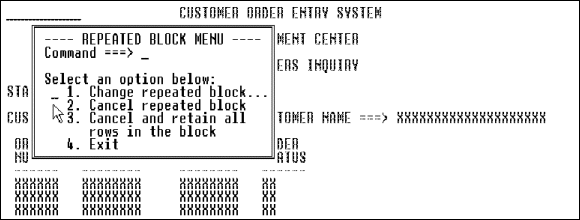
Figure 4-25: Menu for Modifying a
Repeated Block
| Option |
Select … |
To
… |
|---|---|---|
|
1 |
Change repeated block |
Display the Repeated Block pop-up to change the number of rows or occurrences in the record block. |
|
2 |
Cancel repeated block |
Eliminate the record block and its repeated rows. The original source fields remain. |
|
3 |
Cancel and retain all rows in the block |
Eliminate the record block, but retain every source field. The Screen Painter gives each field a unique name, and thereafter treats each as a separate entity. |
|
4 |
Exit |
Exit the screen without changing the record block. This option is the same as pressing PF3. |
You can move, and if your site standard allows, copy I/O fields, text fields, or entire rows, including those from repeated blocks, to any location on the screen where there is sufficient space. To do so:
Press PF10. Move the cursor to the opposite side of the group and press PF10 again.
If you add, delete, or modify several fields in the same row at the same time, the APS Screen Painter may prompt you to identify the names of some of the fields resulting from your changes. The Screen Field Name Selection screen displays; the asterisk points to the field in question.
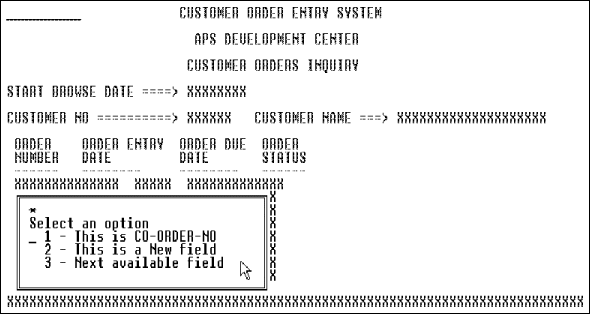
Figure 4-26: Screen Field Name Selection
Screen
From this screen, select one of the following options by entering its number in the column preceding the first option listed.
|
Select … |
To
… |
|---|---|
|
1 |
Assign the displayed value to the field. In fieldname, the Screen Painter displays an existing field name that cannot be assigned with certainty to a screen field. |
|
2 |
Let the APS Screen Painter assign a default name to the field. The default name reflects the row and relative position of the field in that row: for example, A-ROW003-FLD002. |
|
3 |
Default. If more than one existing field name cannot be assigned with certainty to a screen field, you can cycle through those field names by selecting option 3. |
When you are satisfied with your screen designs, you can define the parameters that the APS Screen Generator uses to generate the screens for your data communications (DC) target environment. To do so, follow the steps below. After step 1, you can perform most of the steps in any order.
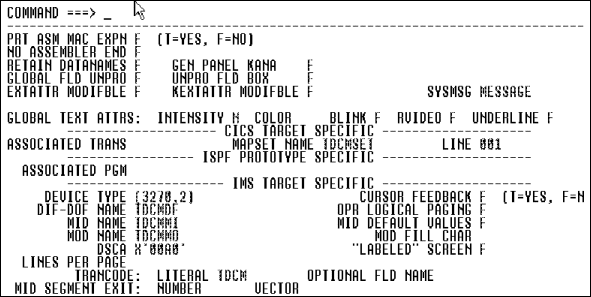
Figure 4-27: Screen Generation
Parameters Screen
| Parameter |
Description and Values |
||||||||||||||
|---|---|---|---|---|---|---|---|---|---|---|---|---|---|---|---|
|
Prt Asm Mac Expn |
|
||||||||||||||
|
No Assembler END |
|
||||||||||||||
|
Retain Datanames |
|
||||||||||||||
|
Exattr Modifble |
Anything specified in this field has no effect during prototyping. |
||||||||||||||
|
|||||||||||||||
|
Intensity |
Change the intensity of all text fields.
|
||||||||||||||
|
Color |
Change the color of all text fields.
|
||||||||||||||
|
Blink |
Set only one field to T(rue) for text fields. Blinking, reverse video, and underline are mutually exclusive. |
| Parameter |
Description and Values |
|---|---|
|
Associated Trans |
Specify an associated transaction ID; default is the first four characters of the screen. If more than one screen begins with the same four characters, you need to define a unique transid. |
|
Mapset Name |
Override an APS-generated mapset name; maximum seven characters. The default mapset name reflects the number of characters in the screen name, as follows: 4-character name: screennameSET |
|
Line |
Starting line of the map on the physical screen; default is 001; value cannot exceed the screen depth. |
| Parameter |
Description and Values |
||||
|---|---|---|---|---|---|
|
Global Fld Unpro |
|
||||
|
Associated Pgm |
Name of the program receiving control from the screen; default program name is screenname. |
| Parameter |
Description and Values |
||||
|---|---|---|---|---|---|
|
Device Type |
Standard device characters for different model terminals and printers. Defaults are IBM-recommended device characters. See your IBM MFS or IMS installation manual for further details. |
||||
|
Cursor Feedback |
Cursor feedback fields do not affect output cursor positioning. |
||||
|
DIF-DOF Name |
Override APS-generated name. Default reflects the number of characters in the screen name, as follows: 4-character name: screennameDF |
||||
|
Opr Logical Paging |
|
||||
|
MID Name |
Override APS-generated name. Default reflects the number of characters in the screen name, as follows: 4-character name: screennameMI |
||||
|
MID Default Values |
|
||||
|
MOD Name |
Override APS-generated name. Default reflects the number of characters in the screen name, as follows: 4-character name: screennameMO |
||||
|
MOD Fill Char |
Generate fill characters in the MOD seqment statement. Valid characters are: --, NULL, PT, C, or 'x', where x is any character value. |
||||
|
DSCA |
Override the Default System Control Area default value of X'00A0'. |
||||
|
"Labeled" Screen |
|
||||
|
Lines Per Page |
If device type is a printer, specify number of lines to print on a page. |
||||
|
Trancode: Literal |
Specify any literal value as the trancode. Default is the screen name. |
||||
|
Optional Fld Name |
Specify fieldname or MFS PFKEY to hold the trancode or operator logical paging command. Alternatively, enter *PF and assign the PF key value on the MFS Function Keys screen, or *TC and construct a trancode on the Trancode Construction screen. |
||||
|
MID Segment Exit:
|
Generate the EXIT parameter on the MID segment statement with Number as the exit routine number and Vector as the exit vector number. Valid values are: Number: 0 to 127 Vector: 0 to 255 |
Note: To learn how to generate an entire application, see Generate the Application.
The BMS Mapset Importer creates a screen member from an existing BMS screen description and stores it in APSSCRN.
To access the BMS Mapset Importer, follow these steps:

Figure 4-28: BMS Importer Screen
Copyright © 2002 Micro Focus International Limited. All rights reserved.
This document and the proprietary marks and names
used herein are protected by international law.