Solution Installation and Configuration
This section contains information on installing and configuring the ArcSight User Behavior Monitoring (UBM) solution and contains the following topics:
Prepare Your Environment
Before installing, prepare your environment for the UBM solution:
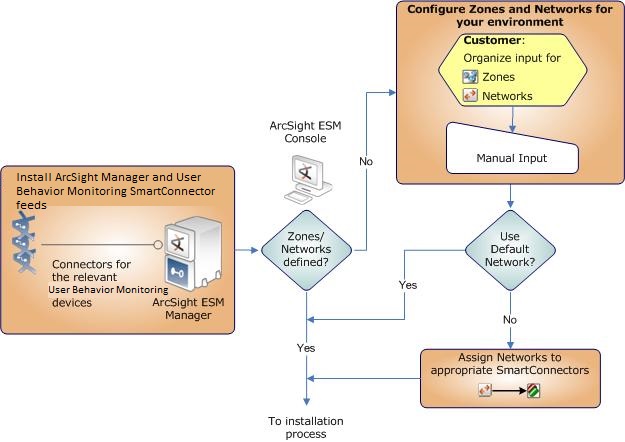
- Install and configure the appropriate SmartConnectors for the devices found in your organization.
- Model your network to include UBM devices. Verify that zones and networks are defined for your organization and that networks are assigned to the connectors reporting events relative to UBM into ESM. Learn more about the ArcSight network modeling process in the ESM 101 Guide. Find instructions for how to configure zones and networks in the ArcSight Console User’s Guide.
Configure Device Feeds, Zones, and Networks
Verify Your Environment
Before installing UBM, verify your ArcSight installation. The ArcSight User Behavior Monitoring 24.2 Release Notes indicate the supported versions of ArcSight ESM.
Verify that your system has the ESM Console connected to a supported ESM Manager and meets the prerequisite requirements for your operating system as detailed in the Installation and Configuration Guide for the ArcSight product.
Verify Your License
Verify that your ESM Manager is licensed for UBM. The UBM license enables the Actors feature of ESM:
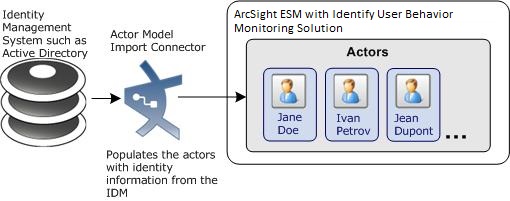
Actors—The UBM solution uses the identity data stored in actors. The Actor Model Import connector populates the identity information stored in Actors on the ESM Manager. The number of Actors licensed should be equal to or greater than the number of identities imported from your Identity Management System.
For more information about licensing, see the ArcSight Console User’s Guide.
Configure ArcSight ESM for a Large Number of Actors
For ArcSight ESM 7.6.5 and later, using certain Actor Model Import Connectors, UBM supports up to 500,000 actors per ESM Manager, with an average of 10 roles and 10 accounts for each actor. For information about which Actor Model Import Connectors support 500,000 actors, see the ArcSight User Behavior Monitoring Release Notes.
For organizations that have more than 300,000 actors, an ArcSight Professional Services engagement is required to assist with hardware sizing.
The following configuration is required for environments with more than 50,000 actors.
- SSH to the ESM Manager as the arcsight user.
- Stop the ESM Manager by running the following command in the /sbin directory:
/sbin/service arcsight_services stop manager
You can check the service status by running the following command:
/sbin/service arcsight_services status all
- Increase the maximum capacity for session lists by adding the following lines to the server.properties file in /opt/arcsight/manager/config:
sessionlist.max_capacity=5000000
resource.broker.cache.size.Actor=500000
persist.file.size.archive.size.max=307200
search.index.level.Actor=0
Note that sessionlist.max_capacity is set to five million, and resource.broker.cache.size.Actor is set to five hundred thousand.
- Increase the memory for ESM Manager by modifying the following lines in the server.wrapper.conf file located in /opt/arcsight/manager/config, as shown below:
wrapper.java.initmemory=32768
wrapper.java.maxmemory=32768
ArcSight recommends a minimum value of 32768 MB (32 GB) to support 500,000 actors.
The initmemory and maxmemory values must be a multiple of 1024.
- Increase the memory for the resvalidate command by editing the resvalidate.sh file in /opt/arcsight/manager/bin/scripts and change this:
ARCSIGHT_JVM_OPTIONS="-Xms2048m -Xmx4096m -XX:+HeapDumpOnOutOfMemoryError"
to this:
ARCSIGHT_JVM_OPTIONS="-Xms8192m -Xmx16384m -XX:+HeapDumpOnOutOfMemoryError"
- Increase the memory for indexing by editing the searchindex.sh file located in /opt/arcsight/manager/bin/scripts, and update the line highlighted below with the values shown:
# Running on Linux.
IS_64BIT_JRE=`$JAVA_HOME/bin/java -version 2>&1 | grep "64-Bit"`
if [ "$IS_64BIT_JRE" = "" ]; then
ARCSIGHT_JVM_OPTIONS="-Xms128m -Xmx1024m"
export ARCSIGHT_JVM_OPTIONS
else
ARCSIGHT_JVM_OPTIONS="-Xms1024m -Xmx8192m" <======
export ARCSIGHT_JVM_OPTIONS
fi
;;
- To ensure that MySQL shuts down gracefully in , edit the mysql_ctl file in /opt/arcsight/logger/current/arcsight/service and change this line:
STOPCMD="kill -9"
to this:
STOPCMD="kill "
Include the space after kill.
- Increase the maximum capacity for session lists. Run the following command in the /opt/arcsight/logger/current/arcsight/bin directory:
./mysql -u <username> -p<password>
<username> and <password> are the database user name and password, as set when you configured the database, typically by using the First Boot Wizard.
Per MySQL conventions, omit the space between -p and the password, as shown in the following example:
./mysql -u arcsight -parcsight
In the resulting MySQL prompt, enter the following MySQL instructions:
use <ESM database name>;
update arc_session_list set in_memory_capacity=5000000 where resource_based_type=56;
commit;
quit;
Note that in_memory_capacity is set to 5,000,000.
- Restart the ESM Manager for the new settings to take effect, by running the following command in the /sbin directory:
/sbin/service arcsight_services start manager
Install and Configure the Actor Model Import Connectors
Install and configure a supported version of the Active Directory Actor Model Import Connector, as described below.
- Locate the installation file(s) for the Actor Model Import connector and the Actor Model Import Connector Configuration Guide downloaded from the support site.
- Follow the instructions in the Configuration Guide to install and configure Actor Model Import connector. Note that there are configuration steps prior to connector installation as well as after connector installation.
-System that hosts the Actor Model Import connector
-System that hosts the ESM Manager
-System that hosts the Domain Controller
If you are unable to synchronize using an NTP source, make sure the system time of the machine hosting theESM Manager is ahead of the system time for the machine hosting the Actor Model Import connector.
- Follow the instructions in the Configuration Guide to populate the actors in ESM from the Identity Management System.
- You can verify that the actors were imported into ESM Manager:
- From the ESM Console, go to the Navigator panel and go to Actors.
- Verify that actors are listed in the /Actors/Shared/All Actors group.
Configure Event Connectors to Return Uppercase User Names
Configure all the event (device) connectors that supply UBM-relevant events to return the user names in uppercase. When the Actor Model Import connector(s) populate the user names in actors, it converts all the account user names to uppercase. In order for the account user names in the events to match the account user names stored in the actors, you must configure the connector to return the user name in uppercase.
To configure an event connector to supply user names in uppercase:
- In the Navigator panel, go to Connectors.
- Right-click a Connector and select Configure.
- In the Inspect/Edit panel, select the Default tab.
- In the Processing panel for the Uppercase User Names field, select the Enabled (orig to ID) option.
- Repeat this procedure for all event connectors.
Install the UBM Solution
Follow the procedure below to install the UBM solution.
To install the UBM Solution package:
- Download the following package to the machine where you plan to run the ArcSight Console:
ArcSight-SolutionPackage-UBM.<nnnn>.0.arb
Where <nnnn> is the four character build number specified in the ArcSight User Behavior Monitoring 24.2 Release Notes.
- Log into the ESM Console with an account that has administrative privileges.
- Click the Packages tab in the Navigator panel.
- Click Import (
 ).
). - In the Open dialog, browse and select the package file and select Open.
The progress of the import of the package is displayed in the Progress tab of the Importing Packages dialog.
When the import is complete, the Results tab of the Importing Packages dialog is displayed as well as the Packages for Installation dialog.
- Leave the UBM 24.2 checkbox selected.
- In the Packages for Installation dialog, click Next.
The progress of the install is displayed in the Progress tab of the Installing Packages dialog. When the install is complete, the Results tab of the Installing Packages dialog displays the Summary Report.
- In the Installing Packages dialog, click OK.
- In the Importing Packages dialog, click OK.
- To verify that the installation was successful and the content is accessible in the Navigator panel, expand the ArcSight Solutions/UBM package resource.
- Optional—After you import actors with the Active Directory Actor Model Import SmartConnector, verify that the actors are populated by viewing the actors in the Actor Changes dashboard:
- In the Navigator panel Resources tab, select Dashboards from the drop-down menu.
- Navigate to ArcSight Solutions/UBM/Actor Management/.
- Right-click Actor Changes and select Show Dashboard.
Installation Troubleshooting
If the installation was not successful, contact ArcSight technical support for assistance.
Assign User Permissions
By default, users in the Default user group can view UBM content, and users in the ArcSight Administrators and Analyzer Administrators user groups have read and write access to the UBM solution content. Depending on how you have set up user access controls within your organization, you might need to adjust those controls to make sure the new content is accessible to the right users in your organization.
The following process assumes that you have user groups set up and users assigned to them.
In the following procedure, assign user permissions to all the following resource types:
- Active channels
- Active lists
- Cases
- Category Models
- Dashboards
- Data monitors
- Global variables
- Field Sets
- Filters
- Integration Commands
- Integration Configurations
- Integration Targets
- Patterns
- Profiles
- Queries
- Query Viewers
- Session Lists
- Snapshots
- Trends
- Reports
- Rules
- Session Lists
- Use Cases
To assign user permissions:
- Log into the ESM Console with an account that has administrative privileges.
- For all the resource types listed above, change the user permissions:
- In the Navigator panel, go to the resource type and navigate to ArcSight Solutions/UBM.
- Right-click the UBM group and select Edit Access Control to open the ACL editor in the Inspect/Edit panel.
- In the ACL editor in the Inspect/Edit panel, select which user groups you want to have which permissions to the UBM active channels and click OK.
Configure UBM Solution
Several of the UBM solution resources should be configured with values specific to your organization. This section describes these configuration processes.
Depending on the features you want to implement and how your network is set up, some configuration is required and some are optional. The list below shows all the configuration tasks involved with the UBM solution and where to find instructions for performing the configuration.
This section contains the instructions required to enable content for the UBM solution and contains the following topics:
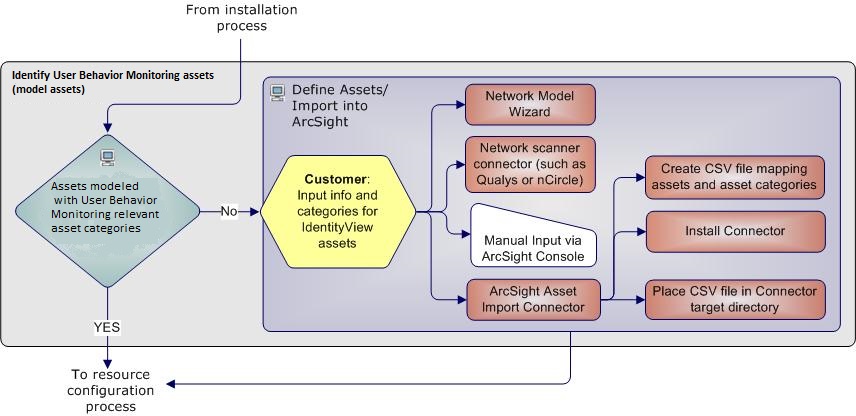
The configuration processes outlined in this section (shown in the figure below) apply to resources that feed multiple UBM use cases.

Model Assets (Assign Asset Categories)
Asset modeling is essential to activate UBM solution content. Classifying assets in one or more of the UBM asset categories adds valuable business context to the events evaluated by the UBM solution.
Model Assets
The most important systems in the network should be classified with the Network Domain asset categories.
This taxonomy is extensible, so you can add your own asset categories within these UBM groups. If you create your own groups, or modify the name of an existing group, you might have to modify some UBM content to make use of them.
How to Assign Asset Categories
The UBM asset categories can be assigned using one the methods described here:
One by One Using the Console UI
Use this method if you have only a few assets to categorize. One asset can be categorized in more than one UBM asset category.
To categorize your assets one-by-one:
- In the Navigator panel, go to Assets, select the Assets tab.
- Expand the groups listed in the Asset tab.
- For each asset you wish to classify with a UBM asset category, repeat the following steps:
- Right-click the asset you wish to categorize and select Edit Asset.
- In the Inspect/Edit panel, click the Categories tab. Click the add icon (
 ) at the top of the screen to select new resources.
 - In the Asset Categories Selector pop-up window, navigate to the appropriate network domain category and click OK.
Once you have assigned your assets to the UBM asset categories, you can also assign them to other asset categories, either within the solution package or the general ArcSight categories, or those you have created yourself.
ArcSight Asset Import Connector
If you have many assets that you want to track, you can configure them in a batch using the ArcSight Asset Import Connector. This connector can also create new assets as part of the batch function.
The ArcSight Asset Import Connector is available as part of the SmartConnector download. For instructions about how to use this connector to configure your assets for UBM solution, see the ArcSight Asset Import Connector.
The Network Model Wizard is provided on the ESM Console (menu option Tools | Network Model). The Network Model Wizard provides the ability to quickly populate the ESM network model by batch loading asset and zone information from Comma Separated Files (CSV) files. For more information, see the ArcSight Console User’s Guide.
Deploy the UBM Rules
In order for the UBM solution to process UBM events, the UBM rules must be deployed to the Real-time Rules group.
To deploy the UBM rules:
- From the Resources tab in the Navigator panel, go to Rules and navigate to the ArcSight Solutions/UBM group.
- Right-click the UBM group and select Deploy Real-time Rule(s).
A new Real-time Rules/ArcSight Solutions/UBMgroup is created that is a link to the original ArcSight Solutions/UBM group.
For more information, see the ArcSight Console User’s Guide.
- As part of the use case configuration, enable only the rules for the use cases you want to implement. By default, the UBM solution rules are disabled. The UBM solution rules do not trigger until they are deployed and enabled. For detailed instructions on enabling and configuring the use case rules, see the Configure Resources section of each use case in ArcSight User Behavior Monitoring Use Cases.
Populate Account Authenticators List
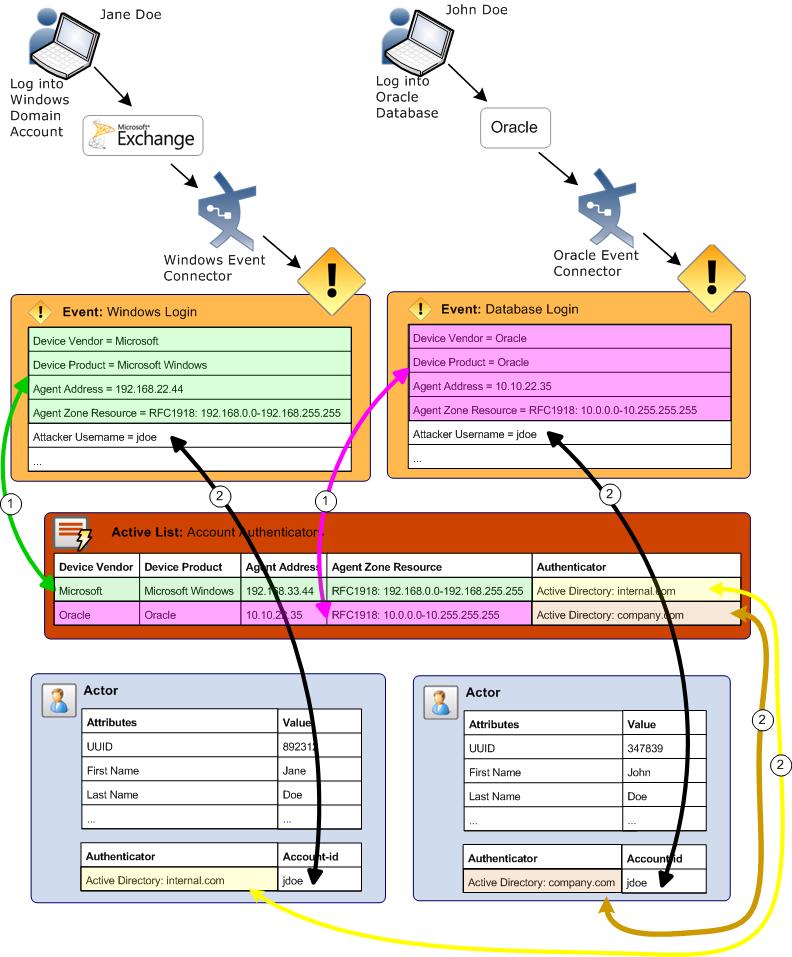
Populate the Account Authenticators List active list in ESM with the list of account authenticators used in your organization. The Account Authenticators List active list is used to uniquely qualify account IDs imported from multiple authentication systems and seen in events. This list provides a way to correlate an account ID to the correct actor as shown the figure below. For example, the Windows connector collects events from an application that uses the Authenticator called Active Directory: internal.com, while the Oracle connector collects events from an application that uses the Authenticator called Active Directory: company.com. The active list tells the UBM solution which authenticator to use to look up an actor based on which event connector is reporting the event.
The following steps show how an event generated from activity from a jdoe account is correlated to the correct actor even though two jdoe accounts generate events in the environment. As shown in , Jane Doe logs into a Window Domain using the account jdoe and John Doe logs into an Oracle database using the account jdoe. (The steps listed below correspond to numbered circles in the diagram.)
- The Windows Login event is correlated to the appropriate authenticator by matching the attributes of the event (shown highlighted in green) to the appropriate entry in the Account Authenticator List active list. In addition, the Database Login event is correlated to the appropriate authenticator by matching the attributes of the event (shown highlighted in pink) to the appropriate entry in the Account Authenticator List active list.
- Using the user name specified in the event and the appropriate authenticator identified by matching attributes, the UBM solution determines the correct actor associated with each event.
Correlating Account IDs to Actors
Detailed instructions for populating this list manually are provided in the ArcSight Console User’s Guide. The UBM solution also provides the rule to help you populate the ArcSight System/Actor Data Support/Account Authenticators active list with the account authenticators for each device as described in the following procedure.
To use the Populate Authenticators rule to populate the Account Authenticators active list:
- Find the exact string that identifies the authenticator used by the most connectors in your organization:
- In the Navigator panel, go to Dashboards.
- Navigate to ArcSight Solutions/UBM/Actor Management/Actor Overview.
- Right-click the Actor Overview dashboard and select the Show Dashboard option. Make a note of the exact value of the Authenticator string including any punctuation, spaces, and capitalization, for example: Active Directory: <domain>.com.
- In the Navigator panel, go to Rules.
- Navigate to ArcSight Solutions/UBM/BookKeeping.
- Right-click the Populate Authenticators List rule and select the Edit Rule option.
- Select the Local Variables tab.
- Double click the Expression field of the setDefaultAuthenticator row.
- In the String field of the Arguments sub-panel, replace set-actor-authenticator-here string with the authenticator string you noted in and click OK.
- Click OK.
- In the Navigator panel, right-click the rule and select the Enable Rule option.
The rule looks for events generated from all devices for the specified authenticator and adds entries into the Account Authenticators active list for each device generating events. Each entry created specifies the default authenticator you specified in Step 7.
- Wait until the ESM Manager receives events from every device for the specified authenticator in your environment.
- If your organization has more than one authenticator, edit the ArcSight System/Actor Data Support/Account Authenticators active list and for each of the devices that use a different authenticator, edit each entry and change the value of the Authenticator field to the correct value.
- After populating the Account Authenticator List active list, disable the rule. The rule is resource intensive because it compares every event to entries in an active list.
Configure Common Filters
Configure the following common filters stored in the My Filters group to reflect your organization.
Defines the time period which is considered to be after business hours. The default after hours time period is set to 8:00 p.m. to 6:00 a.m. on weekdays, and all day Saturday and Sunday.
The filter uses two local variables:
- DayOfWeek
- HourOfDay
You can change this filter to match what is considered to be after-hours for your organization.
The HourOfDay variable returns a numerical value for the current hour in 24-hour format ranging from 12 AM = 0 to 11 PM = 23.
Attacker/Target Username is a System Account Filters
Selects events in which the attacker or target username are system accounts. These filters are designed to return events which can only be attributed to system or default accounts such as SYSTEM, ANONYMOUSLOGON, NETWORK SERVICE, NT AUTHORITY, -, or containing the character:$. Configure this filter with additional system accounts for your organization, by adding additional conditions.
Defines the names of confidential documents. Edit the filter and add the file names of confidential documents.
Ddefines the names of suspicious documents. Edit the filter and add the file names of suspicious documents.
Customize the following filters to reflect the values used in your organization.
Employee Type - Contractor Filter
Selects events that are attributable to contract employees. Edit the filter and specify the value(s) used to denote contractors in your organization.
Employee Type - Full Time Filter
Selects events that are attributable to full time employees. Edit the filter and specify the value(s) used to denote full time employees in your organization.
Employee Type - Part Time Filter
Selects events that are attributable to part time employees. Edit the filter and specify the value(s) used to denote part time employees in your organization.
Selects events attributable to actors having an administrative role such as administrator or dba. Configure this filter with any additional administrator roles used in your organization.
Selects events in which the actor associated with the attacker or target user name has been deleted. Edit the filter and specify the value used to denote deleted identities in your organization.
Selects events in which the actor associated with the attacker or target user name has been disabled. Edit the filter and specify the value used to denote disabled identities in your organization.
Run Integration Commands
The UBM solution provides integration commands that are invoked from the ESM Console and run on external web applications, ArcSight Logger appliances, and NSP appliances.
When a UBM solution integration command is run against an event, it derives identity data from the event, processes that data with a global variable, and passes the result into an external web application, Logger appliance, or NSP appliance.
The following behavior regarding events cannot be attributed to an actor:
- When a UBM Logger integration command is run against an event and the event cannot be attributed to an actor, the search criteria is empty and Logger returns all events.
- When a UBM NSP integration command is run against an event and the event cannot be attributed to an actor, the search criteria is empty and NSP appliance does not return any users.
The integration commands provided with the UBM solution only support investigating events listed in an active channel.
To run a UBM solution integration command:
- In the Navigator panel, go to Lists and browse for an active channel that is receiving events.
- Right-click an event in the active channel and select the Integration Commands | UBM <Type> where <Type> equals User Lookup, TRM, or Logger.
- In the dialog, select the appropriate command, the target, and click OK. If values are not specified for all the parameter, the Parameters dialog displays.
- Enter values for the input parameters.
Note: If you see a parameter name with underscores and a number such as AttributableActor____9, this is expected. The underscores and number specify an attribute. For example, the string AttributableActor____9 specifies the AttributableActor.Full Name attribute.
The following table provides parameter information for some integration commands.
|
Integration Commands |
Parameter Information |
|
For these commands, the following parameters specify the URL to the web application: AppHost, AppPath and AppParam. For example to search Bing website for the Full Name of the actor associated with the event, specify the following values for the command:
If the value of Jane Doe is returned from the AttributableActor.Full Name attribute, the following URL is invoked when the integration command is run: http://www.bing.com/search?q=Jane Doe NOTE: If you cannot construct the appropriate URL for your web application using the supplied parameters listed above, edit the integration command and customize the URL. |
|
For these commands, there are two types of authentication methods for logging into an ArcSight Logger: Original Logger Authentication Method—This method is supported for all current and future releases of ArcSight Logger and uses the following set of authentication parameters: LoggerHost LoggerUser LoggerPassword One Time Password (OTP) Authentication Method—This method will be supported in a future release of Logger and uses the following set of authentication parameters: LoggerHost OTPUser OTPPassword LoggerPort For more information, see the ESM and Logger documentation. If available, the One Time Password (OTP) Authentication Method is the preferred authentication method. |
|
For these commands, you connect the NSP appliance using the following parameters: NSPAuth—user authentication token NSPHostIP—target NSP appliance |
- You can optionally choose to save the parameter values at either the target level or user level:
- Save To Target—Parameter values are saved in the associated target and all the users on the ESM Manager can access the values stored in the target.
- Save To User—Parameter values are saved associated with the current ESM user and only the current user can access the saved values.
Click OK. The integration command is invoked.
For more information, see the ArcSight Console User’s Guide.
Customize the Value Type Passed into the Command
For some integration commands, you might want to customize the value type that is passed to the web application or appliance. For example, when you run the integration command, the integration command invokes the global variable and specifies that the full name associated with that actor should be returned. The full name is then passed to the google search web application. If you would rather search for the email address associated with the actor, you can change the type of value returned by the global variable and passed back to the integration command as described in the following procedure.
To customize the return value:
- In the Navigator panel, go to Integration Commands.
- Select the Commands tab.
- Browse for a UBM solution integration command such as ArcSight Solutions/UBM/External/.
- Right-click the integration command and select Edit Command.
- Click the value in the URL field and click ... .
- Delete all the text after the = character including the $ character.
- Leave the cursor after the = character and type the $ character. A dialog appears to select appropriate field.
- Select the appropriate value to be returned by the global variable. For example to change the value returned by the global variable, select Global Variables | AttributableActor.Email Address.
Configure UBM Use Cases
Additional configuration might be needed for the individual resources associated with a use case. For more information, see ArcSight User Behavior Monitoring Use Cases.
This section provides the general use case configuration information.
View Use Case Resources
The UBM solution resources are grouped together in the ESM Console using use case resources. A use case resource provides a way to group a set of resources that help address a specific security issue or business requirement.
To view the resources associated with a use case resource:
- In the Navigator panel select the Use Cases tab.
- Browse for a UBM solution use case resource such as ArcSight Solutions/UBM/Actor Threat Score.
- Right-click the use case resource and select the Open Use Case option.
The resources that make up a use case resource are displayed as shown in . The use case resource tables listed in ArcSight User Behavior Monitoring Use Cases. contain all the resources that have been explicitly assigned to the use case and any dependent resources used by the assigned resources.
Viewing the Resources Assigned to the Use Case
Configure Active Lists
You can populate UBM solution active lists manually using the following processes:
- Add entries to an active list, one-by-one, using the List Entry editor in the ESM Console.
- Add entries in batch to active list from a comma separated value (CSV) file.
Configure Lists Using Console Entry Editor
You can add entries to active lists, one-by-one, using the Entry editor of the ESM Console.
- In the Navigator panel, go to Lists.
- Select the Active Lists tab.
- Navigate to ArcSight Solutions/UBM.
- Right-click the list you wish to populate and select Show Entries. The list details are displayed in the Viewer panel.
- For each entry you wish to add to the list, repeat the following steps:
- To add an entry to the list, click the Add icon in the list header.
- In the Entry editor of the Inspect/Edit panel, enter values for the required fields of the list and click Add.
Individual use cases might require additional active lists to be configured. For more information see the individual use case descriptions in ArcSight User Behavior Monitoring Use Cases.
Configure Active Lists by Importing a CSV File
Active lists can be populated in a single step, by importing entries from an existing CSV file. The number of columns in the active list must match the number of comma separated values in the CSV file. For example, if the active list has two columns of data, the imported CSV file must have two comma-separated fields.
- In the Active Lists resource tree of the ESM Console, right-click an active list and choose Import CSV File. A file browser displays.
- Browse to find the CSV file you want to import, select it, and click Open. The Import Preview dialog displays the data from the CSV file to be imported into the active list.
- To add the entries from the selected file into the active list, in the Import Preview dialog, click OK. The new entries from the file are appended to the existing entries in the active list.
- To verify that your entries were imported as expected, right-click the active list you just populated with the CSV file and select Show Entries.
This displays the newly-added data from the CSV file in the Viewer panel as active list details.
Individual use cases might require additional active lists to be configured. For more information, see ArcSight User Behavior Monitoring Use Cases.
Determine the UUID to Populate Active Lists
Some of the active lists require that you specify the Universally Unique Identifier (UUID) associated with an identity as specified by the Identity Management System. The UUID of identity is stored as an attribute in the actor and is used as the key to look up the other attributes of the identity. For example, the UUID of Jane Doe specified in the active list, can be used by the UBM solution resources to look up the Employee Type attribute stored in the Jane Doe actor.
To get the UUID associated with an actor:
- In the Navigator panel, go to Actors, and select the Actors tab.
- Expand the groups listed in the Actors tab.
- Right-click an actor and select Edit Actor. The UUID is displayed at the top of the Inspect/Edit panel in the Attributes tab.
Test Filters
Most of the content in the UBM solution relies on event categorization fields to identify events of interest. Although this method applies to most of the events and devices, for certain use cases, it is recommended that you test key filters to verify that they actually capture the required events. This section describes, generally, how to test filters. The following procedure should be performed only on a test (non-production) system.
To ensure that a filter captures the relevant events:
- Generate or identify the required events and verify that they are being processed by ESM by viewing them in an active channel or query viewer.
1. Set up a connector to capture events from a target system and perform the actions that would generate the required events on that system. For example, to test the filter, set up a connector on a Microsoft Windows machine and login into the server.
or
2. Import into ESM an existing batch file that contains relevant events.
Alternatively, you can identify that these types of events have already been processed by ESM and ensure that the start and end time of the active channel or query viewer (as shown in ) covers the event time of these events.
- Navigate to the appropriate filter, right-click it, and then choose Create Channel with Filter. If you see the events of interest in the newly created channel, then you know that the filter is functioning properly.
If you do not see the events of interest:
- Verify that the configuration of the active channel is suitable for the events in question. For example, ensure that the event time is within the start and end time of the channel.
- Modify the filter’s condition to capture the events of interest. After applying the change, repeat to verify that the modified filter captures the required events.
For a use case to process and display complete information, filters should capture similar events from different systems. For example, the filter should capture such events from both Microsoft and Unix systems.
Also, try to minimize false positives and negatives as much as possible. For example, the filter should capture a single event for every successful login attempt to a Unix machine, but not unsuccessful login events. To achieve this end, you might have to further fine tune the filter’s condition.
Enable and Test Trends
By default, the UBM solution trends are not enabled. Many reports and query viewers require that trends be enabled to capture data shown in these monitoring resources. As part of the use case configuration, enable trends for the use cases you want to implement. Before enabling a trend, you should verify that trend captures data relevant for your environment as described in procedure below. In addtion before enabling a trend, you might want to also customize the following values:
- Schedule Range Start date in the Schedule tab of the Inspect/Edit panel—By default, the UBM trends collect data based on the installation time of the UBM 24.2 package on the ESM. Before enabling the trend ensure that the Start field of the trend on the Schedule tab reflects the date you want to start collecting events from.
- Partition Retention Period (in days) attribute— This attribute specifies the number of days to retain the partitions from this trend as active in the ArcSight database. You might want to increase Partition Retention Period (in days) attribute of the trend for your environment. This attribute is used in combination with the Partition Size. Note that reducing the partition retention period might case the use case not to function properly.
For more information about trends, see the ArcSight Console User’s Guide and the Trends sections in ArcSight User Behavior Monitoring Use Cases
To ensure that a trend captures the relevant events:
- Generate or identify the required events and verify that they are being processed by ESM.
1. Set up a connector to capture events from a target system and perform the actions that would generate the required events on that system. For example, to test the filter, set up a connector on a Microsoft Windows machine and login into the server.
or
2. Import into ESM an existing batch file that contains relevant events.
Alternatively, you can identify that these types of events have already been processed by ESM and ensure that the start and end time of the active channel or query viewer (as shown in ) covers the event time of these events.
- Navigate to the appropriate trend, right-click it, and then choose Test. If you see the events of interest in the test panel, then you know that ESM is processing events that could be captured by the trend. The test panel shows relevant events that could be captured by the trend in the last hour, up to 25 rows.
If you do not see the events of interest, you might want customize the queries invoked by the trend for your environment.
Configure Cases
Cases are ESM's trouble-ticket system that can be used as-is or in conjunction with a third-party trouble-ticket system. The UBM solution includes the ArcSight Solutions/UBM group, which holds the cases generated by UBM rules.
You can add more groups to the ArcSight Solutions/UBM group or your own group if you want to add more differentiations. If you do add more groups to the ArcSight Solutions/UBM group, modify the ESM Console rules that generate cases to use of your new case groups.
By default, some rules contain Add to Existing Case actions. These actions are triggered only if the action is enabled and the rule is both deployed and enabled.
If you want to generate cases for specific suspicious activities, you can edit rules that trigger on that specific behavior and add actions those rules to create cases. For example, if you want to create a case every time activity from rogue account occurs, edit the rule and add an action that creates a case.
Configure Notifications
You can add a rule action to UBM solution rules that send notifications when the rule is fired. In addition, you can create notification destinations that receive the notifications when the rules fire. For more information, including configuration information, see the ArcSight Console User’s Guide. This configuration is optional. Additional information about configuring notifications for specific rules are described for individual use cases in this chapter.