4.2 Setting Properties on a Single Workstation after Installation
-
At the user’s workstation, right-click the
 icon in the notification area of the taskbar.
 -
Click .
-
Set any of the following properties that you want to change:
-
Click to set the changes and close the property pages.
4.2.1 Client Settings
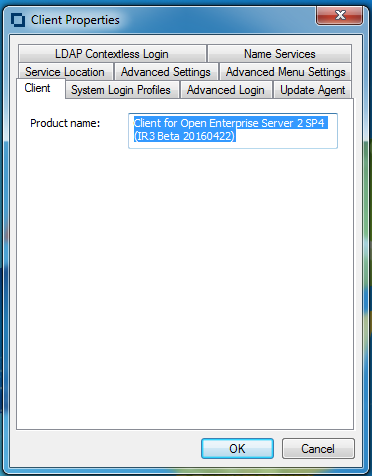
Use the Client property page to view which version of the Client you are running.
This page contains one option, , which displays the product name and version.
Figure 4-1 Client Property Page
4.2.2 Login Profiles Settings
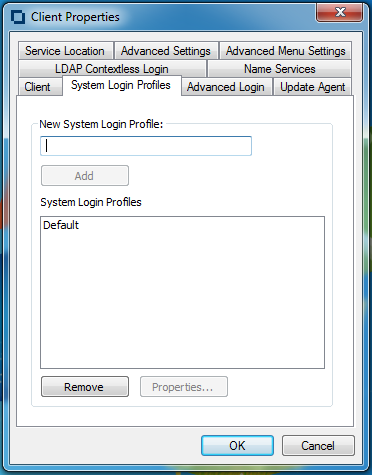
Use the System Login Profiles property page in the Properties dialog box to create one or more system login profiles that a user can select when logging in. When the user selects the profile, the profile automatically sets up login information such as the user's name, server, context, login script, and other applicable information so that the user does not need to type this information. For more detailed information, see Section 8.7, Setting Up Login Profiles.
Figure 4-2 System Login Profiles Property Page
Adding a System Login Profile
-
Right-click the
icon in the notification area of the taskbar. -
Click , then click the tabbed page.
-
Type the name of the profile you want to add in the text box.
-
Click .
-
In the Login dialog box, specify the login information you want for this profile, such as the user's name, server, and context.
-
Click to close the Login dialog box, then click to close the Client Properties dialog box.
Viewing or Editing a System Login Profile's Properties
-
Right-click the
icon in the notification area of the taskbar. -
Click , then click the tabbed page.
-
I n the list, select the name of a profile.
-
Click .
-
In the Login dialog box, view or modify the login information you want for this profile, such as the user's name, server, and context.
-
Click to close the Login dialog box, then click to close the Client Properties dialog box.
Removing a System Login Profile
-
Right-click the
icon in the notification area of the taskbar. -
Click , then click the tabbed page.
-
In the list, select the name of the profile you want to remove.
-
Click .
-
Click to close the Client Properties dialog box.
4.2.3 Advanced Login Settings
Use the Advanced Login property page to configure user login settings.
Figure 4-3 Advanced Login Property Page
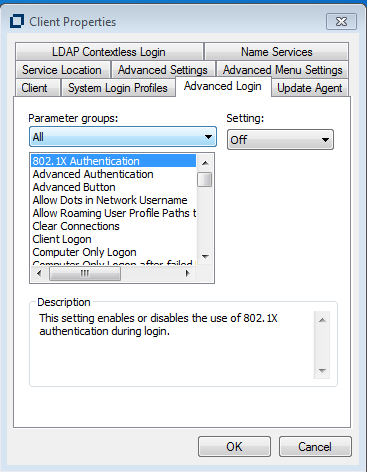
Use the drop-down list to display all the advanced login parameters or to sort the parameters by function (, , and ). Select the parameter you want, then use the option to configure the parameter. For most parameters, this consists of simply turning it On or Off. Some parameters require a filename or text or number setting. A short description of each parameter is available in the field when you select the parameter.
The Advanced Login parameters include the following:
-
802.1X Authentication: Enables or disables the use of 802.1X authentication during login. For more information, see Section 8.9, Configuring 802.1X Authentication.
-
Advanced Authentication: Enables or disables the use of Advanced Authentication when performing eDirectory login.
NOTE:On a fresh install of Advanced Authentication Client and Client for Open Enterprise Server 2 SP4 (IR 11) or later, the default option is .
For more information, see Section 2.7, Installing and Configuring Advanced Authentication Client
-
Advanced Button: Specifies whether the button on the Login dialog box is enabled. This button leads to various tabs that help you to specify advanced login parameters.
-
Allow Dots in Network Username: If this setting is On, any periods entered in the network user name are treated as part of the name, rather than as eDirectory context delimiters. The user cannot enter the context as part of the username, but must enter it separately. This makes it possible for the user to log in with a user name such as John.Smith to both OES and Windows.
-
Allow Roaming User Profile Paths to non-Windows servers: Enables or disables the Windows policy. By default, Windows attempts to enhance profile security by checking the permissions on a remote roaming profile directory. But the check is performed in a Windows-specific manner, and this fails when the roaming profile path is to an Open Enterprise Server (OES) volume or other non-Windows-compatible resource. Setting this parameter to allows roaming profile paths to OES volumes and other non-Windows server by disabling this Windows-specific security check. Note this policy is defined and controlled by Windows and not the Client for Open Enterprise Server, so group policies and other Windows management tools may also set or change this policy (CompatibleRUPSecurity).
-
Clear Connections: Specifies whether the check box appears in the Login dialog box. The check box allows you to clear all previous connections when you create a new connection to the network.
-
Client Logon: Enables the Client Logon option to provide Open Enterprise Server logon options when logging into Windows on this computer. When it is set to , Client for Open Enterprise Server Credential Provider provides the logon experience.
-
Computer Only Logon: Specifies whether the Computer Only Logon option is shown when the Network Logon option is presented by the Welcome screen. The Computer Only Logon option is used to log in to the Windows workstation without logging in to the Open Enterprise Server network.
-
Computer Only Logon after failed Network Logon: Determines whether or not Computer Only Logon is offered when a Network Logon attempt fails. means a Computer Only Logon will be offered unless the administrator has hidden the ‘Computer Only Logon’ option. and indicate how the Computer Only Logon should be offered regardless of whether the Computer Only Logon option is hidden.
-
Computer Only Logon Default: Determines whether the Client will default to the Computer Only Logon mode. means the Client will remember when Computer Only Logon was the mode previously selected, and will continue defaulting to Computer Only Logon until Logon mode is interactively selected again. means the Computer Only Logon will always be the default mode presented, even if Network Logon was the previous mode used. means that Logon will always be the default mode presented, even if Computer Only Logon was the previous mode used.
-
Context Box: Specifies whether the field is displayed on the Login dialog box.
-
Context Browse Button: Specifies whether the browse button is displayed in the Login dialog box.
-
Default bitmap for Client Login dialog: Specifies the path and filename for a bitmap that will be used on the Client Login dialog in place of the default Client bitmap. Custom bitmap sizes can be used, but will affect the overall size of the Client Login dialog.
-
Default bitmap for Welcome screen tiles: Specifies the path and filename for a bitmap that will be used on the Welcome screen tiles whenever a user-specific bitmap is not yet known. Note that Windows imposes the size limit on any bitmap used for a Welcome screen tile, and will stretch / deform the bitmap provided to conform to that limit as needed.
-
Enable Sigle Sign-On: Enables use of NMAS-based Single Sign-On for automatically providing the Windows account password during an otherwise non-password-based NetIQ eDirectory login using NMAS. This setting is only available on machines where the installed version of the NMAS client supports Single Sign-On capabilities. For more details on SSO, see Section 8.12, Setting Up Single Sign-On (SSO).
-
Force Early Password Expiration Period: Specifies the number of days by which the password expiration mechanism is preempted, before the actual eDirectory password expiration occurs. For example, if the eDirectory password expiration is set to occur in 5 days, and "Force Early Password Expiration Period" is set to 5, Client will preempt the password expiration process 5 days in advance.
NOTE:This setting takes effect only when the "Password Expiry Warning" setting is also enabled.
This parameter is set to 0 by default and has a valid range of 0 to 120 days.
-
Force Grace Login Password Change: This setting forces users to change their passwords at the last grace login. With this setting activated, when the password expires, the password must be changed in order to successfully log in.
-
Forgotten Password Prompt: Specifies whether the prompt is displayed in the Login dialog box. This prompt provides an option to recover from a forgotten password based on an administrator-defined password policy. See Section 6.3, Using Forgotten Password Self-Service for more information.
-
Last Logged On User: Specifies whether the last logged on user is displayed along with the Network Logon when logging on to the computer. Note this does not override the fact that the last logged on user is not displayed on Windows Server 2012 when Terminal Services are installed.
-
Last Logged On User Default User: Forces the "Last Logged On User" presented by Client to always be the user that is specified, regardless of which user has logged in last. If no value is specified, the default behavior is to specify the previously logged in user. The default value of this parameter is blank.
-
Last Logged On User Default Profile: Indicates which Client Login Profile should be used in conjunction with the "Last Logged On User Default User”. If no value is specified, the default behavior is to use the Client Login Profile that was previously selected for the user, if more than one Client Login Profile is available.
For example, when configuring a specific "Last Logged On User Default User" that should always be shown by default, it might be desirable to configure "Last Logged On User Default Profile" as "Default" (or a different Client Login Profile name that has been created) so that a specific Client Login Profile will always be selected by default.
-
Login Profile List: Specifies whether the drop-down list on the Client Login dialog box is enabled.
-
Login Windows password synchronization option default: This is the default state of the functionality that occurs during login to both eDirectory and Windows when the password are not already synchronized. This setting controls the default synchronization behavior that will occur, regardless of whether the "Show login Windows password synchronization option" is allow the checkbox to be shown to the user or not.
-
Login With Third-Party Credential Provider: This setting controls whether an OES login will still be attempted after the Windows logon, in cases where the Client's credential provider was not used during the Windows logon.
-
Make Script Tab Read Only During Login: Disables all the fields in the tab during login to prevent users from overriding any of the tab settings.
-
NMAS Authentication: If this setting is On, Novell Modular Authentication Services (NMAS) is enabled during login. NMAS authentication adds additional security to the network. However, if your network does not use NMAS, login might take additional time and you might want to disable NMAS authentication by changing this setting to Off.
-
Password Expiry Warning: Enables or disables the presentation of password expiration alerts before the actual password expiration occurs. When disabled, no alerts are presented until the password expiration occurs, and the user must change their password before exhausting the available grace logins. This is the normal eDirectory password expiration behavior.
When enabled, the Client will begin presenting expiration alerts before the password expiration occurs, allowing the user to change their password before expiration or grace logins occur. This is similar to the Windows password expiration behavior.
-
Password Expiry Warning Period: Specifies the number of days before the password expiration that the user starts receiving password expiration alerts. If the number of days is set to "0", Client will default to using the number of days specified by the Microsoft-defined "Prompt user to change password before expiration" policy, such that both Windows and Client will begin prompting at the same number of days before expiration. This parameter is set to 0 by default and has a valid range of 0 to 120 days.
-
Prompt for Network login during Windows AutoAdminLogon: If the Client Login parameter is enabled, and Windows is configured to perform a Windows-only AutoAdminLogon as a specific user account, enabling this setting causes a Client login to interactively prompt for eDirectory login information to be used in addition to the AutoAdminLogon-defined Windows login.
-
Server Connection Retries: This parameter controls the number of times that Login tries to establish a connection to a server. If Login tries to connect to a server and fails, it waits 1 second and then tries to connect again. It continues to do this until the number of retries has been reached. It is recommended that this setting be no higher than 20.
-
Show login Windows password synchronization option: Specifies whether the option is shown when logging in to both eDirectory and Windows when the passwords are not already synchronized.
-
Show Suppress Single Sign-On checkbox: Specifies whether the "Suppress Single Sign-On for this login" check box appears in the "Windows" tab of the Show Advanced Options dialog. This setting to optionally show the suppression check box is only available when the "Enable Single Sign-On" setting is enabled. Selecting this check box during a logon attempt allows you to disable the use of Single Sign-On for the current login attempt only; the check box will automatically reset back to the de-selected state for the next login attempt. For more details on SSO, see Section 8.12, Setting Up Single Sign-On (SSO) .
-
Suppress NMAS ID Plugin support: When enabled, the Client will suppress the features provided by an NMAS Identity Plug-In (ID Plug-In), even though the ID Plug-In is registered and configured for use with NMAS. This option is intended for use by an administrator who needs to temporarily suppress the ID Plug-In related behaviors in the course of setup or troubleshooting. ID Plug-Ins provide various NMAS method-specific behaviors such as certificate lookup in eDirectory for certificates found on a smart card or token device, automatic entry of the Novell eDirectory identity in the Client login interface, user interface overrides such as hiding the 'Username' and 'Password' fields, or other behaviors which are specific to the NMAS method or hardware device being used.
-
Suppress NMAS Support for Computer Only Logon: When enabled, the Client will suppress the features related to performing Computer Only Logon using NMAS, even though the required NMAS components and configuration may be available on the local machine. This option is intended for use by an administrator who needs to temporarily suppress this NMAS behavior in the course of setup or troubleshooting. This setting will not be available on machines where the required NMAS components and configuration are not present. For more information, see Section 8.13, Setting Up NMAS Based Windows Logon.
-
Tree Box: Specifies whether the field is displayed on the Login dialog box.
-
Tree Browse Button: Specifies whether the browse button is displayed on the Login dialog box.
-
Unlock Workstation Credentials: Specifies the types of credentials that are accepted during workstation unlock, terminal session reconnect, and switch user operations. The option allows the user to provide either eDirectory or Windows credentials. The option defines that eDirectory credentials are required if the logged-on user session is logged into eDirectory. The option defines that Windows credentials must always be used. The option defines that only eDirectory credentials are permitted, and unlock will not be allowed to use any other credential type.
-
Use NMAS for Windows Logon Default: Determines the initial state of the 'Use NMAS for Windows Logon' check box. 'Automatic' means the Client will select this check box by default if the NMAS has been configured to enforce use of NMAS for Windows logons. If NESCM is not configured to be enforced, the behavior of 'Automatic' will be the same as 'Last Used'. 'Last Used' means the Client will remember the previously used state of the 'Use NMAS for Windows Logon' check box. 'Never' means the 'Use NMAS for Windows Logon' check box will be initially de-selected by default. 'Always' means the 'Use NMAS for Windows Logon' check box will be initially selected by default. For more information, see Section 8.13, Setting Up NMAS Based Windows Logon.
-
Variables Button: Specifies whether the button in the Login dialog box is enabled. The button allows you to enter login script variables to be used when the user logs in.
-
Windows Password Synchronization: With this feature enabled, the user can change the Network password, and the Windows password is set to the same value. Turning it off leaves the passwords separate unless they are synchronized through some other means (for example, Novell Identity Manager).
4.2.4 Update Agent Settings
The Client Update Agent provides a workstation-initiated (manual or automatic) update of the Client software. It launches acu.exe from a specified location. Update Agent can be run manually from the Client Application Tray menu or it can be configured to automatically check for updates at specified intervals.
If it is configured to check automatically, each time a user logs in to the network, Update Agent runs and determines if the preconfigured number of days have elapsed since the last upgrade check, then checks the specified location for a newer version of the client. If a newer version is found, ACU then launches the appropriate installation process.
Before workstations can check to see if updates are available, the Update Agent must be configured during a software installation. Or, you can configure the Update Agent on each machine locally through the Client Property Pages.
The Update Agent is configured by modifying the Update Agent property page settings or (optionally) the Install.ini file. Because the Update Agent launches ACU, which in turn launches setup.exe, all of the configuration changes made to these subsequent utilities are used in the same way they would be when not running the Update Agent. For more information, see Setting Up the Client Update Agent.
Figure 4-4 Update Agent Property Page
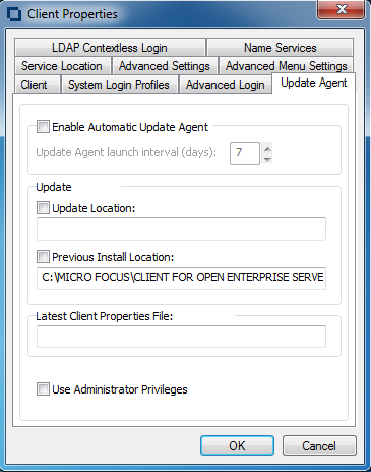
This page contains the following options:
-
Enable Automatic Update Agent: Select this check box to enable the automatic update agent, then use the option to set the interval (in days) that the Client Update Agent will check for a new version of the Client for Open Enterprise Server.
-
Update Source(s): Select the check box to enable the Client Update Agent to look for a new version of the Client in the designated update location.
The Update Agent checks for updates: first, in the ; and second, in the .
The Update Agent looks in each enabled location for a valid set of Client installation files. Make sure that you that you have the latest Client installation files in the first location that the Update Agent searches.
-
Latest Client Properties File: Displays the name, date, and time of the most recent Client properties file used to apply Client settings on this workstation. For more information, see Section 2.2.1, Creating the Client Properties File.
-
Use Administrator Privileges: If this option is selected, the Update Agent uses the Client Update Agent service to install the Client. The service runs with elevated privileges required for a non-administrator to install the Client. If this setting is not selected, the user must be able to elevate to an administrator user to complete the Client installation.
4.2.5 Service Location Settings
Use the Service Location property page in the Client Properties dialog box to manage a list of scope names to be reported to SLP applications for a workstation and a list of SLP Directory Agent addresses.
Figure 4-5 Service Location Property Page
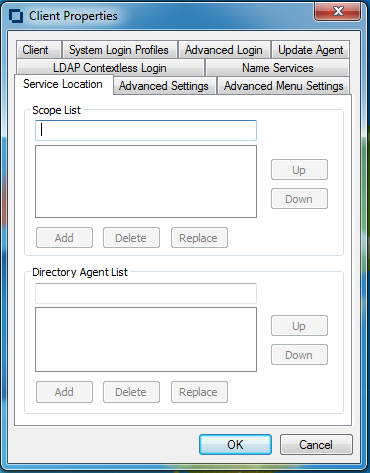
This page contains the following options:
-
Scope List: A list of scope names to be reported to SLP applications on a workstation. Multiple scope names are allowed. The list order reflects the preference order. Scopes can also be configured via DHCP or discovered dynamically from Directory Agents.
A scope is like a collection of services within a logical group. You might want to use a scope to create a group of directory agents and services registered with these directory agents in a large organization.
To add a scope to the list, specify a name, then click . To remove a scope from the list, select a name in the list, then click . To replace a scope in the list with a new scope, type the name of the new scope, select the name of the item you want to replace, then click . Use the and buttons to move a scope up or down in the list.
-
Directory Agent List: A list of SLP Directory Agent addresses. Multiple Directory Agent addresses are allowed. Each address is a fully qualified domain name (DNS), or a dotted decimal IP address. Directory Agents can also be configured via DHCP, or discovered dynamically.
To add a Directory Agent to the list, specify a name, then click . To remove a Directory Agent from the list, select a name in the Directory Agent list, then click . To replace a Directory Agent in the list with a new Directory Agent, type the name of the new Directory Agent, select the name of the item you want to replace, then click . Use the and buttons to move a Directory Agent up or down in the list.
4.2.6 Advanced Settings
Use the Advanced Settings property page in the Client Properties dialog box to configure connection, packet management, performance, cache, and SLP settings.
Figure 4-6 Advanced Settings Property Page
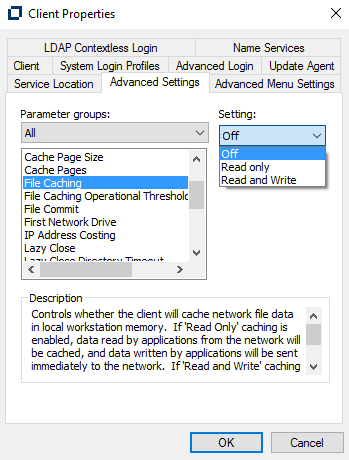
Use the groups drop-down list to display all the Advanced Settings parameters or to sort the parameters by function (Connections, Packet Management, Performance, Cache, and SLP). Select the parameter you want, then use the option to configure the parameter. For most parameters, this consists of simply turning it On or Off. Some parameters require a number setting. A short description of each parameter is available in the field when you select the parameter.
The Advanced Settings parameters include the following:
-
Auto Reconnect: Enables or disables Client auto reconnect.
-
Auto Reconnect Interval: Specifies the delay in seconds between Client reconnect attempts.
-
Bad Address Cache: Enables or disables use of the Bad Address Cache. You can set this value to “ON” or “OFF” to enable or disable Bad Address Cache. This parameter is set to “ON” by default.
-
Bad Address Cache Timeout: Determines the number of seconds a Bad Address will remain in the Bad Address Cache. If the Client is unable to establish a TCP-level connection to a particular IP address, it stores that address in the Bad Address Cache for the number of seconds specified in this parameter. The timeout can be set from 30 to 21600 seconds and the default value is set to 300 seconds.
-
Cache Page Size: Specifies the size of a cache page in kilobytes. This setting multiplied by the Cache Pages is the amount of physical memory consumed by the cache. It is the largest read-ahead or write-behind that will be performed.
-
Cache Pages: Specifies the number of available cache pages. This setting multiplied by the Cache Page Size is the amount of physical memory consumed by the cache.
-
Cipher Strength: Specifies the strength of cipher suites that is used in establishing an encrypted connection between the server and the client. This setting is related to NCP encryption feature and it determines the strength of the algorithm used for encryption and decryption between the server and the client. You can set this value to “Low”, “Medium”, or “High”. This parameter is set to “Medium” by default.
-
File Caching: Controls whether the Client caches files locally or not. Setting this value to Read only caches the data read by the applications from the network and the data written by the applications is sent to the network immediately. Setting this value to Read and Write returns the control to the application during data write and the data is written to the network in the background.
-
File Caching Operational Threshold: Establishes the threshold, in kilobytes, for which application read and write requests should be cached. Application read and write requests which are smaller than this value will be cached. Typically it is more efficient to send applications that read or write a large amount of data as a single request directly to the network, rather than utilizing the cache. Recommended and default value is 128KB.
-
File Commit: Controls whether buffers flushed by an application are committed to disk on the server. Setting this value to On ensures data integrity at the expense of performance by ensuring that file buffers are committed to disk on the server when an application flushes its file buffers.
-
First Network Drive: Defines which Windows drive letter the Client will start with in response to eDirectory login script commands such as “MAP *1” and “MAP NEXT”, which are expecting to utilize drive letters relative to a First Network Drive setting which may be unique to each machine where the eDirectory login script executes.
The First Network Drive setting only applies to these "relative" drive mapping commands. The First Network Drive setting does not force or prevent attempts to map using an explicit drive letter reference (such as “MAP E:”), nor does the First Network Drive setting affect or prevent drive selection in the “OES Map Network Drive" feature available in the Client Application tray menu.
By default, the First Network Drive parameter is set to “Automatic”. This means that the Windows drive letter will be determined and selected automatically based on the local virtual and physical drives present at the time the map command is executed. Starting with drive “A:”, the Client will skip past any removable media, hard disk drives, optical drives and RAM disks and will select the first available Windows drive letter after these local drives. For example, if drive letters "A:" through “P:” are already assigned to local drives on the current Windows machine, having the Client “First Network Drive” parameter set to “Automatic” will choose “Q:” as the effective First Network Drive letter during the map command.
For more information regarding the MAP command and syntax, see the Client Login Script Commands and Variables documentation.
NOTE:After mapping a network drive using a script, if you change the eDirectory tree context, the same drive letter is used for mapping. You might loose all the unsaved changes that are associated with the previous eDirectory tree context.
-
Lazy Close: Delays the file close on the network, allowing the file to be reopened without accessing the network. This parameter is turned “OFF” by default.
-
Lazy Close Directory Timeout: Determines the time, in milliseconds, that Lazy Close will delay before closing a directory or volume handle.This parameter is set by default to 2000 milliseconds and has a valid range of 100-15000 milliseconds.
-
Lazy Close File Timeout: Determines the time, in milliseconds, that Lazy Close will delay before closing a file handle.This parameter is set by default to 500 milliseconds and has a valid range of 100-15000 milliseconds.
NOTE:The Lazy Close File and Directory timeouts can be configured according to file access patterns to maximize performance improvements. Client workstations that predominantly access files exclusively can benefit from higher lazy close timeout values. On the other hand, client workstations with predominantly running applications that frequently access files shared for concurrent use by other workstations should consider lowering the timeout values or turning the Lazy Close feature OFF altogether.
-
Maximum Delayed Writes: Controls the maximum amount of data, in megabytes, that will be allowed to queue for background writing when File Caching parameter is set to Read and Write. It is recommended to use a smaller value because setting larger values may impact available Windows kernel mode memory. Default value is set as 4MB.
-
NCP Encryption: Determines the encryption capabilities between the server and the client. If this parameter is set to “Encryption preferred” and connected OES server supports encryption, then the Client establishes an encrypted connection with the OES server for all communications. If this parameter is set to “Non-encryption preferred”, then the Client establishes a non-encrypted connection with the OES server for all its file communications unless the OES Server enforces encryption to all connected clients.
-
Receive Broadcast Messages: Tells the client which broadcast message, if any, to receive. You can choose one of the following settings: All (receive all broadcast messages), Server Only (receives broadcast messages sent by the server only), or None (do not receive any broadcast messages).
-
Server Time Zone Configuration Cache Timeout: Determines the time interval (in minutes) for which Client will cache the server time zone configuration for an NCP connection. After this time interval is over, Client queries the server again to determine the current time zone configuration. This refresh of the server's time zone configuration helps the Client workstation respond to Daylight Savings Time events or other time zone configuration changes that occur on the server. This parameter is set by default to 60 minutes and has a valid range of 1 to 720 minutes.
-
Signature Level: Determines the level of enhanced security support. Enhanced security includes the use of a message digest algorithm and a per connection/per request session state. The values are as follows: 0 = disabled, 1 = Enabled but not preferred, 2 = Preferred, 3 = Required. Setting the value of this parameter to 2 or 3 increases security but decreases performance.
-
SLP Broadcast Only: Enables or disables a broadcast only network for this SLP agent. If this option is set to On, the SLP agent must send only broadcast messages (in other words, it forces broadcasts to be used instead of multicasts). If this option is set to Off, the SLP agent can send multicast messages.
-
SLP Maximum Results: Specifies the maximum number of results to accumulate and return for a synchronous request before the timeout, or the maximum number of results to return through a callback if the request results are reported asynchronously.
-
UNC Path Filter: Enables or disables the UNC Path Filter. Filters requests for UNC path resolution sent to the Client for Microsoft Networks (Microsoft redirector). When enabled, UNC path queries sent to the Microsoft redirector will first be filtered by the Client to determine if the server name is known to be a OES resource. If it is determined to be a OES resource, the UNC path request will not be allowed to proceed to the Microsoft redirector. This can help avoid unnecessary delays caused by repeated failing attempts to access the OES resources as though it might be a Windows server.
4.2.7 Advanced Menu Settings
Use the Advanced Menu Settings property page in the Client for Windows Properties dialog box to determine which options are available to users on the Client Application Tray menu when they right-click the icon in the notification area of the taskbar, or in other context menus.
Figure 4-7 Advanced Menu Settings Property Page
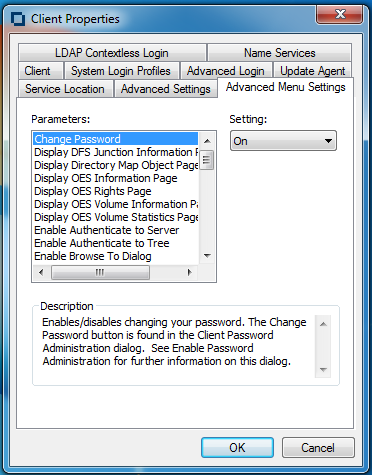
Select the parameter you want, then use the drop-down menu to turn the parameter On or Off. A short description of each parameter is available in the field when you select the parameter.
The Advanced Menu Settings parameters include the following:
-
Change Password: Enables or disables the ability of users to change their passwords. The button is found in the Client Password Administration dialog box. See Enable Password Administration for more information on this dialog box.
-
Display DFS Junction Information Page: Display or hide the tab. The tab is found by selecting from the context menu of a DFS Junction on a OES server.
-
Display Directory Map Object Page: Display or hide the Directory Map Object page. The Directory Map Object page is accessed by selecting from the context menu of the selected Directory Map Object icon in the Network folder.
-
Display OES Information Page: Display or hide the tab. The tab is found by selecting from the context menu of a volume, directory, or file on a OES server.
-
Display OES Rights Page: Display or hide the tab. The tab is found by selecting from the context menu of a volume, directory, or file on a OES server.
-
Display OES Volume Information Page: Display or hide the tab. The tab is found by selecting from the context menu of a volume.
-
Display OES Volume Statistics Page: Display or hide the tab. The tab is found by selecting from the context menu of a volume.
-
Enable Authenticate to Server: Enables or disables authenticating to a server. The menu item is displayed in the context menu of a server.
-
Enable Authenticate to Tree: Enables or disables authentication to a tree. The menu item is displayed in the context menu of a tree.
-
Enable Browse To Dialog: Enables or disables the Browse To dialog box. This menu item is displayed in the context menu of the Client Tray icon.
-
Enable Challenge/Response Administration: Enables or disables the item in the menu. For more information, see Configuring Challenge/Response Settings.
-
Enable Change Context Dialog: Enables or disables the Change Context dialog box. This menu item is found in the context menu of the selected container in the Network folder.
-
Enable Group Membership Dialog: Enables or disables the item in the menu. See
Configuring Your User Account
in the Client for Open Enterprise Server User Guide for more information on this menu. -
Enable Inherited Rights Dialog: Enables or disables the Inherited Rights dialog box. This dialog box can be reached from a menu item in the context menu of a volume or directory or under the menu item in the Client Application Tray menu.
-
Enable Login Account Information: Enables or disables the item in the . See
Configuring Your User Account
in the Client for Open Enterprise Server User Guide for more information on this menu. -
Enable Login Dialog: Enables or disables the Login dialog box. This menu item is displayed in the context menu of the Client Tray icon and in the context menu of the Network folder.
-
Enable Login to Server: Enables or disables logging in to a server. The menu item is displayed in the context menu of the selected server.
-
Enable Logout of Server: Enables or disables logging out of a server. The menu item is displayed in the context menu of a server. Subsequently, the button when a server is selected in OES Connections is also enabled or disabled according to this parameter.
-
Enable Logout of Tree: Enables or disables logging out of a tree. The menu item is displayed in the context menu of a tree. Subsequently, the button when a tree is selected in OES Connections is also enabled or disabled according to this parameter.
-
Enable Map Dialog: Enables or disables the Network Drive Mapping dialog box.
-
Enable Mapped Drive Disconnect Dialog: Enables or disables the Disconnect dialog box.
-
Enable Modify Container Script: Enables or disables the menu item. This item is displayed in the context menu of the selected container.
-
Enable NDS Mailing Information: Enables or disables the item in the menu. See
Configuring Your User Account
in the Client for Open Enterprise Server User Guide for more information on this menu. -
Enable NDS Personal Information: Enables or disables the item in the menu. See
Configuring Your User Account
in the Client for Open Enterprise Server User Guide for more information on this menu. -
Enable NDS Work Information: Enables or disables the item in the menu. See
Configuring Your User Account
in the Client for Open Enterprise Server User Guide for more information on this menu. -
Enable Client Help: Enable or disables the Client help. This menu item is displayed in the context menu of the Client Tray icon.
-
Enable Client Properties: Enables or disables viewing the Client property pages. This menu item is displayed in the context menu of the Client Tray icon.
-
Enable OES Connections Dialog: Enables or disables the OES Connections dialog box. This menu item is displayed in the context menu of the Client Tray icon and in the context menu of the Network folder.
-
Enable Novell Copy Dialog: Enables or disables the Novell File Copy dialog box. This menu item is displayed in the context menu of the selected directory or file.
-
Enable OES Utilities: Enables or disables the OES Utilities. This menu item is displayed in the context menu of the Client Tray icon.
-
Enable Object Properties Dialog: Enables or disables the Object Properties dialog box. This menu item is displayed in the menu. See
Using OES Utilities
in the Client for Open Enterprise Server User Guide for more information on this menu. -
Enable Password Administration: Enables or disables password administration.
-
Enable Purge Dialog: Enables or disables the Purge Files dialog box. This menu item is displayed in the context menu of the selected volume or directory on a server.
-
Enable Salvage Dialog: Enables or disables the Salvage dialog box. This menu item is displayed in the context menu of the selected volume or directory on a server.
-
Enable Send Message: Specifies whether the Send Message function is enabled. This function is accessed from the Context menu for the selected server in Network Neighborhood.
-
Enable Send Message to Server Dialog: Enable/disable the send message to server dialog. This menu item is displayed within the server context menu item Send Message. See the Enable Send Message Dialog setting for further information on this menu.
-
Enable Send Message to User Dialog: Enable/disable the send message to user dialog. This menu item is displayed within the server context menu item Send Message. See the Enable Send Message Dialog setting for further information on this menu.
-
Enable Systray Config Dialog: Enables or disables the Configure System Tray dialog box. This menu item () is displayed on the Client Application Tray menu in the notification area of the taskbar.
-
Enable Trustee Rights Dialog: Enables or disables the Trustee Rights dialog box. This dialog box can be reached from a menu item in the context menu of a volume or directory or under the submenu on the Client Tray icon.
-
Enable Update Client: Enables or disables the menu item. This menu item is displayed in the context menu of the Client Tray icon.
-
Filter User List: Enables or disables showing only users objects in the Send Message dialog box.
-
Show Current Connections: Shows or hides the current connections displayed in the OES Resource Browser and in the Network folder.
-
Show Edit Login Script Item: Specifies whether the item is available in the . See
Configuring Your User Account
in the Client for Open Enterprise Server User Guide for more information on this menu. -
Show Client System Tray Icon: If this parameter is enabled, the Client Tray icon appears in the notification area of the taskbar, located in the bottom right portion of the Windows screen. Right-click the Client Tray icon to select from a list of Client options.
-
Show User Administration Menu: Enables or disables the menu item for user administration. This menu item is displayed in the context menu of the selected server or tree in the Network folder.
4.2.8 LDAP Contextless Login Settings
Use the LDAP Contextless Login property page in the Client Properties dialog box to let users log in to the network without specifying a tree name or context For more detailed information, see Section 8.8, Setting Up LDAP Contextless Login and LDAP Treeless Login.
Figure 4-8 LDAP Contextless Login Property Page
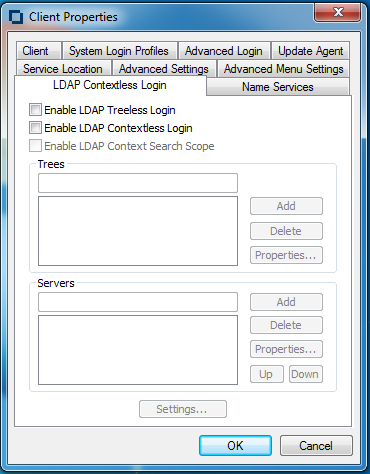
This page contains the following options:
-
Enable LDAP Treeless Login: To enable treeless login, select this check box. Treeless login makes it possible to log in to the network without specifying a tree.
-
Enable LDAP Contextless Login: To enable LDAP contextless login, select this check box. You must have LDAP Services for eDirectory installed on your corporate server hosting the corporate tree to take advantage of LDAP contextless login.
-
Enable LDAP Context Search Scope: Use this option to limit the search scope to a specific context or to a specific context and subtree.
-
Trees: Lists the eDirectory trees running LDAP Services that will be searched during login.
To add a tree to the list, specify a tree name in the field, then click . To delete one or more trees from the list, select the trees and click . These trees are no longer searched during login. To set a tree’s context scope information, select a tree from the list, then click . You can limit the scope of the search by selecting in the Tree Properties dialog box.
-
Servers: Lists the servers associated with the tree running LDAP Services.
To add a server, enter a server name in the box, then click . Servers are searched in the order they appear in this list. You can rearrange the search order by clicking or . To delete one or more LDAP servers, select the servers and then click . To set the LDAP server timeout and data encryption settings, select the server from the list, then click .
-
Settings: Opens the LDAP Contextless Login Parameters dialog box. Select the parameter you want, then use the option to configure the parameter. For most parameters, this consists of simply turning it On or Off. Some parameters give you other configuration options. A short description of each parameter is available in the field when you select the parameter.
4.2.9 Name Services Settings
Use the Name Services property page in the Client Properties dialog box to specify which name service protocols are used to attempt to resolve names.
Figure 4-9 Name Services Property Page
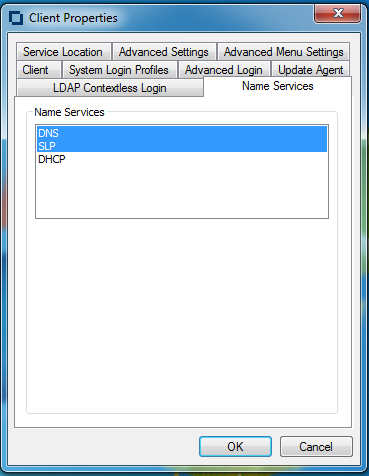
All configured name service providers are queried asynchronously in order to resolve the name to an address. They are first queried with a cache flag that allows name service providers (NSP) who maintain a cache to attempt to resolve the name. If no NSP resolves the name then they are queried again without the cache flag, allowing all NSPs to attempt to resolve the name. Service Location Protocol queries SLP for eDirectory and Bindery names.