3.9 Managing Your Login Profiles
You can use login profiles to save login information, such as your username, server, tree, context, and login script. When you select a profile during login, the profile automatically sets up the login information you (or your system administrator) specified so that you don’t have to enter this information.
Login profiles are especially useful if you log in from multiple places. You can create separate profiles for the office, home, laptop, or any other workstation you use. This simplifies the login process so that you don’t have to remember your login information for each workstation.
The Client also allows different users on the same machine to have their own login profiles.
You can add, modify, or delete your own login profiles. Your system administrator can also create login profiles for you, or define a set of system login profile templates that contain the information most commonly needed for your environment. You can modify or delete your own login profiles as needed, but you can only view login profiles created by your system administrator.
3.9.1 Creating a Login Profile
-
Right-click
 , then click .
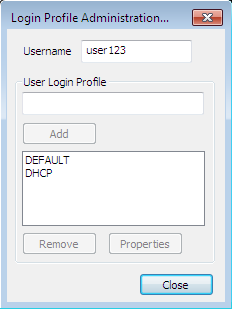
-
To create a login profile, type the name of the profile you want to add in the text box, then click .
-
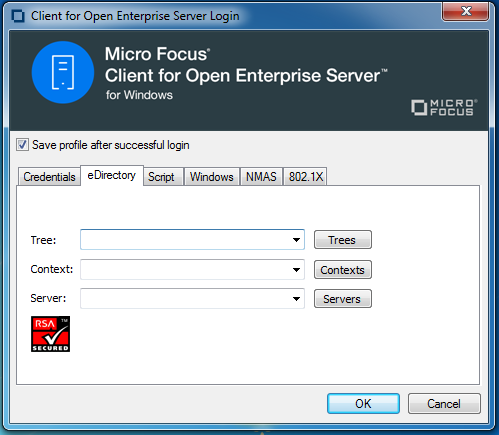
In the OES Login dialog box, specify the login information you want for this profile, such as the user's name, server, and context.
-
Click to close the OES Login dialog box, then click .
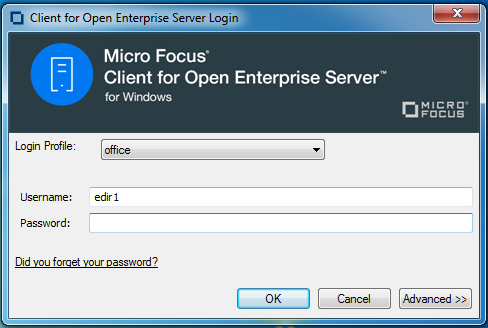
When you log in using the OES Login dialog box, you can use the drop-down list to select the login profile you created.
Figure 3-1 OES Login Dialog Box with the “office” Login Profile Selected
3.9.2 Viewing or Editing a Login Profile
-
Right-click
, then click . -
Select the name of the login profile you want to view or edit.
-
Click .
-
In the OES Login dialog box, view or modify the login information you want for this profile, such as the username, server, and context.
-
Click to close the OES Login dialog box, then click .
3.9.3 Removing a Login Profile
-
Right-click
, then click . -
Select the name of the login profile you want to remove.
-
Click .
-
Click to close the Client Properties dialog box, then click .
3.9.4 Enabling the Use of DHCP In a Personal Login Profile
If a DHCP server is set up on your network, the DHCP server can inform the Client of network-specific configuration information. To enable the use of DHCP in the Client for Open Enterprise, create a DHCP entry in a login profile. You can do this by creating a new profile or by editing an existing profile.
-
Right-click
, then click . -
Type the name of the profile you want to add (for example, Corporate) in the text box, then click .
-
In the fields you want to be filled by DHCP, select from the drop-down menu.

-
Click , then click .
The next time you open the OES Login dialog box, the DHCP profile you created is available as an option on the drop-down menu.
Select the DHCP profile from the drop-down menu to automatically populate the fields that were given the <DHCP> option in Step 3 with whatever the DHCP server sends.

NOTE:When using the login profile to perform a OES login, you can overwrite the values displayed by DHCP, but the changes are in effect only for that specific login. If is chosen as an option in a login profile for Tree, Context, or Server, you cannot remove it by simply editing the field when logging in or by saving the profile on successful login. Any values entered in these fields during login are not saved when is enabled for that field. If you want to permanently change the values in that field, you must edit the login profile using either the System Profile Manager ( tab on the Client Properties dialog box) or the User Profile Manager ( option on the Client Tray Application menu).