8.9 Configuring 802.1X Authentication
The Client includes an Extensible Authentication Protocol (EAP) plug-in to the Microsoft Windows supplicant, which lets users authenticate through RADIUS to wireless access points and wired switches for added network security. Using FreeRADIUS as the RADIUS server, users can authenticate to their local machines, to eDirectory, and to 802.1X with the same set of credentials for a single sign-on experience.
When 802.1X authentication is enabled, the username and password entered in the Login dialog box are first passed to the EAP plug-in module. An exchange of messages (PEAP/MSCHAPv2) between the Windows supplicant, the wireless access point/wired switch, and the RADIUS server allows network access if the correct credentials were entered. After the 802.1X authentication has succeeded, both the eDirectory and local logins take place just as they have in previous versions of the Clients. If the 802.1X authentication fails, no access to the network is given, and the user will not be able to access the network.
The 802.1x authentication feature supports both wired and wireless connections. Only password-based authentication is supported (the Client supports only PEAP with MSCHAPv2). Biometrics (non password-based) authentication types are not supported with this release. If you want certificate support, the Microsoft EAP plug-ins are sufficient and no Client-specific EAP support is required.
The ability to browse for trees and servers in the Login dialog box is not supported because the 802.1X port blocks all network access.
HINT:We recommend testing this functionality with user accounts that don't expire. There is a possibility that grace login messages won't display to users, which means that users might unknowingly exhaust their grace logins.
This configuration is intended for use only with the native 802.1x supplicant provided with Windows. We recommend that you install only the driver for your wireless adapter (that is, that you do not install other supplicants or utilities that come with wireless adapters). This is because such utilities often disable the wireless service in Windows. You should also make sure that the Use Windows to configure your wireless network setting is always enabled (to do this, right-click the wireless connection).
8.9.1 Enabling 802.1X Authentication
-
Right-click the Client Tray icon (
 ) in the notification area of the taskbar, then click Client Properties.
 -
In the Client for Windows Properties dialog box, click the System Login Profiles tab.
-
Select Default in the Location Profiles box, then click Properties.
-
Select Default in the Service Instance drop-down list, then click Properties.
-
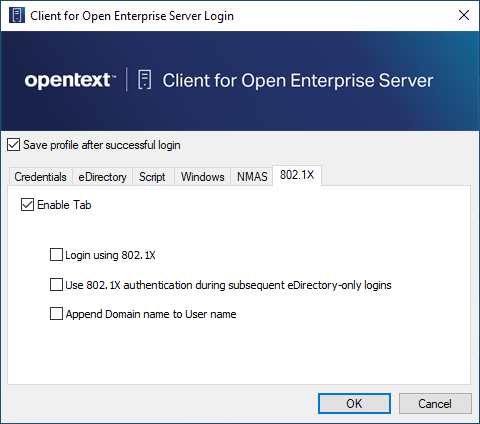
Click the 802.1X tab, then select Enable Tab.

-
Select Login using 802.1X.
You can also select any of the following options:
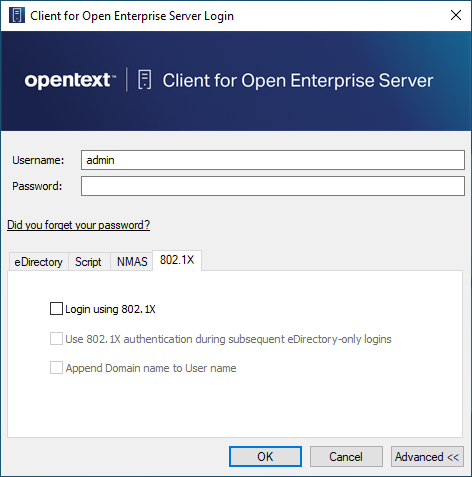
Use 802.1X authentication during subsequent eDirectory-only logins: Causes 802.1X authentication to take place when a user logs in from the Client Tray icon, even if he or she is already logged in to the Windows workstation. If the user is not logged in, 802.1X authentication takes place even if this option is not selected.
Append Domain name to User name: Prepends the user’s domain to the username when the username is submitted to 802.1X. The format is DomainName/username. Use this option if the RADIUS server expects the domain name to precede the username. This options is normally used when IAS/AD is the RADIUS backend.
NOTE:Contextless login runs after you click OK.
-
Click OK three times.
-
Reboot the workstation for the changes to take effect.
After it is enabled, an 802.1X tab appears on the Login dialog box when you click the Advanced tab. Use the options on the tab (see Step 6) to control 802.1X authentication at login time.

8.9.2 Enabling Wired 802.1X Authentication on Windows10, Windows 8, and Windows 7
To enabled wired 802.1x authentication on Windows, perform the following procedure. You must be logged in as an administrator to perform these steps.
-
Click the Start button in the lower left corner of the Windows desktop, then click Control Panel.
-
Click System and Maintenance, click Administrative Tools, then double-click Services.
-
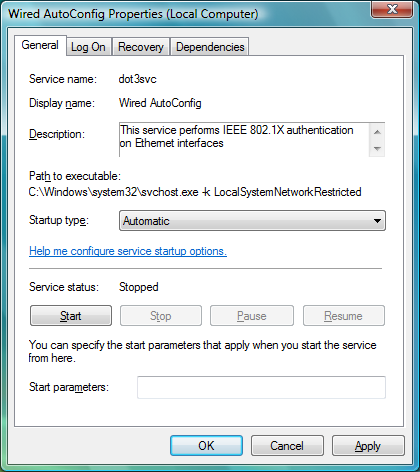
In the list of services, double-click Wired AutoConfig.
-
From the Startup type drop-down list, select Automatic.

-
Click the Start button under Service status, then click OK.
-
Close the Services and Administrative Tools windows.
-
In the Windows Control Panel, click Network and Internet, then click Network and Sharing Center.
-
Click Manage network connections in the left navigation panel.
-
Right-click your LAN connection, click Properties, and then click the Authentication tab.
-
From the Choose a network authentication method drop-down list, select Protected EAP (PEAP), and then click Settings.
-
In the Protected EAP Properties dialog box, clear the Validate server certificate check box.

-
Click OK twice.
-
Close the Network Connections window.