3 Initial Setup and Installation
3.1 On Content Manager server
The components used by the app to interact with Content Manager must be installed on all Content Manager servers that you have identified for your Content Manager Farm. Before you begin, there are features that must be enabled. This section covers the preparation that must be performed to ensure your Content Manager farm is ready for installation to begin.
3.1.1 Server roles and features
IMPORTANT: In addition to the .NET Framework mentioned in the below sections, it is highly recommended to install .NET Framework 4.7.2. If this version of .NET Framework is not available with the server features, make sure to install it manually.
Server roles
Content Manager servers must have the following role and role elements enabled:
-
Application Server role
-
.NET Framework 4.5
-
Web Server (IIS) Support
-
-
Web Server (IIS) role
-
Web Server
-
Security
-
Windows Authentication
-
-
-
Server features
Content Manager servers must have the following features enabled:
-
.NET Framework 3.5 Features
-
.NET Framework 3.5 (includes .NET2.0 and 3.0)
NOTE: The .NET Framework 3.5 feature is not required for Azure environments.
NOTE: To install .NET 3.5, you will need the windows server DVD mounted in the dvd drive or else use the alternative path and point to the sources\sxs folder of the windows server dvd.
-
-
.NET Framework 4.5 Features
-
.NET Framework 4.5
-
ASP.Net 4.5
-
WCF Services
-
HTTP Activation
-
Message Queuing(MSMQ)Activation
-
Names Pipe Activation
-
TCP Activation
-
TCP Port Sharing
-
-
-
Windows Process Activation Service
-
Process Model
-
Configuration APIs
NOTE: The Windows Process Activation Service will be automatically activated as a result of activating the HTTP Activation feature.
-
3.1.2 AppFabric
NOTE: This section does not apply if your Content Manager servers are installed in a Windows Azure environment. See Azure Cache section in General Administration Tasks.
Configuration caching is used by the application to improve performance. The technology underpinning this configuration caching is Microsoft AppFabric.
All Content Manager servers in the farm must have AppFabric correctly installed and configured.
NOTE: This section assumes that you have configured all 3.1.1 Server roles and features prior to beginning the installation.
The supported version is 1.1 x64.
For more information on installing and configuring AppFrabic, see AppFabric Cache.
3.1.3 Azure caching
For instructions to create Azure cache, details of cache endpoint, and the primary cache key during configuration, see the appendix Azure cache.
3.1.4 SQL Server
Install the following SQL server components on the Content Manager workgroup server. This step is only necessary on the server where you will run the configuration tool on.
Install the Microsoft SQL Server feature pack. It is necessary to download and install the following component:
- ENU\x64SQLSysClrTypes.msi
The SQLSysClrTypes.msi can be downloaded from the following location https://www.microsoft.com/en-us/download/confirmation.aspx?id=56041.
For information on MS SQL Server supported versions, see Content Manager Specifications and Limitations document.
Failure to install these on a workgroup server will result in an error similar to the one below when running the configuration tool or the configuration wizard:
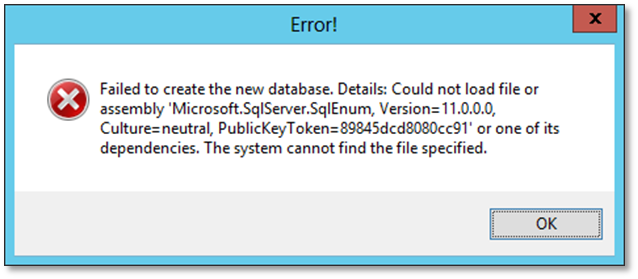
In the configuration wizard pre check window, the SQL Server Client Tool check fails.
3.1.5 SharePoint client components
The connection to SharePoint is made from the Content Manager server using the SharePoint Client Side Object Model, known as the CSOM. These components are responsible for the communication between the Content Manager and SharePoint.
The CSOM is installed by the SharePoint Server 2013 Client Components SDK MSI available from Microsoft. Download and install these components from here: http://www.microsoft.com/en-us/download/details.aspx?id=35585.
NOTE: Make sure to download and install the 64bit version of these components.
NOTE: For Content Manager 10.1, make sure to download and install the 64 bit version 16 of client components from the following link: https://www.microsoft.com/en-us/download/details.aspx?id=42038.
NOTE: Make sure to install these components on all Content Manager Workgroup server before you install the CM Governance and Compliance app. Otherwise, you will encounter an error and not be able to run the Content Manager SharePoint integration MSI.
3.1.6 Configure Content Manager
3.1.6.1 Workgroup server configured
All servers that will form part of the Content Manager farm must be configured to run as workgroup servers. Each server must have access to any Content Manager datasets that you intend to use when managing SharePoint content.
For details regarding how to configure a workgroup server, see the Content Manager documentation.
3.1.6.2 Configuring the account, permissions and granting access for a location
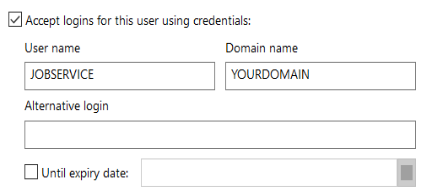
The following steps assume that a Content Manager Internal Location of type “Person” has already been created for the applicable account.
NOTE: Although the following example screenshots depict configuration for the job service account; the steps are applicable for configuring the profile of any Content Manager “Person” Location.
-
Logged into the Content Manager client as an Administrator, locate the applicable Location using the Internal Locations Directory from the Search menu. Double-click the location name to open the properties dialog.
-
In the Network Login tab of the Location’s Properties, to enable a Location to accept logins, check the option to Accept logins for this user using credentials. Enter the domain account details (User name and Domain Name).
-
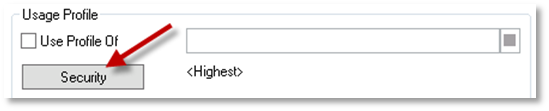
In the Profile tab, to provide a security level of <Highest> to a Location, click Security and in the resulting dialog, select the Highest level. Click OK to return to the Properties dialog.
-
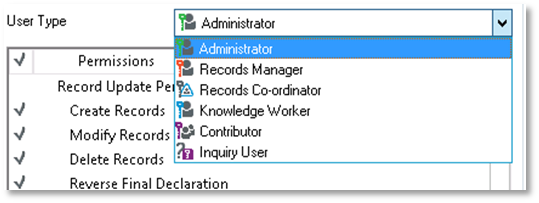
To set the User Type of the Location, select the applicable option from the User Type drop-down menu.
-
- Click OK on the properties dialog to save settings.
All the users managing the content using SharePoint must have valid location in Content Manager. User accounts must be active and the login details should include that the user will access SharePoint.
When using SharePoint online, the format of the accounts present in Content Manager is as follows:
username@domain
For example
steven@acme.com
Make sure that the account details on the Profile tab for a location use the same format.
NOTE: This does not apply to the service accounts Job Processing service account and Application pool account. These will require the account name and domain fields on the profile tab to be completed separately regardless of whether you are using SharePoint Online or an on premise SharePoint farm.
Locations must be at least a Contributor in Content Manager to manage content. Locations that use the default Contributor or Knowledge Worker user types in Content Manager must have the Modify Record Additional Field Values permission enabled. This is not enabled by default.
It is suggested that you make this modification globally rather than on a location by location basis. See, Setting the permissions granted to a user type section for instructions.
3.1.6.3 Add trusted server accounts
-
Logged into the Content Manager Enterprise Studio as a system administrator. Select the Dataset used for SharePoint and Content Manager integration. Go to, Home > General > Options. The Options window is displayed. Click Other tab.
-
In the field captioned Enter user account name and press Add, enter the name of the job service account in the format domain\username and click Add.
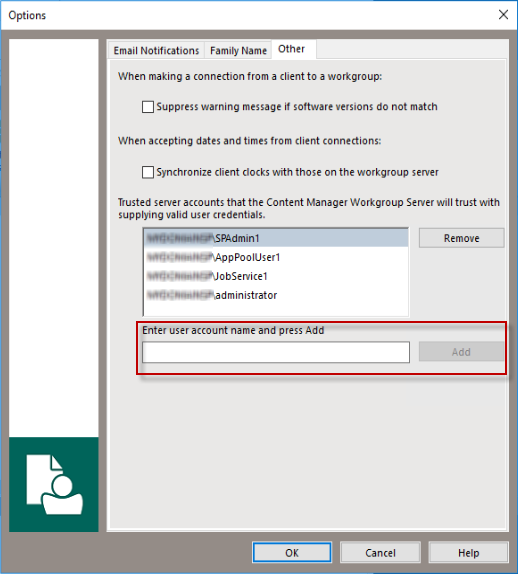
-
With the job service account added to the trusted server accounts list, click OK to close the dialog.
-
Save and deploy your changes in the Content Manager Enterprise Studio.
3.1.6.4 Enable Content Manager features
There are two Content Manager features that need to be enabled. Perform the following steps to enable them:
-
Run the Content Manager as an administrator. Go to Administration > System. The System Options window is displayed.
-
Click Features.
-
Enable the Content Manager SharePoint Integration and SarePoint Zero Footprint features.
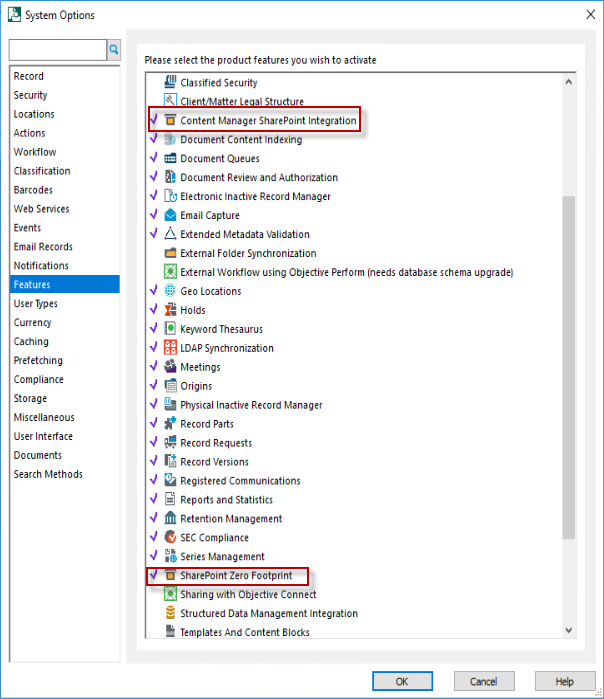
NOTE: After enabling the features, restart the Content Manager Workgroup Windows service for the settings to take effect.
3.1.6.5 Add to a SharePoint farm
All servers in the Content Manager farm must join the same SharePoint farm.
-
Open the Content Manager Enterprise Studio.
-
Expand the Workgroup Servers node.
-
For each Workgroup server under this node (that you are using in your Content Manager farm):
-
Double-click the server to open the properties dialog.
-
Choose a SharePoint server farm to join to. The value you choose is arbitrary, however all servers that form part of the same Content Manager farm must use the same value.
-
Click OK.
-
Once all the workgroup servers are configured, save the configuration and deploy it to all the servers. For details, see Saving and deploying Content Manager configuration settings.
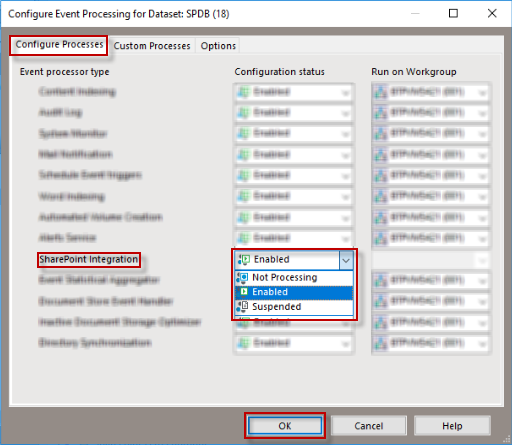
3.1.6.6 Enable event processing
You must enable event processing for each dataset used for managing SharePoint content. Using “Content Manager Enterprise Studio”, for each dataset perform the following steps:
-
Expand the Datasets node.
-
Right-click on the dataset to be used and choose Event Processing > Configure.
-
Ensure that the SharePoint Integration event processor type is set to Enabled and then click OK.
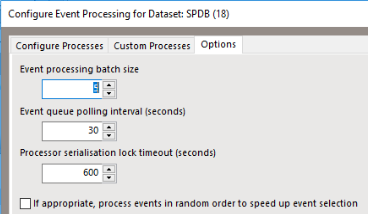
Reducing event handling time
The Content Manager event handler periodically examines the event queue to determine if there are events to be processed. By default, this polling of the event queue is performed every 120 seconds. This may lead delays in processing Content Manager record changes.
It is recommended that you decrease this polling time to reduce the amount of time taken to process these types of changes.
On the event handling configuration dialog (see previous section), navigate to the Options tab. Change the Event queue polling interval to a lower time frame. It is recommended that you do not reduce this interval to less than 30 seconds as this can cause errors during document maintenance.
The dataset used for SharePoint management must be configured to support Unicode. To enable this support, run Content Manager Enterprise Studio as an administrator.
NOTE: The process to enable Unicode has changed since previous versions.
Ensure you follow the steps below correctly in order to enable Unicode support on your datasets.
In Content Manager 9.0, you cannot directly convert a dataset from ANSI to Unicode. Create a new dataset, initialize it with Unicode support and then migrate existing data over to it. You will need to create a new dataset, initializing it with Unicode support and then migrate your existing data over to it.
Locate the dataset that is to be used and review the description. The description will include the term Unicode if Unicode has been enabled.
If this has not been enabled, select Create Dataset from the ribbon and follow these steps:
-
Follow the dataset creation steps until you reach the Initialization wizard step. Ensure to supply a bulk loading path during the creation process, otherwise it will not migrate to Unicode.
-
Check the Migrate option and select the Migrate data from Content Manager dataset from the drop down.
-
Check Support storing unicode character in string columns option.
-
Click Next and follow the rest of the prompts to create the new dataset.

Upon completion of the tool you should be able to see the new dataset and the old, the new one showing Unicode support in the description.
3.1.6.8 Saving and deploying Content Manager configuration settings
In the Content Manager Enterprise Studio, once you have made all the required changes:
-
Save the configuration. From the File ribbon, click on the Save icon.
-
Deploy the configuration changes. From the File ribbon, click on the Deploy icon.
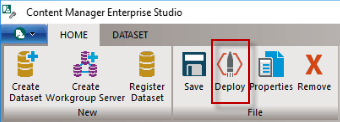
NOTE: If you receive an error when attempting to save configuration, then you need to close the Enterprise Studio, and run it again as Administrator.
3.1.7 Render configuration wizard help
To get the configuration wizard help files to render properly, install the Microsoft WebView2 Runtime. You can download from the following location: Microsoft WebView2 Runtime.
- NOTE:
-
If WebView2 Runtime is not installed the help will displayed in Edge browser.
-
If Webview2 Runtime is installed but failed to load due to permissions issue, then also help will be displayed in Edge browser.
-
The help displayed in the Edge browser is not context sensitive.
3.2 On SharePoint server
3.2.1 Prepare the corporate App catalog
The Content Manager Governance and Compliance app will be hosted in your corporate app store following installation.
In SharePoint Online, an app catalog is available automatically. In an on premise installation either you need to create new app catalog or need to know to access the existing app catalog.
Identifying the app catalog in use
During installation, you need to access the corporate app catalog to upload the Content Manager Governance and Compliance app as part of the configuration process.
For an on premise installation of SharePoint, it is possible to identify the app catalog in use using central administration. For SharePoint Online, the SharePoint admin center provides access.
You will need the URL of your app catalog during the configuration stage.
For more information, see the appendix Identifying the app catalog in use.
To create an app catalog, see the Creating an app catalog and to configure the app URL, see the Configuring an app URL.
NOTE: This section is not applicable to SharePoint online.
To install and deploy apps, ensure the following services are running on the farm:
- App Management Service
- Microsoft SharePoint Foundation Subscription Settings Service
- User Profile Service
- User Profile Synchronization service (required only for Sharepoint 2013)
Ensure you have a subscription settings service application
NOTE: This section is not applicable to SharePoint online.
A subscription settings service application must be available on your SharePoint farm. This is used by site collections to consume apps from the farm.
To identify if you already have one of these configured, examine the list of service applications installed on your farm and look for a service similar to Microsoft SharePoint Foundation Subscription Settings Service Application.
NOTE: This service is not same as Microsoft SharePoint Foundation Subscription Settings Service.
If the service is not available, you need to create one. See, the Creating a Subscription Settings Service Application appendix. If a service exists, ensure that it is started.
3.2.2 Prepare environment for high trust apps
NOTE: This section is not applicable to SharePoint online.
High trust apps are apps that require access to SharePoint information. The Content Manager app is one of them.
In order to configure your environment to allow high trust apps, it is necessary to provide a certificate that is used by SharePoint and the Content Manager server to create the necessary trust.
For further reading about high trust apps, you can read the following article: http://msdn.microsoft.com/library/office/fp179901.aspx
NOTE: If you are configuring through wizard, a certificate automatically gets generated and used. If you are using tool, a certificate is required to prepare environment for high trust apps.
Distribute the certificate to Content Manager servers
The certificate used for high trust must also be available on every server in the SharePoint farm.
NOTE: Make sure to place the certificate in the same location on every server.
- Identify a folder on the Content Manager server that will be used to hold the certificate.
- Ensure that the following accounts have at least read rights to this location:
- Any user who will run the Configuration Tool
- The job processing service account
- The application pool account
- Copy the “.cer” file to this location
- Add the certificate to the “Trusted Root Certification Authorities” (see the Adding a certificate in the Trusted Root Certification Authorities store)
NOTE: The final step is omitted in a number of Microsoft articles regarding high trust apps but has been found to be necessary.
Record the path that the certificate is located as this will be required during configuration.
Distribute the certificate to SharePoint servers
The certificate used for high trust must also be available on every server in the SharePoint farm.
NOTE: Make sure to place the certificate in the same location on every server.
- Identify a folder on the SharePoint server that will be used to hold the certificate.
- Ensure that the following accounts have at least read rights to this location:
- the app pool identity for the IIS app pool “SecurityTokenServiceApplicationPool”
- the app pool identities used by any SharePoint web application that will use the Content Manager Governance and Compliance app
- Copy the “.cer” file to this location
- Add the certificate to the “Trusted Root Certification Authorities” (see the Adding a certificate in the Trusted Root Certification Authorities store)
NOTE: The final step is omitted in a number of Microsoft articles regarding high trust apps but has been found to be necessary.
Configure SharePoint server to use certificates
The following procedure configures the certificate as a trusted token issuer in SharePoint. It is performed once and can be done on any SharePoint server in the farm.
This is done by registering the certificate with SharePoint as a “Trusted token issuer”.
Using PowerShell ISE (running as administrator) on any SharePoint server in the farm, run the script later in this section.
If you don’t use Powershell ISE, you will need to run the script line by line.
NOTE: You must run this script only once.
When this script runs, it will prompt you for the full path to the certificate file that is being used to establish high trust. The console will display the issuer ID that has been allocated.
You must be sure to record the issuer ID as you will require this during installation and configuration.
SharePoint server does not normally accept self-signed certificates. The script provided in this section includes the following entry that allows you to use a self-signed certificate. If you are not using a self-signed certificate then you should remove the following line from the script before running it:
$serviceConfig.AllowOAuthOverHttp = $true
You should remove this entry before running the script except when one or more of the following is true:
-
The certificate used to configure high trust is a self-signed certificate
-
You intend to use http as the protocol for connection with Content Manager
-
You intend to use http as the protocol for SharePoint
NOTE: The registration of the certificate as a token issuer is not effective immediately. It may take as long as 24 hours before all the SharePoint servers recognize the new token issuer. Running an iisreset on all the SharePoint servers, if you can do that without disturbing SharePoint users, would cause them to immediately recognize the issuer. The script includes an IISReset call. If this will cause issues, you may remove this line in the script.
The following is the token issuer script to run to configure the trust:
Remove-PSSnapin Microsoft.SharePoint.PowerShell -erroraction SilentlyContinue

Add-PSSnapin Microsoft.SharePoint.PowerShell -erroraction SilentlyContinue

#Create a new issuer id

$issuerId = [System.Guid]::NewGuid().ToString()

$realm = Get-SPAuthenticationRealm

$confirm = Read-Host "Caution!!! Run this script once only. Do you want to continue? (Y/N)"

if(($confirm -eq 'Y')  -or ($confirm -eq 'y'))

{

     #Get the certificate path

     $certificatePath = Read-Host "Enter the full path (including file name) to the certificate(.cer)"

     $certificate = New-Object System.Security.Cryptography.X509Certificates.X509Certificate2($certificatePath)


     #Set this certificate as the root authority

     New-SPTrustedRootAuthority -Name “HPRecordsManagerTrust” -Certificate $certificate


     #Construct the full Issuer ID

     $fullIssuerIdentifier = $issuerId + ‘@’ + $realm


     #Register the certificate as a trusted token issuer

     New-SPTrustedSecurityTokenIssuer -Name "HPE Content Manager High Trust App" -Certificate $certificate -RegisteredIssuerName $fullIssuerIdentifier –IsTrustBroker


     Write-Host "Use this issuer id" + $issuerId + "in your App Manager"


     #Turn on OAuth over HTTP

     $serviceConfig = Get-SPSecurityTokenServiceConfig

     $serviceConfig.AllowOAuthOverHttp = $true

     $serviceConfig.Update()

     IISreset

}
If you run this script more than once, you will see an error message indicating that the HPRecordsManagerTrust already exists.
Should this situation arise, it will be necessary to delete the HPRecordsManagerTrust, and the corresponding Trusted Security Token Issuer that was created.
To do this, carry out the following steps:
- In PowerShell ISE (As Administrator) run the following command:
Remove-SPTrustedRootAuthority -Identity "HPRecordsManagerTrust"
- Now identify the RegisteredIssuerName for the HPE Content Manager High Trust App, by running the following command:
Get-SPTrustedSecurityTokenIssuer | select Name,RegisteredIssuerName | fl
- This will list any Trusted Security Token Issuer registered on the farm, including the HPE Content Manager High Trust App:
Name                 : HPE Content Manager High Trust App
RegisteredIssuerName : 85298320-b8a1-4ca6-9057-6407fea6fe49@ab9d84e2-0d92-4e4e-8b36-40bbc4004a7e
- Copy the RegisteredIssuerName value to the clipboard, and then run the following command, inserting the value you just copied:
Get-SPTrustedSecurityTokenIssuer | ?{$_.RegisteredIssuerName -eq "<RegisteredIssuerName value goes here>"} | Remove-SPTrustedSecurityTokenIssuer
- For example, to remove the HPE Content Manager High Trust App listed above, you would run the following command:
Get-SPTrustedSecurityTokenIssuer | ?{$_.RegisteredIssuerName -eq "85298320-b8a1-4ca6-9057-6407fea6fe49@ab9d84e2-0d92-4e4e-8b36-40bbc4004a7e"} | Remove-SPTrustedSecurityTokenIssuer
You can then rerun the token issuer script again to reissue the issuer ID for the HPRecordsManagerTrust.
If you do run the script a second time in this scenario, the issuer ID will change so it will be necessary for you to update any record you have of it.
Run the following script to list out the issuer IDs in your system:
Get-SPTrustedSecurityTokenIssuer | select Name,RegisteredIssuerName | fl
This will list all trusts configured in your SharePoint farm. Locate the entry with the name “HPE Content Manager High Trust App”. The “RegisteredIssuerName” contains a string with the “@” symbol half way along. The characters before the “@” symbol are the issuer ID.
3.2.3 Identify the default site collection
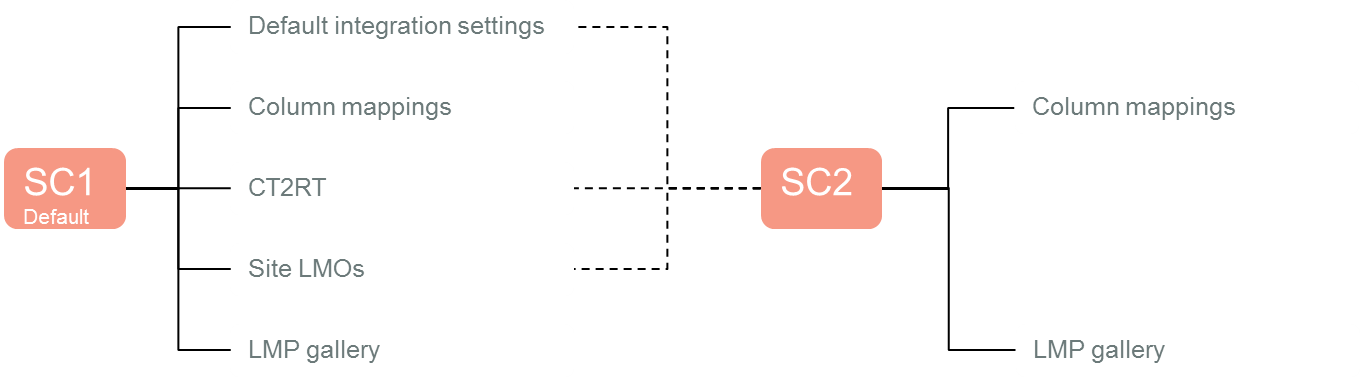
During configuration, you will be required to identify a site collection that will act as the default site collection. The default site collection is used as the provider of default configuration values for other site collections.
On the default site collection you can define the configuration settings that will be used by that site collection.
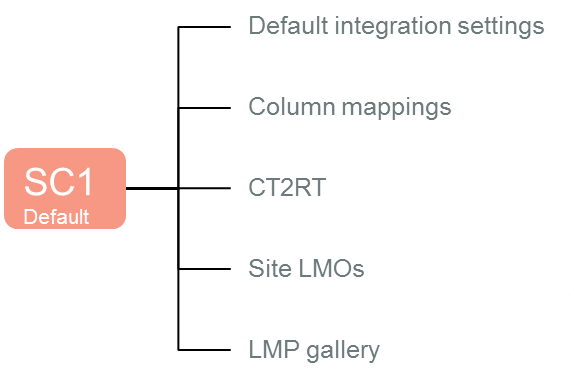
Other site collections can then elect to use the configuration that is specified on the default site collection.
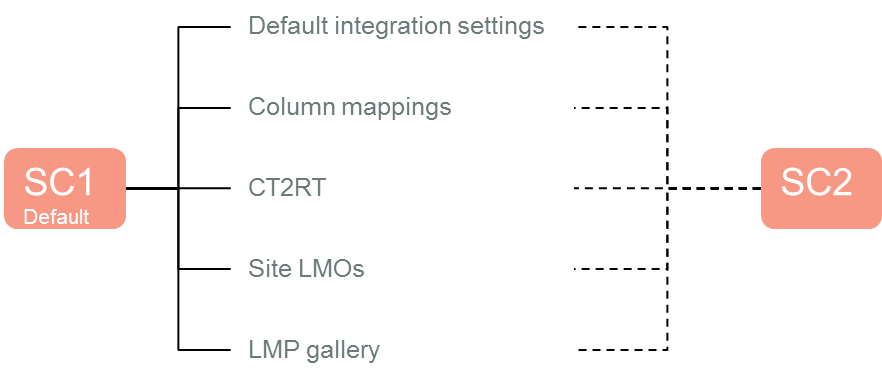
It is even possible to indicate that a site collection will only use some of the default site collection values, and provide values for other configuration.
Considerations for choosing the default site collection
If you are using a site collection as a content type hub, this site collection would make a good candidate for the default site collection as it is already used to provide information to other site collections in your farm. It therefore may be logical to extend it to provide the Content Manager default configuration as well.
3.2.4 Creating Content Manager term sets
In SharePoint, you can define set of terms that can be used across your SharePoint farm.
Content Manager for SharePoint utilizes term sets to represent the following types of Content Manager data:
- Record types
- Classifications
- Security levels
- Security caveats
These terms must be created in SharePoint using the tools provided.
NOTE: Creating term sets must be separately instigated. If you fail to do this, you will not be able to complete configuration of the product.
Currently only single SharePoint farm Managed Metadata Services are supported. There is no support for sharing services across multiple SharePoint farms. It is possible to share services across farms and it may work for the creating and using the Content Manager term sets, however no support will be provided in case there are problems encountered.
-
Create a group for the Content Manager database
Term sets are created in “Term Stores” that reside in a “Managed Metadata Services” (MMS). In a term store you can define a group that is used to logically group related term sets. In order to create the Content Manager term sets, a dedicated group must be created for each Content Manager dataset that terms are required for.
To create this group, you must be a term store administrator. For instructions on how to add a user as a term store administrator, see the Adding a term store administrator.
For each MMS that is used by your SharePoint farm to provide term sets, you must create a new group in the term store (see the Creating a term store group for details if required).
Once the group has been created, you must give sufficient permission to allow the creation of the terms. For details, see Granting permissions to a term store group.
-
Instigating term set creation
The creation of term sets is performed using the configuration tool.
NOTE: It is advised to stop the SharePoint service when undertaking tern set creation or maintenance.
Open the configuration tool and navigate to the Tools > Term Sets tab. See Term sets for more details.
-
Supported Configuration
The Term Set should only be created on the same SharePoint farm that the SharePoint Integration is configured on.
For details on term store, see Working with the term store.
3.3 Identify and configure accounts
There are several key accounts that are used by the product. These accounts must have specific permissions to the Content Manager Server, to Content Manager datasets and also to SharePoint. This section describes the permissions that these accounts must have.
It is advisable to identify and configure these accounts prior to installation and configuration.
The installing user is the account that will be used to:
- Install the Content Manager for SharePoint MSI
- Configure the app using the configuration wizard
- Provision the app in the app catalog
- Add the app to site collections
This user must have the following permissions:
- Have dbcreator permissions in the SQL Server instance in use
- Contribute permissions to the Apps for SharePoint list in the corporate app catalog
- Site collection administrator for the site collection that will be used as the default site collection
- A term store administrator for the managed metadata service used by the default site collection.
- Have a location in Content Manager with a user type of Records Co-ordinator or higher.
- Read access (or higher) to the location that the high trust certificate is installed on every server in the Content Manager farm
Job processing service account
The job processing service account is used to run the “Content Manager SharePoint Service”. During installation you will be asked for the account to use for this service. Provide an account that has the following permissions:
- Have a location in Content Manager with a user type of Administrator and a security level and security caveats at least as high as any records that will be managed. The preference is to grant “<Highest>” security.
- Annotated in Content Manager Enterprise Studio that it can impersonate other accounts (see the appendix “Indicating that an account can impersonate” in the Content Manager tasks section)
- Granted the “log on as a service” right on the machine (the installation process will grant this permission for you)
- Member of the “Performance Monitor Users” group on every server in the Content Manager farm (this is not required in Windows Azure environments)
- A site collection administrator on all site collections that will be managed (required for necessary document access)
- Read access (or higher) to the location that the high trust certificate is installed on every server in the Content Manager farm
An account is required to identity the application pool that will run the IIS site created by the installer. During installation you will be asked for the account to use for the application pool. You will need to provide an account that has the following specific permissions:
- Have a location in Content Manager with a user type of Administrator and a security level and security caveats at least as high as any records that will be managed. The preference is to grant “<Highest>” security.
- Annotated in Content Manager Enterprise Studio that it can impersonate other accounts
- Be a member of the local IIS_USRS group on every server in the Content Manager farm.
- Read and write permission to the installation directory (the installation process will grant this permission for you)
- Be a member of the Performance Monitor Users group on every server in the Content Manager farm (this is not required in Windows Azure environments)
- Read access (or higher) to the location that the high trust certificate is installed on every server in the Content Manager farm
NOTE: It is preferable to have separate accounts for the application pool and job processing service, it is acceptable to make them the same account.
When documents that have been managed are viewed from Content Manager, the document is retrieved from SharePoint in order to display to the user. This document retrieval is performed by the Content Manager Workgroup Service and is therefore performed as the identity that is used by that service.
During configuration you will be asked to specify a group or user who is permitted to perform this document retrieval. This is known as the document viewers group or user.
Ensure that this group has the following members:
- The identity used to run the “Content Manager Workgroup” windows service (see the appendix “Identifying the account that a Windows service is running as”)
Tasks and requests are performed by jobs in the job queue. Any user can view their own jobs but only members of the job administrators group can view all jobs from all users.
During configuration you will be asked to specify a group that contains the users who are considered job administrators. You should identify a group that has only those who are required to view all jobs.
Ensure that this group has the following members:
- All users that will need access to see all jobs in the job queue
If an AD group is not suitable for your environment needs, you can specify a list of users who should have this permission instead.
When a federated search is executed, the result source is configured to attempt the search as a specific user. Although the identity of the request will be presented as this user, it is the interactive user that the search will be performed as.
In order to prevent malicious users attempting to perform searches on behalf of others, the identity of the request must be confirmed as a trusted identity. Trusted identities are indicated by their inclusion in a particular AD group. This group is known as the Search Administrators group. During configuration you will be asked for the group to use. You should identify an AD group that only has the search identity in it.
Ensure that this group has the following members:
- All users that will be used as the NTLM credentials for a result source that access Content Manager records
For more information on the process of creating a result source, see Content Manager SharePoint Integration User Guide.
There are situations where it is not possible to configure a result source to use a particular NTLM account. In those scenarios, the request will be presented as an anonymous. In this scenario, if a value is specified for the Default Search Location, the search will be performed as this user, regardless of who the interactive user is.
You will be asked during configuration for an account to use. Ensure that this user cannot see any records that are not considered available to all Content Manager users.
NOTE: This feature is optional and this value can be left blank to render this feature inoperative.
SharePoint\System location
NOTE: This section applies only if you intend to use the SharePoint Content Organizer feature.
If you plan to use the SharePoint Content Organizer feature, tasks performed by the content organizer present to Content Manager as a user with the account name: SharePoint\System
A location must exist in Content Manager for this account. This location must:
- Have a user type of Contributor or higher (and have correct permissions as described in the Permissions section)
- Have the domain specified as SharePoint and the account name specified as System on the profile tab.
- Be allowed to login to Content Manager
3.4 Determining the protocol and port
3.4.1 Choosing a protocol
The installation creates an IIS site used by the Content Manager Governance and Compliance app. This contains pages, services and resources used by the app as well as all the components that interact with Content Manager.
This site is initially configured to use the HTTP protocol.
It is recommended to use the HTTPS protocol on the app service site. For SharePoint Online installations, the only supported protocol is HTTPS.
There are additional configuration steps required to enable HTTPS. You should determine if HTTPS will be required prior to beginning the configuration process.
3.4.2 Choosing a port
During installation, you will be asked to specify a port that the app service will be installed on. This port must:
- Not in use by IIS (see appendix Determining ports in use)
- Not be in use by another application (see appendix Determining ports in use)
- Be open on any firewalls between the SharePoint farm and the Content Manager farm
- Be open on any firewalls between end users and the Content Manager farm
If you intend to use HTTPS, then the importance of this port is reduced as part of configuration, the site will be switched to port 443. You will still need to enter a port during installation however.
3.5 Installing the Content Manager components
The installation of the Content Manager components is required on each workgroup server in the Content Manager farm. Before you run the MIS, ensure that for each workgroup server necessary preparation described earlier has been performed.
Run the MSI and provide the following information:
-
Double-click on CM_SharePointIntegration_x64 msi to install the Content Manager components. A welcome screen is displayed.
NOTE: If you have not completed installing the required components, an error message is displayed. Complete all the pre-requisite installations and re-run the msi.
-
Click Next. The License screen is displayed.
-
Accept the license and click Next. The Destination folder screen is displayed.
-
Click Next to display the Access Site Details.
-
Enter the port number, app pool user account information and the password. Enter the selected account in the format domain\account.
Click Next. The job processing service identity screen is displayed.
For more details, see 3.4 Determining the protocol and port and Application pool account sections.
-
Enter the job service user name and password. Enter the selected account in the format domain\account. Click Next.
For more details, see the Job processing service account section.
The Ready to install screen is displayed.
-
Click Next. The update system is displayed.
-
Click Finish once the installation is complete.
The Content Manager SharePoint Configuration tool icon appears on your desktop.
3.5.1 Configuring the use of HTTPS
If you have elected to use the HTTPS protocol, there are several manual steps that you must perform following the installation process to convert the app service site to use this protocol.
See 3.4 Determining the protocol and port section on how to make this selection.
Enabling https for the site
The installation process creates a web site in IIS with the name “Content Manager SharePoint Server”. By default, this site is configured to use HTTP.
To enable HTTPS for this site, see the Enabling HTTPS for a site section.
NOTE: Using a self-signed certificate will not be suitable for https on the Content Manager SharePoint Server website. You will need to use an existing SSL certificate, or obtain one through a certificate request in IIS.
To disable HTTP for this site, see the Disabling http for a site section.
Modify the web config files
The web.config file used by the “Content Manager SharePoint Server” site is by default configured for http.
- Navigate to the installation directory and open the file called “web.config” (notepad is a suitable program for opening this file)
- Locate all the following nodes (there should be 3):
<security mode=”TransportCredentialOnly”>
- Modify all nodes to read:
<security mode=”Transport”>
- Now locate the node:
<add binding="basicHttpBinding" scheme="http" bindingConfiguration="secureBinding" />
- Modify the node to read:
<add binding="basicHttpBinding" scheme="https" bindingConfiguration="secureBinding" />
- Save the changes to the web.config file.
Testing that HTTPS is correctly configured
If HTTPS is configured correctly, it should be possible to successfully browse to a number of key URLs (replace <YourURL> with the machine name of the Content Manager server or the load balanced URL used for accessing the Content Manager farm.
- https://<YourURL>/Pages/DialogLoader.html (will display the text “working on it”)
- https://<YourURL>L/EventReceivers/remoteevents.svc (displays a default service description page)
- https://<YourURL>/SecureServices/DataStoreService.svc (displays a default service description page)
3.5.2 Additional steps for Windows Azure
If installing on a server hosted in Windows Azure, the following additional steps are required.
NOTE: These steps are applicable if using a Windows Azure Managed Cache or a Redis cache.
Update the caching configuration
-
In the installation directory, locate the file: CacheConfiguration.xml
-
Open this file (notepad is a suitable application).
-
In the file, locate the following node:
<CacheType>AppFabric</CacheType> -
Modify this node to read (dependant on whether using managed or Redis):
- <CacheType>WindowsAzureManaged</CacheType>
- <CacheType>WindowsAzureRedis</CacheType>
-
Save the file.
NOTE: In some cases it has been found that after publishing using the configuration tool that this value reverts to AppFabric. If this happens, you will be able to access the app start page but no other pages. You may also see errors in the SharePointIntegration.log file stating Failed to access app fabric cache. If this occurs, repeat the steps above to correct the file.
Replace AppFabric assemblies
- Stop the Windows service: Content Manager SharePoint Service.
- In the installation directory, locate the folder: WindowsAzure.
- Copy all files that are in this directory.
- In the installation directory, locate the folder: bin.
- Paste the copied assemblies into this directory, overwriting any existing assemblies already in that directory.
- Start the Windows service after completion of Publish: Content Manager SharePoint Service.
NOTE: If you by mistake perform this step and need to revert to the app fabric assemblies, they are available in the AppFabric folder in the installation directory.
3.5.3 Additional steps for use with SharePoint Online
Authentication used by SharePoint Online differs to the authentication used by a high trust app used with an on premise instance of SharePoint. The installation process assumes that an on premise instance of SharePoint will be used, so IIS authentication must be re-configured. Perform the following steps:
-
Open IIS Manager and select the site: Content Manager SharePoint Server.
-
In the right hand pane using the Features view locate and double click Authentication icon.
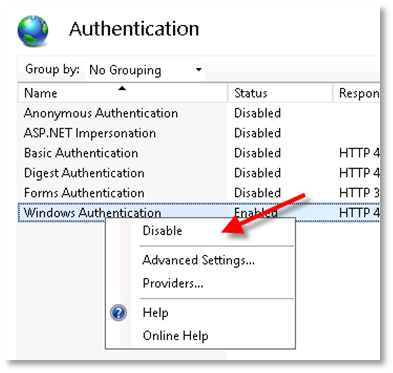
Authentication will initially show Anonymous Authentication as Disabled and Windows Authentication as Enabled.
-
Right click on Anonymous Authentication and select Enable.
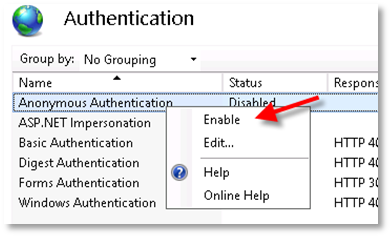
-
Right click Windows Authentication and select Disable.
3.6 Installing the auditing components
In order to capture document view events through SharePoint, a separate SharePoint solution must be installed on the SharePoint farm. This section describes how to install this solution.
NOTE: It is not possible to install the auditing components in Office 365.
3.6.1 Adding the solution to the farm solutions
The solution must be added to the collection of solutions available on the farm before it can be used.
Locate the solution file on the machine where the Content Manager Governance and Compliance app installation package was run. The solution file can be found at:
[Program Files]\Micro Focus\Content Manager\Content Manager SharePoint Integration\Audit\ ContentManagerGovernanceAndCompliance.wsp
Copy this file to a web server in your SharePoint farm.
On the web server, open an instance of SharePoint Management Shell as administrator and execute the following command replacing [source] with the full path to the copied wsp file. This script will add the solution to the solution store.
Add-SPSolution -LiteralPath "[Source]\ContentManagerGovernanceAndCompliance.wsp"
3.6.2 Deploying the solution
The solution must be deployed to any web applications that intend to use it. Perform the following steps:
-
Browse to the Central Administration site for the SharePoint farm and click System Settings.
-
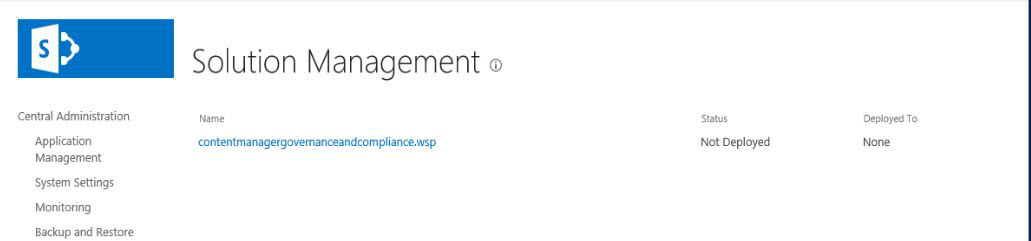
Click Farm Management > Manage farm solutions.
-
Locate and click contentmanagergovernanceandcompliance.wsp solution in the list of solutions displayed in Solution Management page. The Solution Properties page is displayed.
-
Click Deploy Solution.
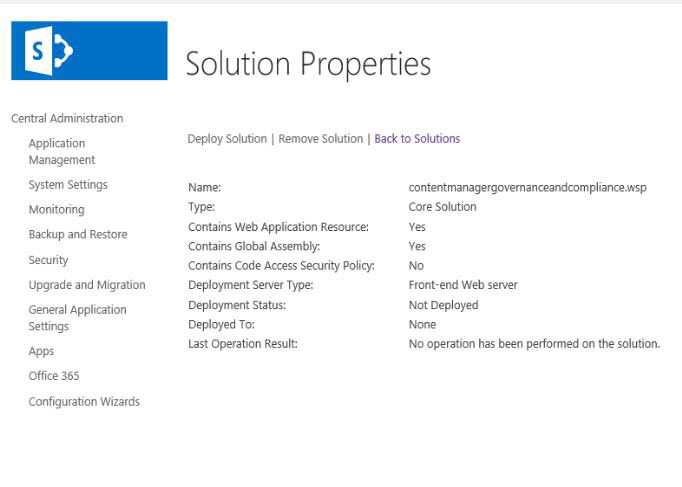
-
Select a web application to deploy from the drop down and click OK.
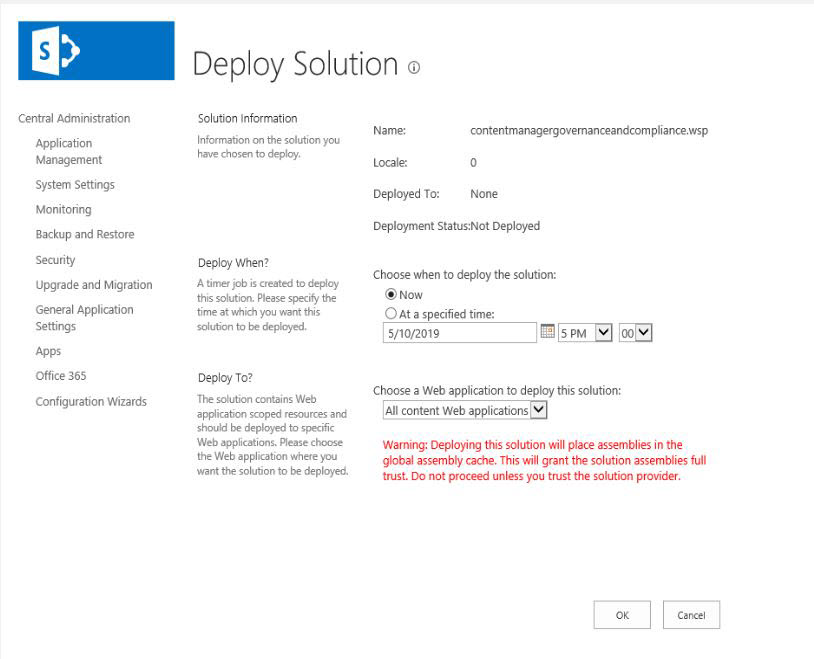
A status message is displayed once the solution has been deployed.