4 Configuration
Following installation of the product, there are various configuration options that must be set before SharePoint content can be managed. The steps in this section take the environment from one where the product is simply installed, to one where the basic configuration of the environment is complete.
To select a configuration option log into the machine as the installing user, right click Content Manager SharePoint Configuration tool available on your desktop and select Run as Administrator. Configuration selection window is displayed.
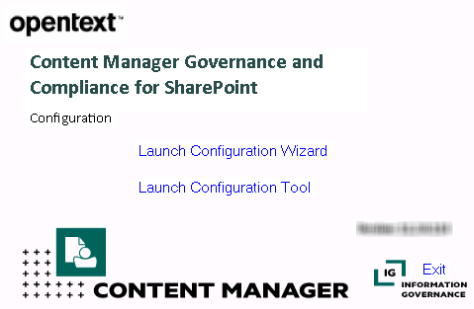
There are two ways of configuring SharePoint Integration:
-
Using the Configuration Wizard
-
Using the Configuration Tool
4.1 Using Configuration Wizard
The Configuration Wizard will guide you through the configuration steps required to correctly configure the SharePoint Integration.
NOTE: The Configuration Wizard is not supported for upgrades.
-
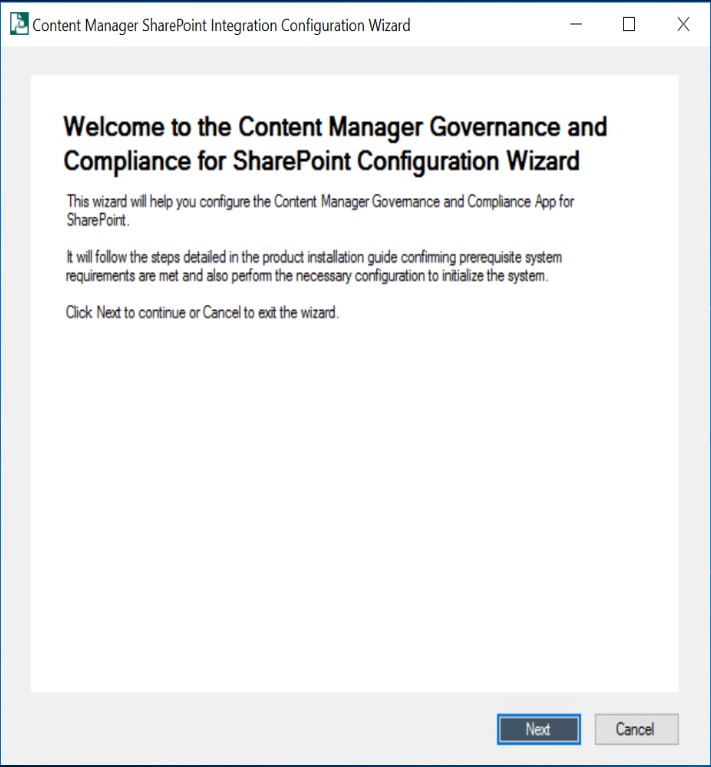
Run the Content Manager SharePoint Configuration tool as Administrator and click Launch Configuration Wizard in the selection window. The welcome screen is displayed.
-
Click Next. The Pre check window is displayed listing all the prerequisites for the integration.
The wizard checks for each prerequisite one by one and displays the status against the list item. Once the pre check is complete, the Next button is enabled.
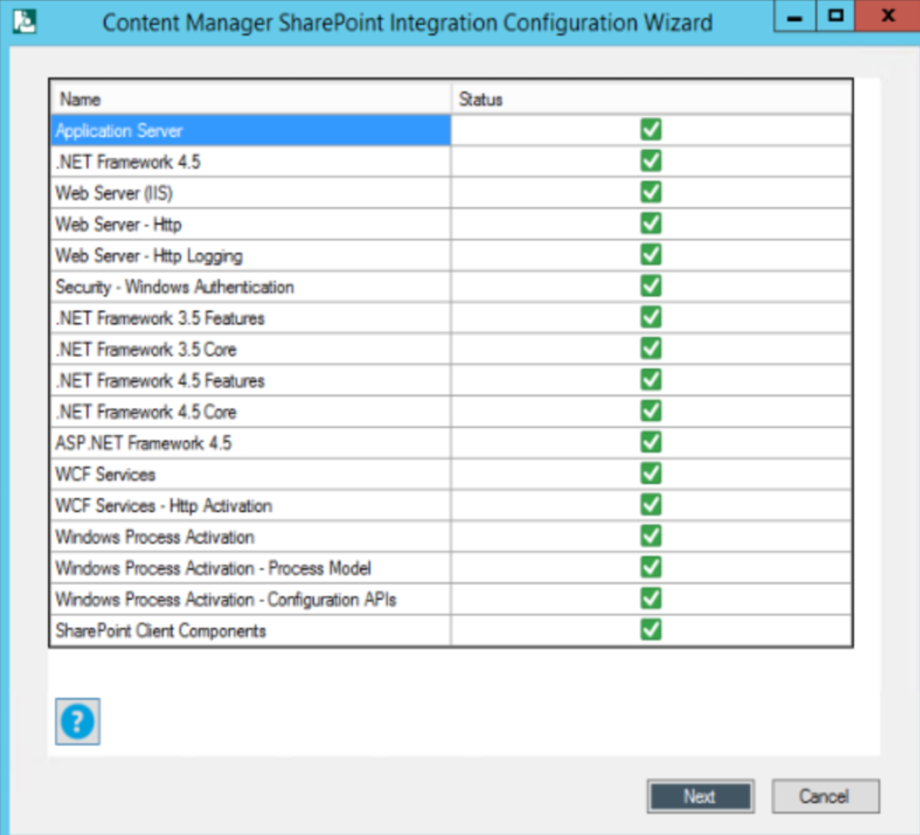
For more information on prerequisite configurations, see 3.1 On Content Manager server.
-
Click Next. The Content Manager Farm details window is displayed.
-
Select from the drop down whether you want to create a new Content Manager farm or join existing one or use the current farm.
-
If you are creating new Content Manager farm, enter the SQL Server Instance and name for the Content Manager farm database in the Create a new Content Manager Farm window.
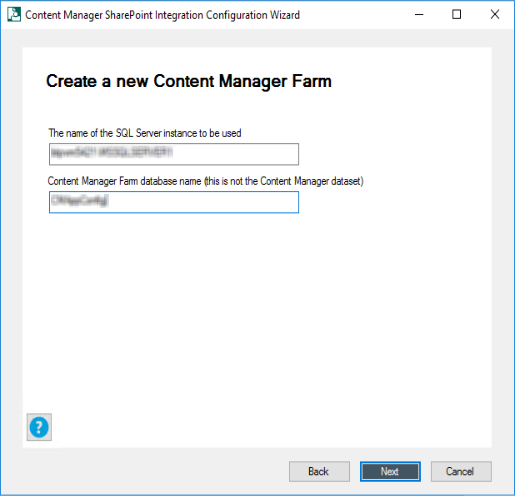
Click Next. The Cache Details window is displayed.
-
if you are joining the existing farm, enter the server name, database details and test the connection in the Join an Existing Content Manager Farm > Data Link Properties window.
Click OK and then click Next. The Cache Details window is displayed.
-
If you are using the current farm, the Cache Details window is displayed.
-
-
Select the type of cache that will be used by Content Manager farm from the drop down and click Next.
For details on various cache configurations, see B: General administration tasks.
The SharePoint Configuration Result window is displayed.
-
Select the SharePoint instance being configured from the drop down and click Next.
The Tenant Information window is displayed.
-
You can add a new tenant or edit existing one based on whether you have created a new Content Manager farm or using the existing / current farm.
-
For new Content Manager farm
If you have created a new Content Manager farm in step 4, then in the Tenant Information window, you get option only to add a new tenant.
Select Add new Tenant from the drop-down and click Next. The Content Manager Farm URL window is displayed. Go to step 8.
-
For existing farm or using current farm
If you have joined an existing farm or using a current farm, then in the Tenant Information windows, you also get an option to Edit an existing tenant information. Perform one of the following steps:
-
Add new Tenant
If you select this option from the drop-down, click Next.
The Content Manager Farm URL window is displayed.
-
If you select this option from the drop-down, the Choose Tenant window is displayed. Select an existing tenant from the drop-down and click Next.
The Content Manager Farm URL window is displayed.
-
-
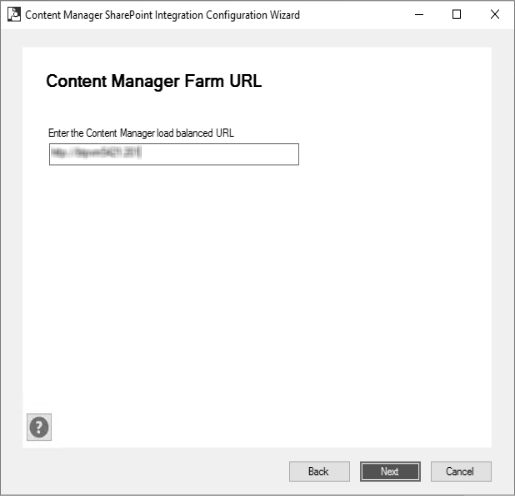
-
Enter the Content Manager load balanced URL and click Next. The Configure SharePoint for Apps window is displayed.
-
Select Yes or No based on whether the SharePoint instance has already been configured or not and click Next. The Default Site Collection window is displayed.
-
Enter the default site collection URL and click Next. For more details, see 3.2.3 Identify the default site collection.
-
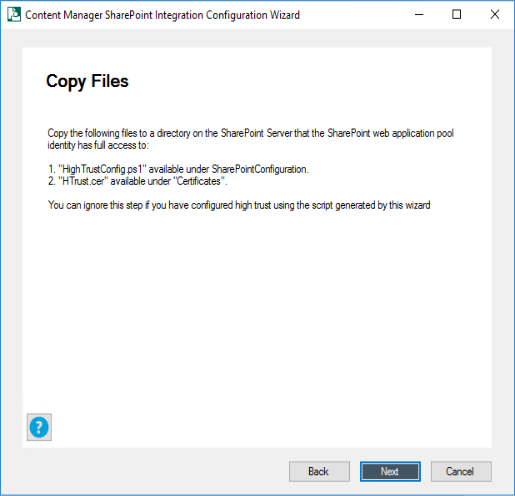
Ensure the following manual steps are completed:
-
Copy the script and certificate files from Content Manager manager to a folder on the SharePoint server.
Click Next if you have already copied the files.
-
On the SharePoint server, run the script copied from Content Manager. This script generates a
.xmlfile. Click Next.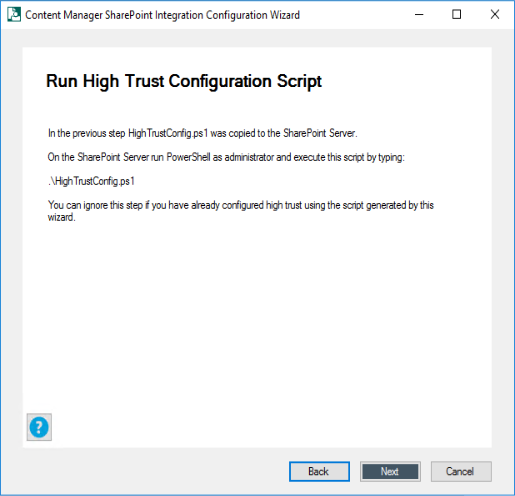
-
Copy the
.xmlfile to the Content Manager system. Click Next if you have already copied the files. The Configure SharePoint Site User Experience window is displayed.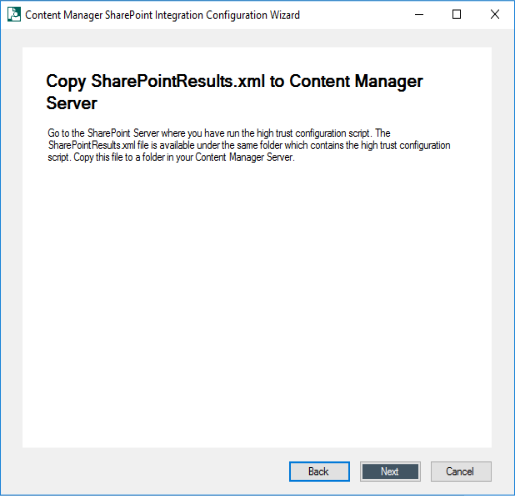
For more information, see 3.2.2 Prepare environment for high trust apps.
-
-
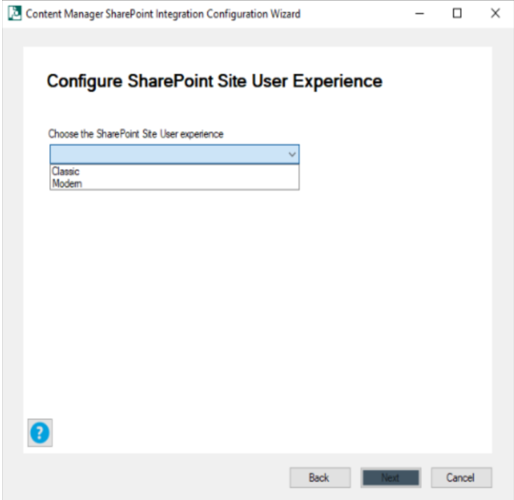
Select the SharePoint Site User experience (Classic or Modern) from the drop down and click Next. The App Identifier window is displayed.
-
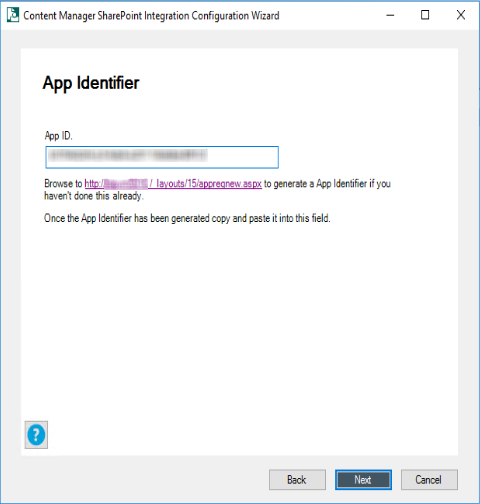
Generate the App ID using the link and copy paste the ID in App ID field. Click Next.
The SharePoint Configuration Results window is displayed.
Register the app in SharePoint system
Before uploading an app to the corporate app catalog, it must be registered with SharePoint first. This process provides an “App ID” that will be used later in the configuration process.
Registration is performed using the SharePoint “appregnew.aspx” page. To access this page, navigate to the following URL where [site collection URL] is the full URL to the root of your default site collection:
[site collection URL]/_layouts/15/appregnew.aspxFor example, if the site collection URL was http://SharePoint, then the URL of the appregnew page would be:
http://SharePoint/_layouts/15/appregnew.aspxFor both SharePoint on premise and online

Using the appregnew page, generate an Client Id and Client Secret by clicking on the Generate buttons.
Take a copy of the generated Client Id, as this will be required in a later step.
NOTE: From SharePoint version 2016 onwards, App ID and App Secret are referred as Client ID and Client Secret, respectively.
Specify “Content Manager Governance and Compliance” for the Title. Specify your App domain i.e. the domain that the app will be used in.
For the Redirect URI, you must specify the full URL of the app start page. This will be the Content Manager farm URL with the following appended:
/pages/appstart.aspxFor example, if the Content Manager farm URL is:
https://service.mydomain.comThen the full URL to specify in the Redirect URL will be :
https://service.mydomain.com/pages/appstart.aspx
After entering all the details, click Create to register the app in your environment.
-
Enter the full path to the
.xmlfile you copied on to the Content Manager system and click Next.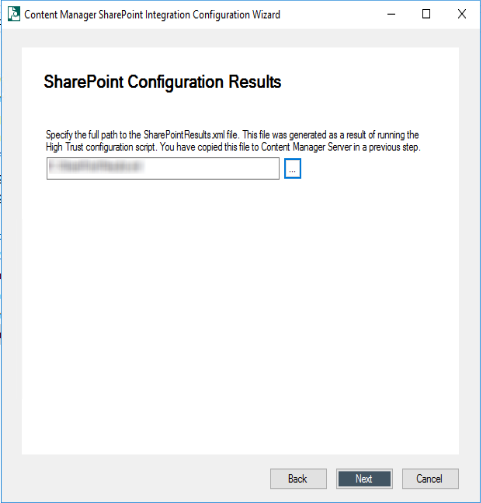
NOTE: If you are using existing tenant (see Edit existing Tenant), only then a check box with the option Fetch Issuer ID from stored configuration is displayed. Select the check box to fetch the issuer ID. The option to enter the path for the
.xmlfile is disabled.The Set the Protocol to use window is displayed.
-
Select the type of protocol to use for communication between Content Manager and SharePoint and click Next.

For information on enabling and disabling HTTPS, see HTTPS.
The Auto Install App window is displayed.
-
Select Yes from the drop down to automatically install the Content Manager Governance and Compliance App to the default site collection and click Next.
If you have already installed the Content Manager Governance and Compliance App, select No from the drop down and click Next.
-
Enter the app catalog URL and click Next.

If you have selected No in Step 15, proceed with next step. Else, go to Step 19.
For information on identifying app catalog, see section Identifying the app catalog in use.
-
On the SharePoint System, manually, upload the Content Manager Governance and Compliance App. Click Next.
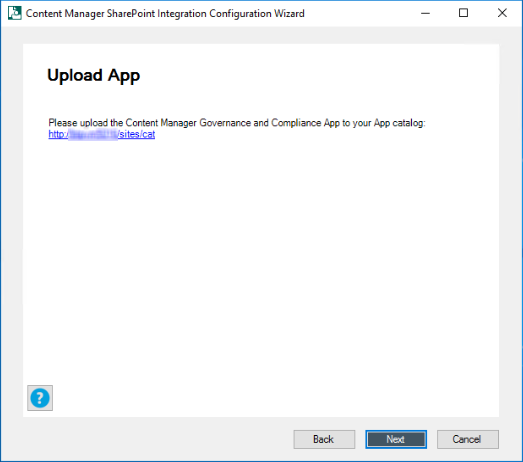
Upload the app to the corporate catalog in SharePoint system
These steps describe how to add the Content Manager Governance and Compliance app to the corporate app catalog.
-
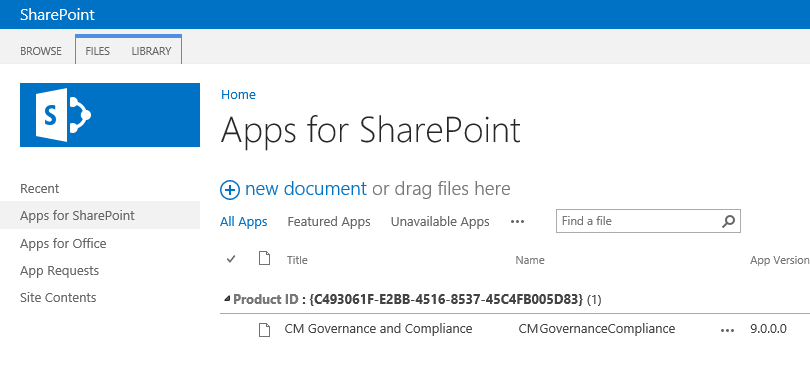
Navigate to the corporate app catalog used by your SharePoint farm.
-
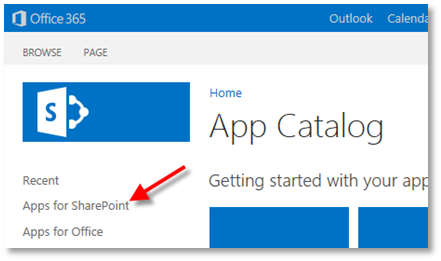
Click the “Apps for SharePoint” link.
-
Click the “upload” link.

When prompted, select the app file to upload. The app file created in the previous step can be found in the installation directory of Content Manager for SharePoint. By default, this directory is:
[Program Files]\Micro Focus\Content Manager\Content Manager SharePoint IntegrationThe app file name is:
HPRMGovernanceCompliance.appDuring upload, you will be prompted to enter metadata for the app. Entry of this information is optional, however, entering the URL of the image to display for the app is recommended.
The URL will be:
<Content Manager Farm URL> + “/Images/AppIcon.png”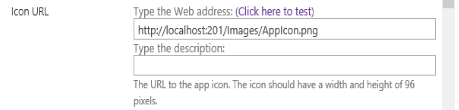
-
Clicking Save on this form will complete the addition of the app into the app catalog.
-
-
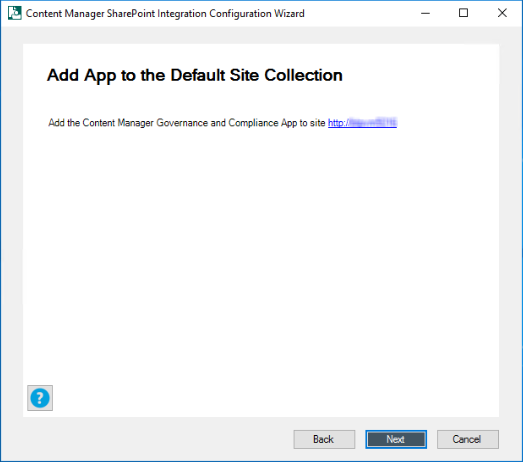
Add the Content Manager Governance and Compliance App to the Default site collection. Click Next.
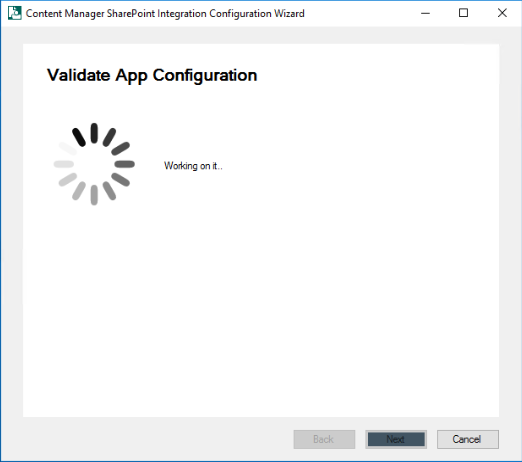
The Content Manager Governance and Compliance App installation is validated.
Add the app to the default site collection in SharePoint system
The app must be added to the site collection that has been selected as the default site collection.
-
Navigate to the root of the default site collection, then to Site Contents for the site collection. On this page choose the add an app link.

-
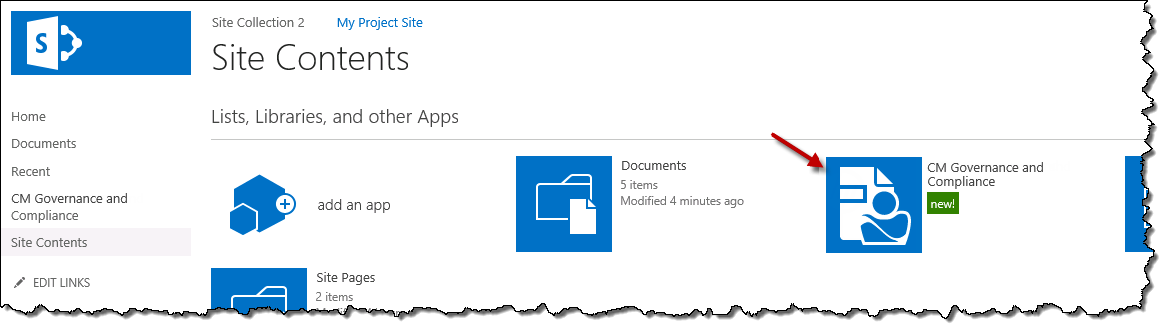
On the apps page, choose either of the links Apps You can Add or Apps from your Organization and select the Content Manager Governance and Compliance app from the list.
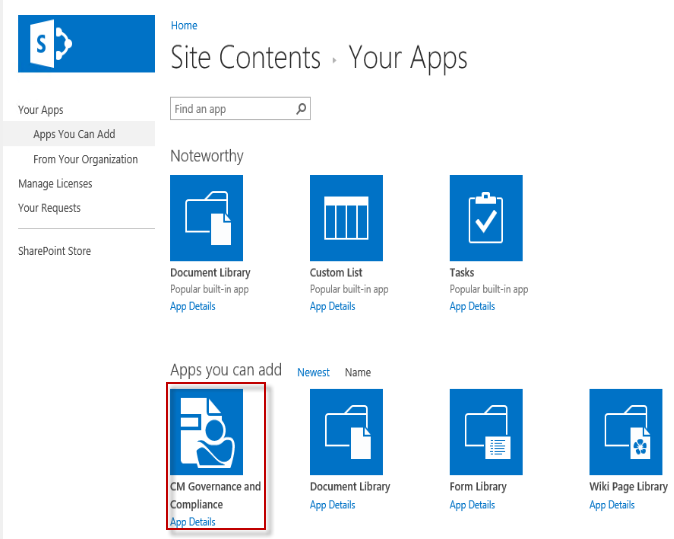
-
Click Trust It to allow the app to be added.

You will see the app added to the site contents and initially in a state where it is being installed. Once installed it will appear as follows on the site contents page.
-
-
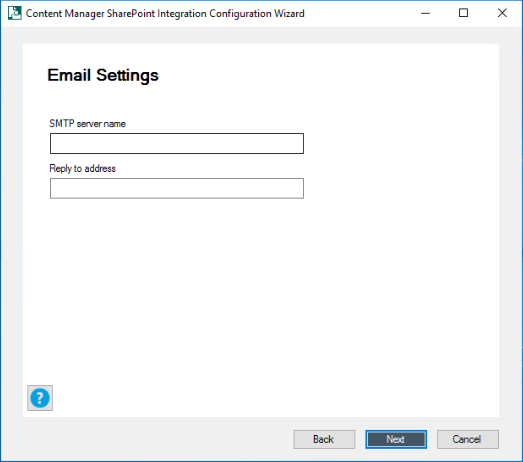
Once the installation and validation of Content Manager Governance and Compliance App are complete, you may choose to enter email settings.
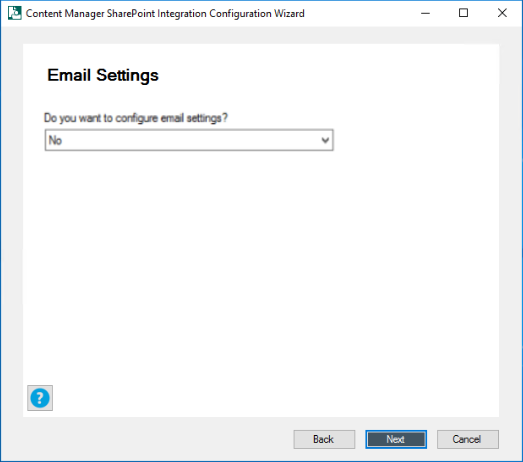
If you are going to configure email at later stage, select No in the drop down, click Next and proceed to next step.
Otherwise, continue by entering the SMTP server name and Reply to address. Click Next.
The Primary Configuration Administrator window is displayed.
-
Enter an account to use as the primary configuration administrator and click Next.
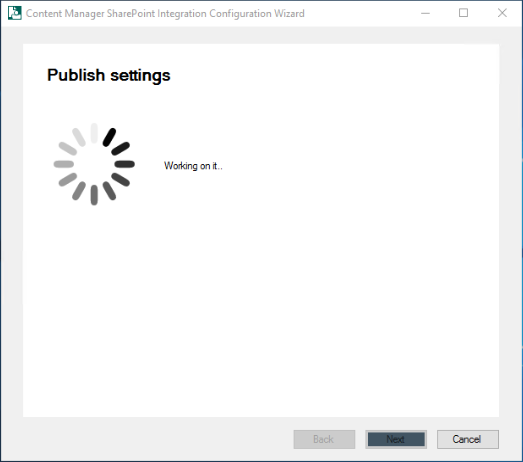
The settings are published. Click Next.
-
Enter the Content Manager dataset ID and click Next.
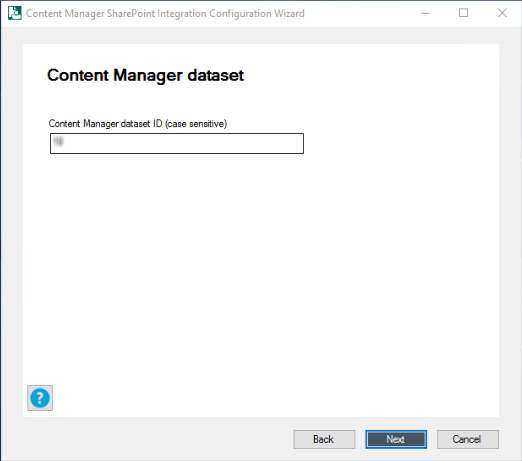
NOTE: Ensure to enter the dataset ID created while creating or registering the dataset in Content Manager Enterprise Studio.
Once you enter the dataset ID and click Next, the service locations are created in Content Manager.
-
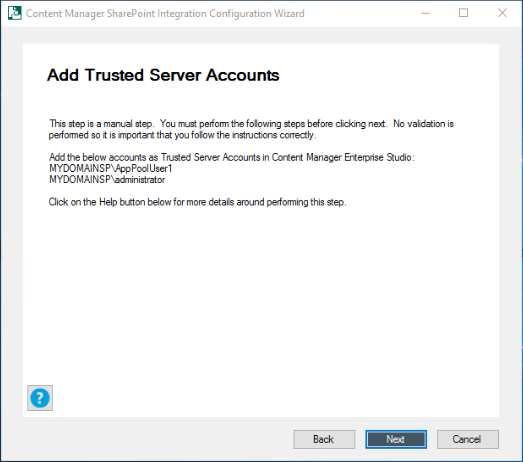
Ensure the following manual steps are completed:
If you have already performed these manual steps, click Next.
-
Add the App Pool User account and the Administrator account as trusted server accounts in Content Manager system.
For more details, see 3.1.6.3 Add trusted server accounts.
-
Enable the event processing in Content Manager. For more details, see 3.1.6.6 Enable event processing.
-
Join a SharePoint farm. For more details, see 3.1.6.5 Add to a SharePoint farm.
-
Enable the Content Manager SharePoint integration and SharePoint Zero FootPrint features. For more details, see 3.1.6.4 Enable Content Manager features.
-
Prepare the document record type for SharePoint items.
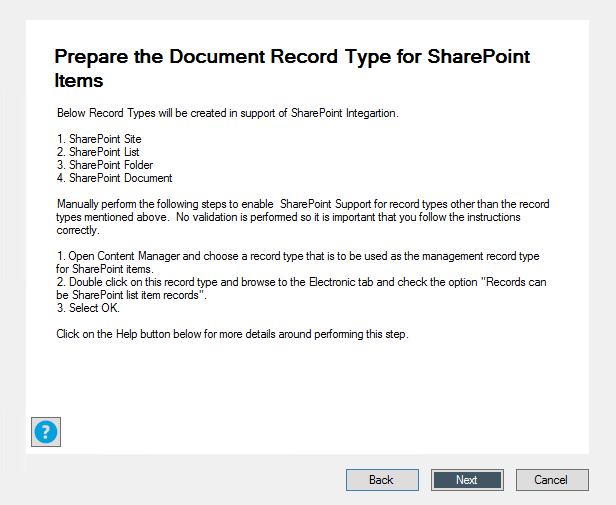
This step is now automated. If you click Next, the record types - SharePoint Site, SharePoint List, SharePoint Folder, and SharePoint Document - required for SharePoint integrations will be created in Content Manager.
You can also follow the manual steps given on the page to create the record types in Content Manager.
For more details, see Prepare record types in Appendix B: General administration tasks.
-
Create Content Manager term set group.
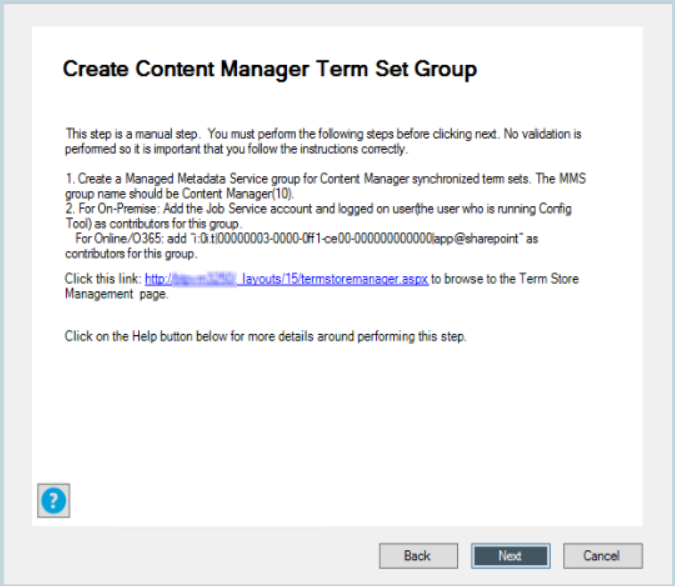
For details, see Working with the term store.
-
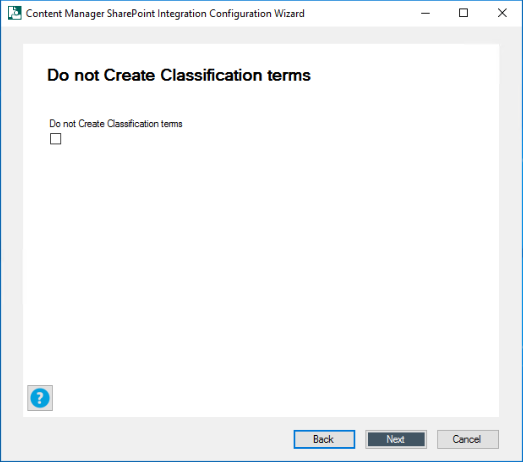
- Click Next. The Do not Create Classification terms window is displayed.
-
Select the check box if you do not want to create classification terms. Click Next.
-
This step to choose the record type is automated. By default, the standard SharePoint record type gets configured. However, you can also configure the record types manually. Follow the instructions given to manually configure the record types as needed. Click Next.
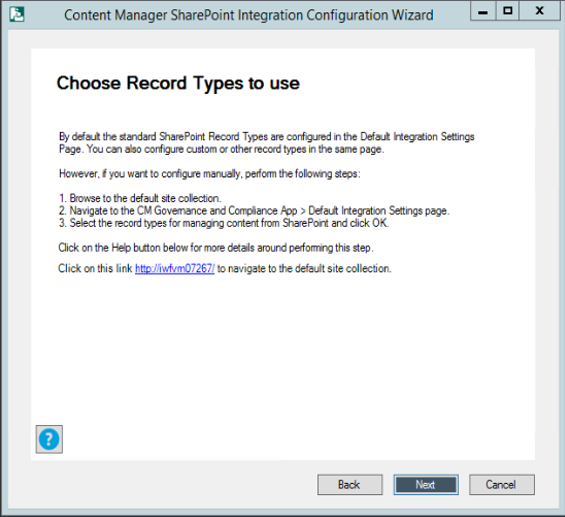
The termsets created in the SharePoint system are mapped with the metadata in dataset created or registered in the Content Manager Enterprise studio. For details on creating term sets, see 3.2.4 Creating Content Manager term sets.
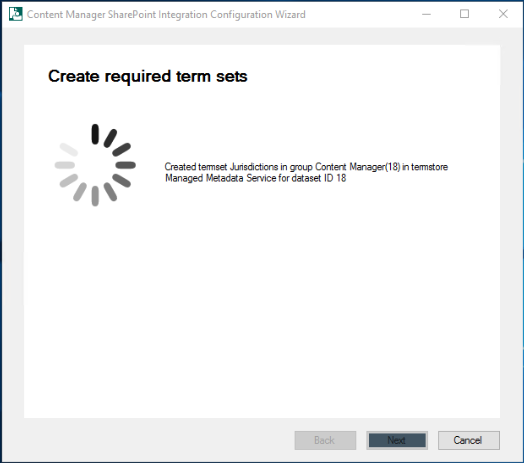
Once the termsets are created, the Content Manager site columns are also configured for the site collection.
-
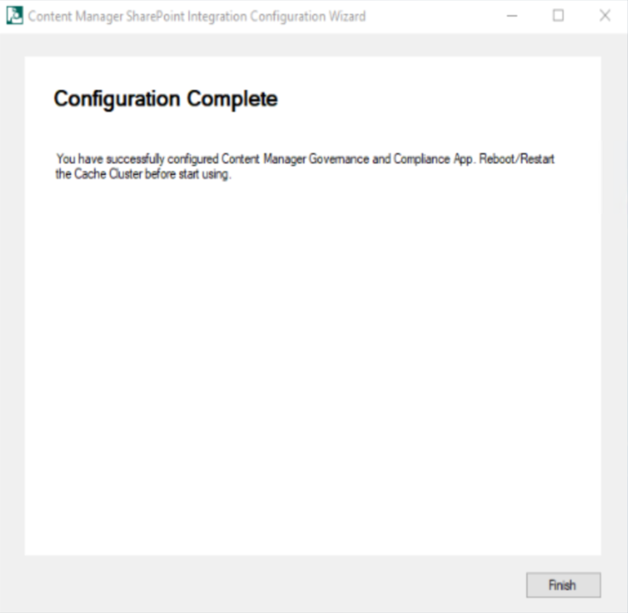
The Configuration Complete window is displayed with a status message. Click Finish.
4.2 Using Configuration Tool
The Configuration Tool allows modification to existing configuration data and should be used once the Configuration Wizard has been used to create the initial configuration.
For more advanced configuration options, see Content Manager Governance and Compliance SharePoint App: User Guide
Right-click the Content Manager Sharepoint Configuration Tool on your desktop and run as administrator to configure the SharePoint integration. Ensure to log in as installing user.
CAUTION: The use of system accounts to configure the SharePoint Configuration Wizard is prohibited, as the tool cannot override the admin/system accounts. Use the job account to login into the system, and then run the SharePoint Configuration Tool as run an administrator. Note that, this restriction is applicable only when running the Configuration Wizard. When running the Configuration Tool, an admin/system account can be used.
The Configuration Tool consists of two main tabs: Configuration and Tenant Settings. The details in these tabs are automatically filled when you run the Configuration Wizard. You can view and modify the information. The following are the details of each tab in the Configuration tool:
NOTE: Make sure to publish once you have modified any of the information using the Configuration Tool. See Publish.
-
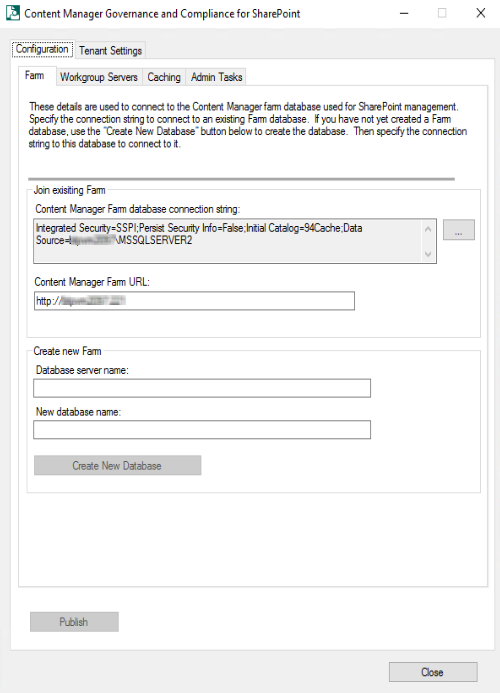
Configuration tab: includes Farm, Workgroup, Cachingand Admin Tasks tabs.
-
Farm tab: This tab includes the details of Content Manager farm database used for SharePoint management. Also includes information on Content Manager Farm database connecting string and Content Manager Farm URL.
In this tab, you can create new database by providing Database server name and New database name. You can click the ellipses and modify the Join existing Farm details. The DataLink Properties dialog box is displayed. Enter the SQL server details, database details, and test the connection. Click OK. The Content Manager Farm Database connecting string is generated.
-
Workgroup Servers tab: This tab lists the details of workgroup servers in the farm. In this tab, you can add new workgroup servers to the farm, modify server details of the existing workgroup servers in the farm or remove the workgroup servers from the farm.

-
Caching tab: In this tab, you can modify the caching settings.
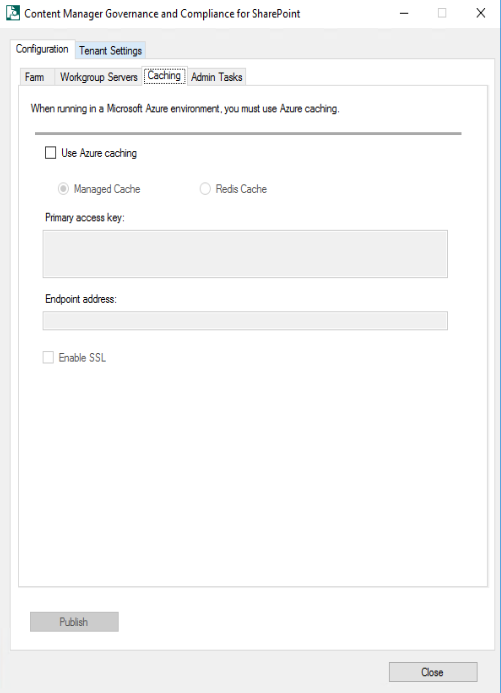
If Content Manager is later on hosted on Windows Azure environment, then set the caching option in the Caching tab. Check the Use Azure caching check box and select the type of Azure caching:
- Managed or Redis.
Check the Enable SSL check box if the cache is configured to be accessed through SSL. To determine if this value is required see Determining if the Azure cache is configured to use SSL.
Enter the details of the Azure cache into the Primary access key and Endpoint address fields.

For more details, see Azure cache.
-
Admin Tasks Tab: This tab lets you create default Record Type and locations for the given Dataset ID.
- Record Types - SharePoint Document, SharePoint Folder, SharePoint List, and SharePoint Site are the default record types that will be created. If the record types already created, then they will be enabled to support SharePoint list item records.
- Locations - The service accounts will be added as Administrator in Content Manager. The AppPoolUser and Job Service accounts will be added to different groups like, IIS users and Performance monitor users groups.
Enter the Dataset ID and click Create Default Record Types and/or Create Service Locations to create default Record Type and locations.

For more details, see Prepare record types and B: General administration tasks in Appendix B: General administration tasks.
-
-
Tenant Settings tab: This tab allows you to add, configure or remove the tenant settings.
A tenant is a logical group of site collections that share the same configuration. In an on premise SharePoint deployment, a tenant represents a SharePoint farm or a SharePoint web application. A tenant represents a SharePoint tenant in SharePoint online. In previous versions, to support these configurations, a separate configuration database was needed. As of 9.1 a single configuration database is used to support these configurations. These changes are introduced as part of SaaS support. Managed Service Providers can now use the configuration tool to support multiple customers.
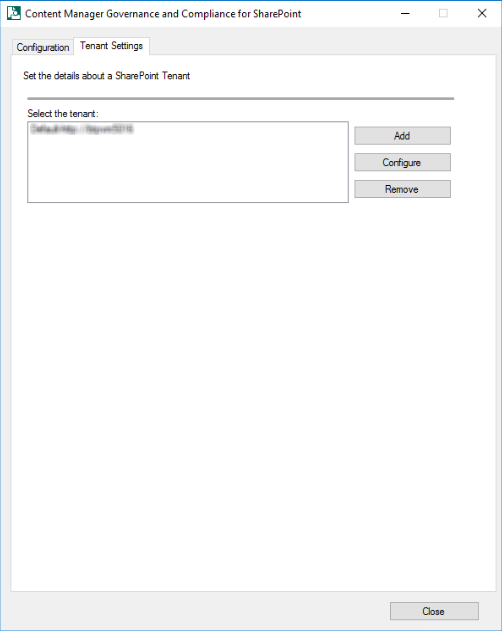
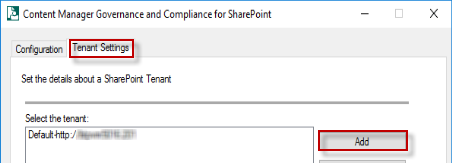
You need to save a tenant before you can continue with the rest of the configuration. From the Tenant Settings tab a tenant can be added, configured or removed. Click Add or Configure on the Tenant Settings tab. The Tenant Settings window is displayed.
-
Add - Will add a new Tenant
-
Configure - Select an existing Tenant and then click 'Configure' This will display the tenant for modifying
-
Remove - Select the existing Tenant and then click remove, this will the Tenant. When a Tenant is removed all the jobs and configuration related to that particular tenant will be removed from the configuration database.
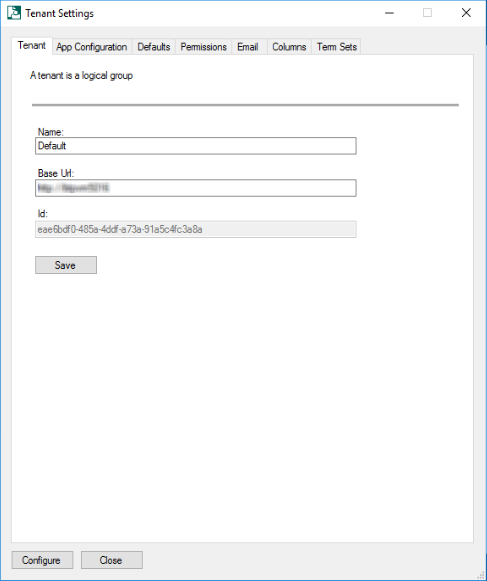
Configuring a Tenant
To configure a Tenant select Add from the Tenant Settings tab. A Tenants settings dialog will display, the Name and base URL need to be populated before the save button is selected. The "Base Url" is your web application url in an on premise scenario, whereas it is your SharePoint online tenant root url in case of SharePoint onlineThe Id is a read only field that is automatically populated with a Tenant ID.

Before you can add the app to the corporate app store, it is necessary to generate the .app file first. The .app file contains the details of the Content Manager Governance and Compliance app. It must be generated uniquely for each organization as it contains the unique URL of the Content Manager Server URL.
Using the configuration tool, navigate to the Tenants tab then select the App configuration tab.

Determining the template to use
When the Content Manager Governance and Compliance app is added to a site, the items ribbon will include the following buttons:
- Manage with Content Manager
- Finalize with Content Manager
- Relocate to Content Manager
- Archive to Content Manager
- Management Details
- Security Details
It may be required in your organization to prevent one or more of these buttons being made available to end users. In the next steps, the app file will be generated based on a template. By default, the template used contains all menu items.
Should you require one or more items to not be included, then you must change the template that is being used. Firstly, identify which template is applicable:
Template file name
Included menu items
ContentManagerGovernanceComplianceTemplate.app
and
CMModernUIGovernanceComplianceTemplate.app
Manage with Content Manager
Finalize with Content Manager
Relocate to Content Manager
Archive to Content Manager
Management Details
Security Details
AppTemplate2.app
and
ModernUIAppTemplate2.app
Finalize with Content Manager
Archive to Content Manager
Management Details
Security Details
AppTemplate3.app
and
ModernUIAppTemplate3.app
Archive to Content Manager
AppTemplate4.app
and
ModernUIAppTemplate4.app
None
AppTemplate5.app
None (including configuration menu options)
NOTE: Since AppTemplate5 is not relevant for Modern UI, it is not added.
NOTE: All templates except AppTemplate5 include configuration menu options such as RMOs and exposure settings.
If a template other than the ContentManagerGovernanceComplianceTemplate.app or CMModernUIGovernanceComplianceTemplate.app is required, you must perform the following steps before proceeding:
Navigate to the directory the templates are installed to. This is the Templates directory under the install directory.
Change the name of the ContentManagerGovernanceComplianceTemplate.app file to ContentManagerGovernanceComplianceTemplate1.app.
Locate the file that is the template to be used. Copy this template and change the name of it to:
ContentManagerGovernanceComplianceTemplate.app-
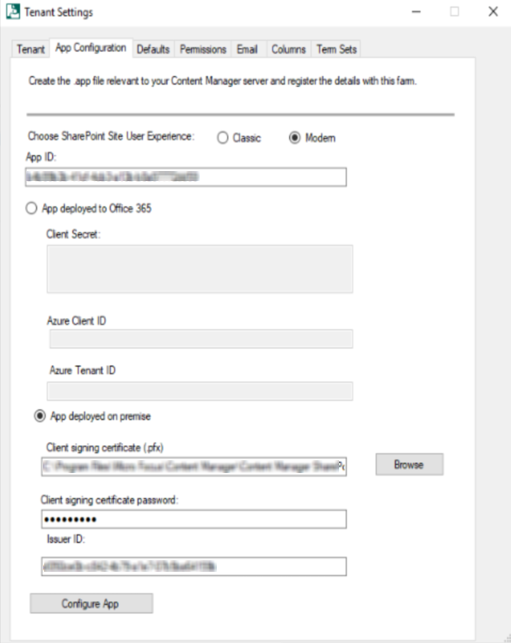
For On premise SharePoint
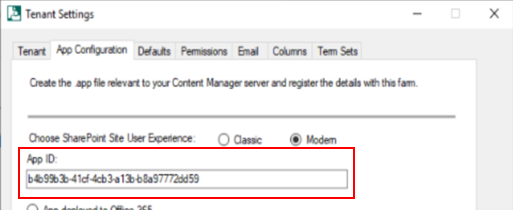
- Select the SharePoint Site User Experience - Classic or Modern. The Classic option is the default SharePoint experience.
-
Enter the App ID captured while registering the app.
-
Select the App deployed on premise radio button to enable the on premise controls.
-
Choose the client signing certificate that was used when 3.2.2 Prepare environment for high trust apps.
-
Enter the password used with the selected certificate.
-
Enter the issuer ID obtained while 3.2.2 Prepare environment for high trust apps.

- Click Configure App. If successful you will be presented with a success message.
-
For SharePoint Online
-
Enter the Client ID captured while registering the app as the App ID.
-
Select the App deployed to Office 365 radio button to enable the relevant controls.
-
Enter the Client Secret, Azure Client ID and Azure Tenant ID.
To get the Client Secret, see registering the app section for details.
To get Azure Client ID and Azure Tenant ID, see section 4.3.3 Configuring the Content Manager Integration for SharePoint Online - Azure AD authentication for details.

-
Click Configure App. If successful you will be presented with a success message.
-
Tenant Settings window
You need to save a tenant before you can continue with the rest of the configuration.
The Tenant Settings window includes the following tabs:
-
Tenant tab: This tab includes details of tenant - Name, Base Url and ID.
The Base Url is your web application url in an on premise scenario, whereas it is your SharePoint online tenant root url in case of SharePoint online. The Id is a read only field that is automatically populated with a Tenant ID.
-
App Configuration tab: This tab includes information on SharePoint Site User experience, App ID, whether App is deployed on SharePoint online or OnPremise, path to certificate file, and Issuer ID.
-
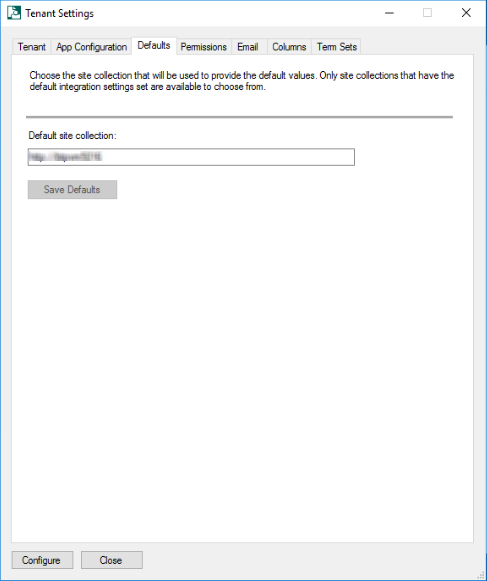
Defaults tab: This tab contains information about the default site collection.
-
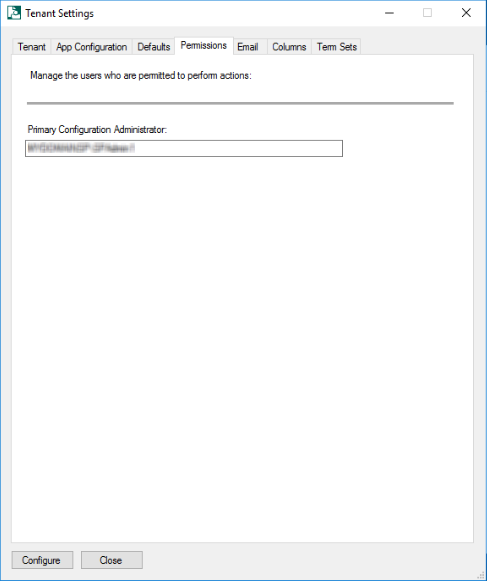
Permissions tab: This tab includes information about the Primary Configuration Administrator, the user who is permitted to perform actions.
-
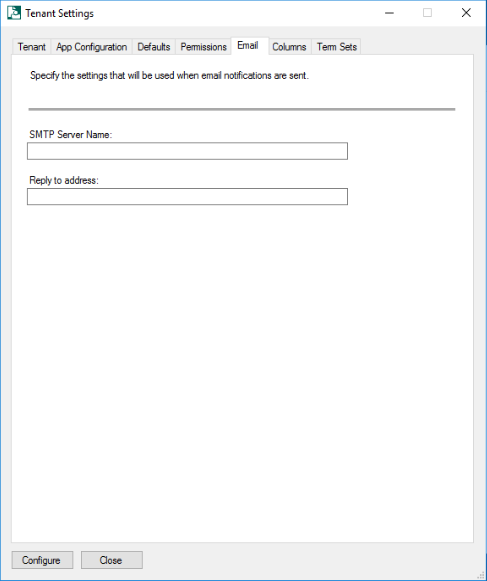
Email tab: This tab contains details of email notification settings, such as, SMTP Server Name and Reply to address.
-
Columns tab: This tab contains information about site columns for site collection that represent fields in the Content Manager.
When working with managed SharePoint content, often there is a requirement to see values for the corresponding Content Manager record in the SharePoint list item itself. For example, it may be important to your organization that the record number for the record is easily identified. In this scenario, a “record number” column could be added to the list. Using column mapping, it can mapped such that it shows the value of the record number from Content Manager.
The configuration tool includes a column creation tool. This tool creates a collection of site columns that represent most of the fields in Content Manager. These columns are automatically mapped to the relevant Content Manager field during creation.
Once created, these fields appear in the “Content Manager Columns” group and can be used throughout the site collection they exist on.
Creating columns requires that the Set default integration settings section has been completed first.
 The creation of columns is optional. It is not required by the application.
-
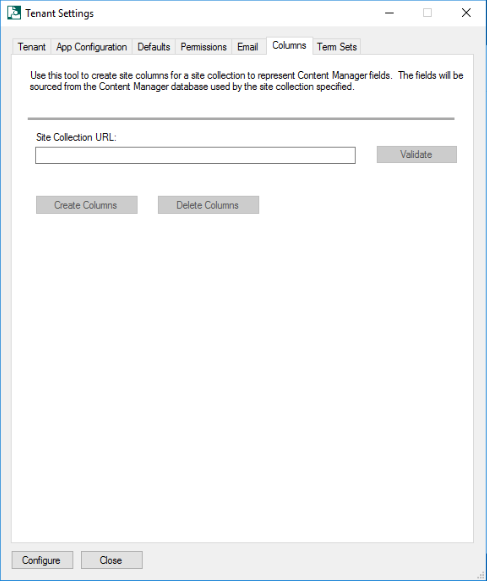
To Create Columns, run the Configuration tool and navigate to the Tools then Columns tab.
-
Enter the full URL of the site collection that the site columns should be created on. The Validate button will confirm that the URL entered is a suitable SharePoint site collection.
-
Click the Create Columns button to start the column creation.

NOTE: For SharePoint Online only
If column creation fails with the error message
Error creating new site field. Details : Classification (All) or “unkown error”, perform the following steps:-
Check if the
HPRMFieldBehaviour.jsfile exists in the site's master gallery. -
During the configuration, due to permission/access issue, the file might not have been uploaded to the master gallery. In this case, run the following powershell commands to upload the file manually:
Connect-SPOService https://<yourdomain>-admin.sharepoint.comSet-SPOSite -Identity https://<yourdomain>.sharepoint.com -DenyAddAndCustomizePages $false
The
HPRMFieldBehaviour.jsfile is available in the installation directory (example, C:\Program Files\Micro Focus\Content Manager\Content Manager SharePoint Integration).Maintenance of columns
Run the create column tool again to modify an existing column.
To remove all columns that have been created by the tool, enter the URL of the site collection to remove them from, then click Delete Columns.
NOTE: This will delete all columns in the “Content Manager Columns group, including any that have been added manually.
If a column is being used by a content type, it will not be deleted. When all columns cannot be deleted, the log file will indicate which columns were not removed.
TIP: It is recommended that if you are using SharePoint farm create columns only on the content type hub so that is is propagated to other site collection.
-
-
Term Sets tab: This tab includes information about Content Manager Dataset ID and term sets.
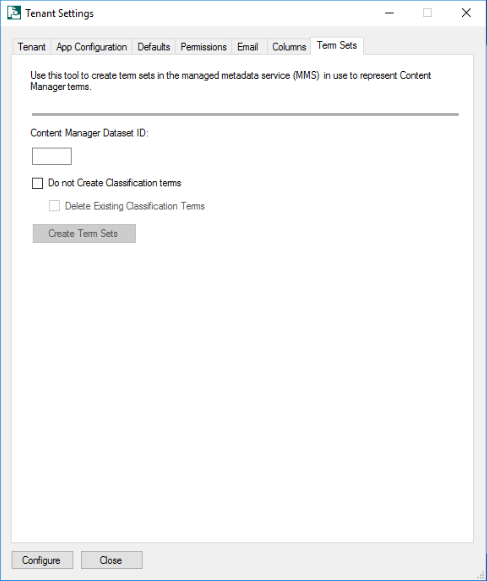
Enter the ID of the Content Manager dataset that the term sets should be created to represent then click Create Term Sets.
This will instigate the process of creating term sets. Note that the term sets will be created in every term store that you have created the Content Manager group.
NOTE: If no groups have been created, this tool will not fail. Term sets will just not be created.
You can repeat use of this tool for as many datasets as you intend to use.
Creation of terms sets without using Classification terms
A term set can be created without leveraging the Classifications within Content Manager by selecting the "Do not create Classification terms" check box on the term sets tab. Doing so will also allow you to remove any existing Classification terms (see below)
Removal of existing term sets
If your installation has existing Classification terms, you can remove all of the existing entries by ensuring the "Delete existing Classification terms" check box is selected when creating term sets without using Classification terms (see above).
Maintenance of term sets
From time to time, new terms will be added to Content Manager and existing terms will be modified or even removed entirely. Because of this, it is necessary to maintain the values of the term sets.
A maintenance process executes every hour to update the terms.
Alternatively, if a change is required more immediately than this, run the term sets tool again. This will correct any term set changes almost instantly.
Set default integration settings
The Default Integration Settings are used to determine how content in SharePoint is managed by Content Manager. It is the Default Integration Settings that are used during the management process.
For more advanced configuration options, see Content Manager Governance and Compliance SharePoint App: User Guide.
NOTE: For initial configuration, you should set the default integration settings used by the default site collection as these will be used by other site collections. If performing initial configuration, in the following sections, use the default site collection.
Accessing app configuration pages
A number of app configuration pages are accessed from a page referred to as the “app start page”. To access the app start page for the Content Manager Governance and Compliance app, navigate to the site contents page of the site collection.
Locate the Content Manager Governance and Compliance app and click on it.
This will take you to the app start page:

-
Once all settings have been entered, they must be published to all servers in the Content Manager farm. Click Publish at the bottom of the dialog to reflect the changes to all the servers in the Content Manager farm.
After you have published the information, configure the default integration settings. See, 4.3.1 Setting the default integration settings.
Restart the Windows service named:
Content Manager SharePoint ServiceThis is required to complete the configuration of Azure caching.
4.3 Additional Configuration
4.3.1 Setting the default integration settings
From the app start page click the Default Integration Settings link. You must be a site collection administrator to access this page.
Settings source
The settings source section allows you to specify if the values used for this page should come from the default site collection, or whether this site collection specifies its own values.
If the Use defaults check box is unchecked, then specific values for this site collection can be entered.
If this site collection is the nominated default site collection, then the Use defaults check box is disabled.
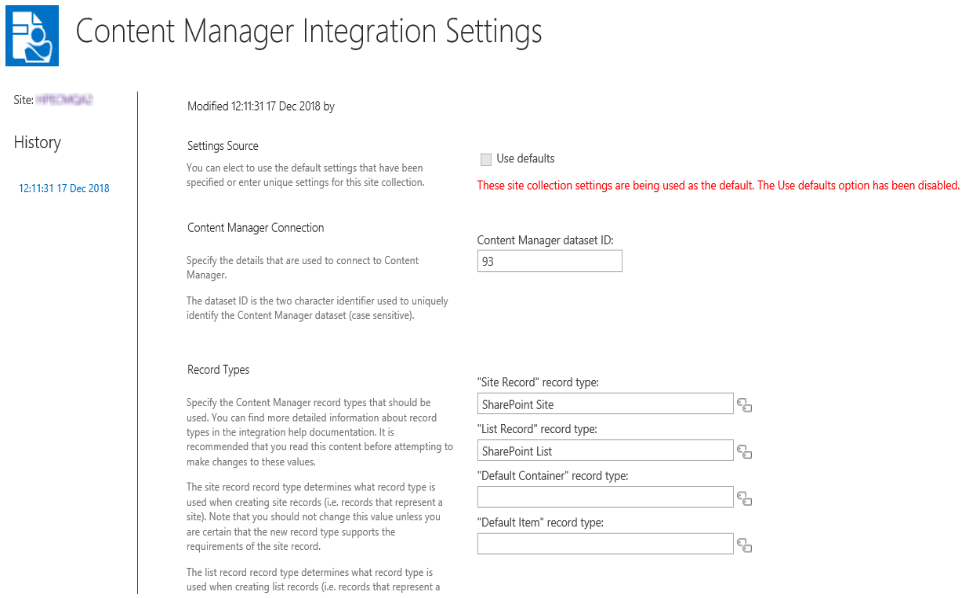
Content Manager Connection
The Content Manager Connection section allows you to specify the ID of the Content Manager dataset to be used.
Enter the two character identifier of the Content Manager dataset ID to use. This value is case sensitive.
Record Types
The record types section allows you to specify the Content Manager record types that should be used by default during management.
-
Site Record - control will allow you to select any record type that has a behavior of SharePoint site.
- List Record - control will allow you to select any record type that has a behavior of SharePoint list.
- Default Container - control will allow you to select any record type that has a behavior of Folder and is marked as suitable for being a list item record.
- Default Item - record type will allow you to select any record type that has a behavior of Document and is marked as suitable for being a list item record.
NOTE: You must specify a value for all four record types before the page will allow you to save.
For details regarding record type requirements see the Prepare record types section earlier in this document.
NOTE: Only record types that existed prior to creating term sets or a term set maintenance job running will be available for selection.
You must have specified a dataset ID prior to selecting record types or the selection dialog will not show any values.
For information on remaining settings on this page, see Content Manager Governance and Compliance SharePoint App: User Guide and can be left default for the initial setup.
4.3.2 Additional configuration to support ADFS
If your environment uses Active Directory Federation Services (ADFS), there are additional steps that you must perform before proceeding further. These steps involve:
- Adding a relying party trust
- Modifying the web.config file used by the Content Manager SharePoint
-
Enable HTTPS.
The ADFS configuration requires HTTPS for communication. Ensure to enable HTTPS, see Configuring the use of HTTPS.
-
A relying party trust is required in ADFS referring to the Content Manager farm URL.
For instructions to perform this task, see the following URL:
The following are the values to enter during the wizard this article describes:
-
Select Data Source
Choose “Enter data about the relying party manually
-
Specify Display Name
Display name: enter the Content Manager farm URL
-
Choose Profile
Choose “AD FS 2.0 profile”
-
Configure URL:
Check “Enable support for the WS-Federation Passive protocol”
Relying party WS-Federation Passive protocol URL: enter the full HRPM farm URL
-
Configure Identifiers
Relying party trust identifier: enter “uri:sharepoint:hprm”
-
Choose Issuance Authorization Rules
Choose “Permit all users to access this relying party”
-
-
The web.config file for the Content Manager SharePoint Server IIS site must have some modifications made to support ADFS.
-
Locate the following file located in the installation directory:
ConfigureSTS.ps1 -
Run this script using PowerShell. This will perform modifications on the
web.configfile. -
Locate the following file located in the installation directory:
Web.config -
Open this file and modify the following highlighted text to reflect the correct values (as found in your AD FS Management console):
<system.identityModel>

    <identityConfiguration>

      <audienceUris>

        <add value="uri:sharepoint:hprm" />

      </audienceUris>

      <certificateValidation certificateValidationMode="None" />

      <issuerNameRegistry type="System.IdentityModel.Tokens.ConfigurationBasedIssuerNameRegistry, System.IdentityModel, Version=4.0.0.0, Culture=neutral, PublicKeyToken=b77a5c561934e089">

        <trustedIssuers>

          <add thumbprint="[Enter your token issuer certificate thumbprint here]" name="[Enter your STS name here]" />

        </trustedIssuers>

      </issuerNameRegistry>

    </identityConfiguration>

  </system.identityModel>

  <system.identityModel.services>

    <federationConfiguration>

      <cookieHandler requireSsl="false" />

      <wsFederation passiveRedirectEnabled="true" issuer="[Enter the full url to the SAML2.0/WS-Federation here (relative url is adfs/ls)]" realm="uri:sharepoint:hprm" reply="uri:sharepoint:hprm" requireHttps="false" />

    </federationConfiguration>

  </system.identityModel.services>

  <appSettings>

    <add key="ClaimProviderType" value="SAML" />

    <add key="TrustedProviderName" value="[Enter your STS name here]" />

    <add key="IdentityClaimType" value="SMTP" />

</appSettings> -
Save the updated web.config file when the changes are complete.
-
-
Ensure Content Manager locations are configured
Any user locations in Content Manager that will be used via SharePoint must have the Alternate Identifier of the location set to the primary claim that will be presented by ADFS. In most cases this is the email address.
-
Ensure SharePoint user profiles include the SharePoint primary claim
When authenticating to SharePoint a user may present a number of claims. During the configuration of ADFS with SharePoint, it is necessary to nominate what is the primary claim to be used to authenticate the user. This is the claim that SharePoint will look for to determine who the user is.
If this primary claim does not exist on the user’s SharePoint profile, then a user will not be able to access SharePoint.
NOTE: If you have not configured the profile with the primary claim and the user can access SharePoint, you have probably left integrated authentication enabled therefore the user is being authenticated by SharePoint using AD credentials.
Typically the primary claim will be the user’s email address. Consult SharePoint documentation for how to determine the primary claim.
To manage the properties configured for a user profile, see the section Accessing a user profile.
-
Restricting Access based on custom group claims
To better provide for custom authentication, we are allowing users to customize the authentication of users by enabling the use of custom group claims. This functionality is enabled by default and is only triggered when the application detects a custom claim during the authentication process.
In order to leverage this feature, you will be required to write and build a custom assembly. A more technical description of what is required to use this feature can be found in the Appendix - Custom Claims Implementation.
-
To view managed documents in Content Manager
Additional configuration steps need to be undertake to be able to view a managed document in Content Manager:
- Browse to the installation directory and edit the DocumentViewDetails.xml.
- Set the value of the LoadBalancedUrl to the URL of new SearchAndViewSite and save it.
- Restart the jobprocessing service.
4.3.3 Configuring the Content Manager Integration for SharePoint Online - Azure AD authentication
The additional configuration steps described in this chapter need to be carried out before you can choose the record types on the Default Integration settings page while you are in a SharePoint Online environment.
NOTE: The Content Manager SharePoint integration supports Microsoft Graph API.
IMPORTANT: The Content Manager SharePoint integration supports multi-factor authentication. If multi-factor authentication is enabled at SharePoint Site, additional security verification steps are prompted when you log in to the SharePoint site. For example, authentication through phone call, text message, or a security device. Once you are authenticated, you will be logged on to the SharePoint site.
-
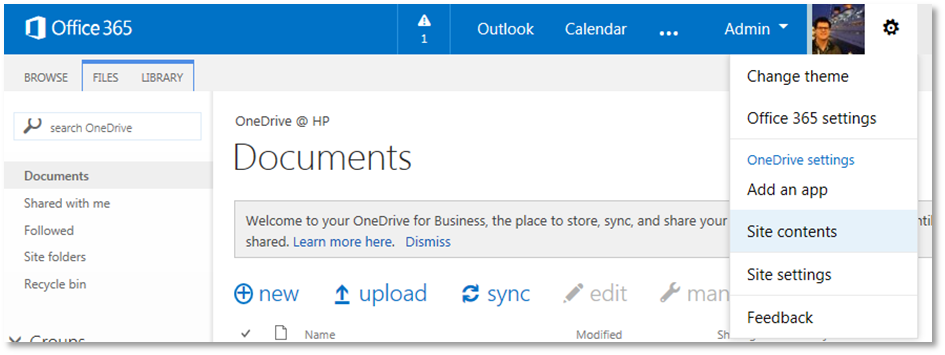
Click Admin on the app launcher and browse to the Office 365 Admin site.
-
Expand the Admin centers and select Azure Active Directory from the list.
-
On the Microsoft Azure portal, select the Azure Active Directory menu.
-
Once in your active directory, click App registrations tab.
-
Click New registration option.
-
On the Register an application page, perform the following:
-
Enter the Name as CM Governance and Compliance.
-
Select the Supported account types.
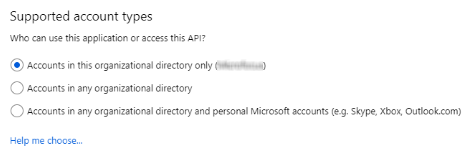
For more information on each option of Supported account types, click Help me choose.
-
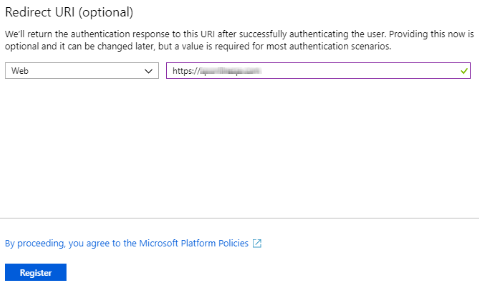
(Optional) Enter the Redirect URI and click Register.
Once the app registration is complete, you will be taken back to the App Registrations page. On this page, click EndPoints.
-
-
Go back to the App registrations page and click on the Content Manager Governance and Compliance app you created.

-
Copy the “Application ID” and "Directory (tenant) ID".
You need the "Application ID" if you are using the Configuration Wizard to complete your configuration.
You need both “Application ID” and "Directory (tenant) ID" if you are using the Configuration Tool to complete your configuration.
4.3.4 Setting up subsequent site collections
Following configuration of the initial, default site collection, all that is required to configure subsequent site collections is to add the app.
If the default values configured on the default site collection are suitable for this subsequent site collection, then there are no further steps required.
4.3.5 Setting up One Drive for Business
One Drive for Business (ODB) provides cloud file storage for business users. A user’s drive in ODB is in fact nothing more than a document library. The Content Manager Governance and Compliance app is fully compatible with ODB.
To utilize the app with ODB involves adding the app as is required for any other site or site collection. This can be done by accessing the Site contents and then add the app.
Alternatively, the Add an app link can be used to navigate directly to apps page.

4.3.6 Supporting multiple SharePoint farms or multiple configuration databases
A configuration database used by a Content Manager farm is only designed to support a single SharePoint farm. In the scenario where your organization has multiple SharePoint farms, you will need to plan for this accordingly.
A similar scenario that requires the same planning in the case where multiple configuration databases are required. Consider the scenario where you have 20 site collections. Ten of these site collections will require one set of configuration while the other 10 use a different set of configuration.
With a single configuration database, the first ten could use the default site collection settings to obtain configuration values. The other ten though would have be set individually as the default values are not the ones required. This requires setting the same values ten time.
If the second lot of ten site collections used an independent configuration database, a default site collection could be defined and the other nine site collections consume the values from it.
There are two primary options available to support these scenarios.
-
Paired SharePoint and Content Manager farms
A Content Manager farm has a single configuration database. In the “paired” approach, for each SharePoint farm, a dedicated Content Manager farm is configured each with a single configuration database.

The advantage of this approach is that it is simple to understand and configure as everything for a particular SharePoint farm is logically separated.
The disadvantage of this approach though is that you may end up with underutilized workgroup servers. Consider the scenario where your organization has two SharePoint farms. It has been determined that the number of workgroup servers required to service the load of each farm is as follows:
- SharePoint farm 1: 1.5 workgroup servers
- SharePoint farm 2: .5 work group servers
Although a sum total of two workgroup servers is required to address the total load, using the paired approach, three servers would be required.

-
The second approach to supporting multiple SharePoint farms is to “share” a Content Manager farm with a number of SharePoint farms. In this approach, one Content Manager farm is created, however, the farm contains multiple configuration databases (one for each SharePoint farm)
The disadvantage of this approach is that it is more difficult to configure than the paired approach. The advantage though can be illustrated by considering the scenario where your organization has two SharePoint farms and it has been determined that the number of workgroup servers required to service the load of each farm is as follows:
- SharePoint farm 1: 1.5 workgroup servers
- SharePoint farm 2: .5 work group servers
Using the shared approach, the requirements can be serviced with two workgroup servers as against the three that are required in the paired approach.

Architecture of a shared Content Manager farm
For the explanation of a shared Content Manager farm, the farm will be considered to only have a single workgroup server. When using multiple servers in a Content Manager farm, the architecture and configuration must be repeated on each server in the farm.
When the Content Manager Governance and Compliance app server components are installed on a workgroup server, two key components are created:
- An IIS site referred to as the Data Store Server (DSS)
- The Content Manager SharePoint Windows service (referred to as the job service)
These components interact with the configuration database used by the farm.
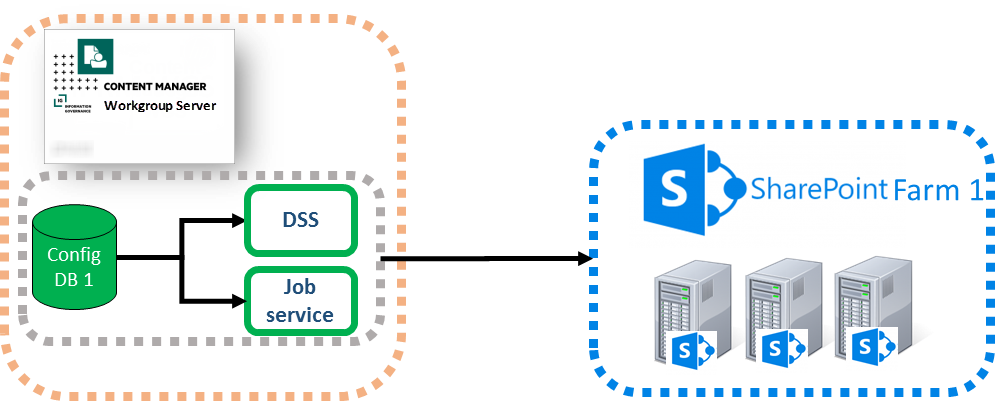
In this diagram the config database is illustrated as residing on the workgroup server. It is important to recognize that this database could reside on a dedicated SQL server farm. It has been drawn this way for convenience.
The shared Content Manager farm approach involves duplicating the core components to allow them to interact separately with the relevant config database.

When duplicated in this way, the DSS must be placed on a different IIS port or use a different host header to allow the Content Manager Governance and Compliance app on each farm to access the correct configuration database.
Creating a shared Content Manager farm
This section assumes that you have correctly installed and configured this Content Manager farm for one SharePoint farm already.
A script is installed with the server components that performs most of the configuration effort for you.
Modifying the execution policy on the machine
In order to run this script, a temporary change to the execution policy may be required.
Run an instance of Powershell as an administrator
Determine the current execution policy in use by running the following script:
Get-executionpolicy
Note down the name of the current policy so it can be used to revert to it.
Set the execution policy to RemoteSigned using the following script:
set-executionpolicy RemoteSigned
After running the script to create the shared Content Manager farm, revert your policy back to the original by running the following script where [Your original policy] is the name of the policy determine by running the get script:
set-executionpolicy [Your original policy]
Running the farm configuration script
Run Powershell ISE as an administrator. Using Powershell ISE open the file FarmConfiguration.ps1 from the installation directory used when installing the Content Manager Governance and Compliance app server components
Run this script.
This script will prompt you for the following details:
- The port number to use for the IIS site – ensure you choose one that is not already in use
- Whether to enable SSL for the site – this will add a https binding to the site
- The identity of the application pool in the format domain\name
- The password for the application pool
- The identity of the job processing service in the format domain\name
- The password for the job processing service
Following the execution of the script, you can verify that it succeeded by confirming the following steps. The name of the components will have the number of your farm appended. The first additional farm you create will be 1, the next 2 and so on. In the following section, the term Farm x has been used to represent the farm number:
-
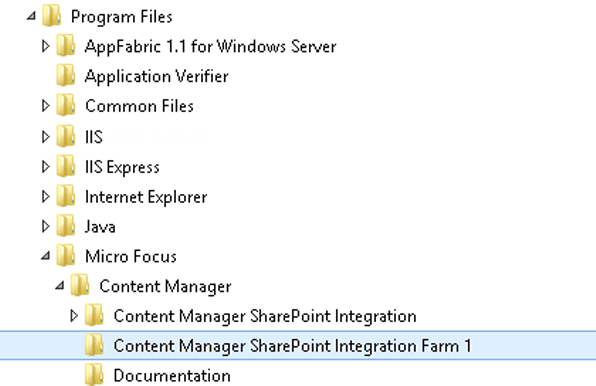
A new directory has been created at the same level as the installation directory named Content Manager SharePoint Integration (Farm x)
-
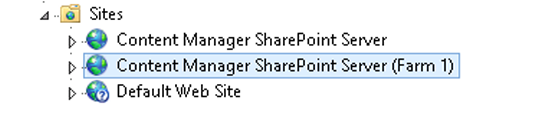
In IIS a new site has been created named Content Manager SharePoint Server (Farm x)
-
In IIS a new application pool has been created named Content Manager SharePoint Server (Farm x)

-
A new windows service has been created named Content Manager SharePoint Service (Farm x)

NOTE: This script should be run for every additional farm that is to be created.
Configuring a shared Content Manager farm
After running the script to create the shared Content Manager farm, each new instance must be configured.
-
Post installation steps
Essentially, running the farm configuration script installs a new instance of the server components. You must complete (for each farm you have created), all steps in chapter 3 after the installation chapter (3.1.2).
-
Configuration
For each farm that has been created using the farm configuration script, you must complete the configuration for the farm just as you did for the first installed farm.
You must run the right instance of the configuration tool though. The shortcut installed for the configuration tool by the MSI is the instance used by the first farm created by the MSI. To locate the correct instance of the configuration tool to run, navigate to the directory that was created by the farm configuration script. Locate the following file:
HP.Integration.SharePoint.JobProcessing.exeRight click and run as administrator. This is the instance of the configuration tool that applies to that farm.
It is also important to understand that you must follow the steps to generate a new app file. The new app file generated will contain the correct URL to the shared Content Manager farm instance to use. This is the app file that must be used on the SharePoint farm managed by this shared instance.
Removing a shared Content Manager farm
If a shared Content Manager farm is no longer required, it can be removed as follows:
- Ensure that the job processing service applicable to the farm is stopped
- Open Powershell ISE as an administrator
- Run the following script replacing “x” with the number of the farm to remove. This will delete the job processing service for the farm:
$service = Get-WmiObject -Class Win32_Service -Filter "Name='Content Manager SharePoint Service (Farm x)'"
$service.delete();
- From IIS delete the site created for the farm
- From IIS delete the app pool created for the farm
- Delete the directory created for this farm
NOTE: The uninstalling the MSI will not remove any shared farms that have been created. You must use this manual process.
4.3.7 Other configuration tasks
Trusted sites
The integration includes a number of dialogs that are shown to the user. These dialogs may include address bars along top of the dialogs. Although these do not hinder the functionality of the product, they may be aesthetically incorrect.

Adding the URL specified as the load balanced URL for the Content Manager farm to trusted sites in Internet Explorer settings will prevent this address bar from being shown.
To add the URL, perform the following steps:
- Go to Internet Options > Security, select the Trusted sites and click Sites. The trusted sites window is displayed.
- Enter the URL in Add this website to the zone field and click Add.
- Click OK to close the Internet Options.
Once added to the trusted sites, the address bar will no longer show.

TIP: This configuration task is best suited to group policy rather than setting on individual machines.