Introducing Databridge Client
Micro Focus Databridge is a combination of host and (optional) client software that provides automated replication of DMSII databases and flat files. All replications occur while the DMSII database is active. After the initial clone, Databridge updates the secondary database, copying only the DMSII data changes from the audit trail.
Choosing the Client Manager Service vs. the Command-Line Client
The Databridge Client provides two modes of operation. One mode lets you configure and run the Client from the Administrative Console, where the Client Manager service launches the Client and automates much of the replication process. The other mode uses a command-prompt session (or terminal session in the case of UNIX) to run the command-line Client (dbutility). For a comparison of these modes of operation, see Comparing the Databridge Client Manager Service to Command-Line Operations.
While this guide can be used with either the command-line or service-controlled Client, it is intended primarily for command-line Client operations. For information specific to the service-controlled Client, see the following topics or refer to the Help in the Databridge Administrative Console:
Using the Administrative Console and the Service
The Administrative Console is an easy-to-use browser-based graphical interface that lets you access Clients on different platforms. You can view multiple data sources (defined by Databridge Server or Enterprise Server) and monitor all Client activity via onscreen messages and status updates.
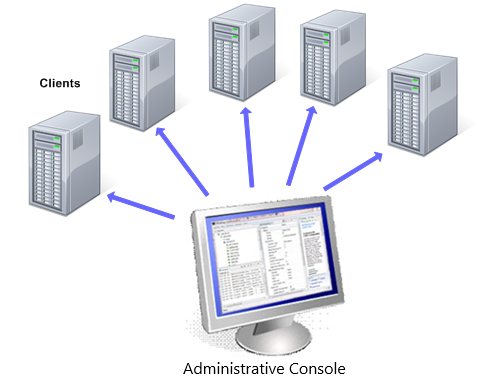
The Administrative Console communicates directly with the Client Manager service, which starts Client runs in the background and completely automates Client operations. Configure how often Client runs are initiated by using the service scheduling settings in the Administrative Console. You can also use command files (shell scripts in UNIX) to interact with the service and automate processes. For more information, see the, Automating Client Operations with the Service section of this guide.
Enhanced Security
Because the service always starts the Client in the background, the Administrative Console is the only interface to service-initiated Client runs. Neither the service nor the background runs interact with the desktop or require that a user be signed on to the server. This makes service-initiated Client operations more secure than command-line operations and prevents the Client runs from being terminated, whether accidentally or maliciously. The service starts at system startup (by default), which ensures that replication can continue in the event of system failure without outside intervention.
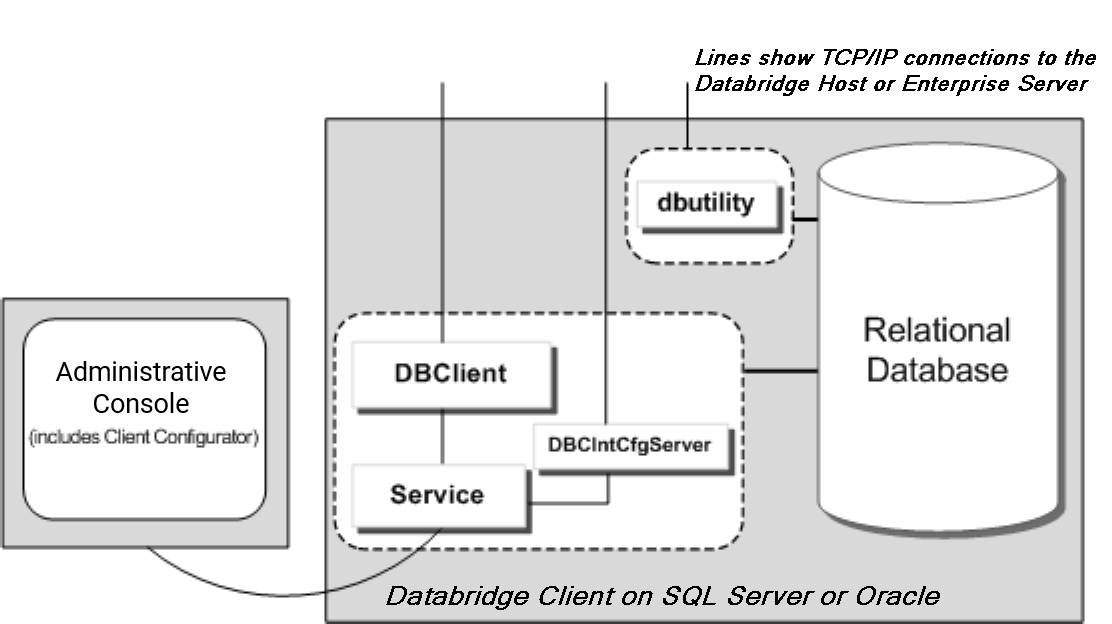
In addition to launching Client runs, the service routes all log and
informational messages to the Administrative Console and facilitates operator
tasks using the DBClient and DBClntCfgServer programs. The first
program, DBClient, performs DMSII processing and cloning tasks. The
second program, DBClntCfgServer, handles Administrative Console requests that
require access to the relational database (such as define,
generateand reorganizecommands). The activity and output of these
programs is displayed in the Administrative Console's console output view.
The following diagram shows the Client architecture for the two types of clients: the command-line Client (dbutility) and the service-controlled client (DBClient and other components).
The Administrative Console can perform data source customizations by selecting Settings > Customize from the data sources page. The Customize command lets you easily customize data sources without any knowledge of SQL or how your Client control tables work. Instead of hand-coding SQL user scripts, select options to configure your data sources and map DMSII data to your relational database tables. To use the Customize command with existing Client configurations that employ user scripts, you must first upgrade your Client control tables using the dbscriptfixup utility. (See the Databridge Installation Guide.)
Note
To customize a specific data source, you must first navigate to the data sources page for the Client Manager in question by using the provided links (Databridge Servers > Client Managers). If you are in the monitor page select the link for the Client Manager in the upper left hand corner of the group of entries for the Client Manager in question. Place your mouse over the desired data source name and click on it to select it (the row should turn light blue). Select Settings > Customize to start the customizations.
How Replication Works
The Databridge Client controls the replication process of DMSII databases and flat files. It initiates connections to Databridge Server on the host and maintains the state information necessary for resuming replication in case operations are interrupted. At the heart of the host-based Databridge system is the Databridge Engine, which is a system library that retrieves structural information and data from the DMSII database and passes it to Databridge Server. When you opt to use Enterprise Server with the Databridge Client instead, Enterprise Server takes over much of the functionality of the Databridge Engine and Databridge Server.
The Databridge Support Library, also installed on the host, provides filtering, formatting, and reformatting services for the Databridge Server. See Client vs. Host Filtering.
After the Databridge Server receives data from the Databridge Engine, it calls the Support Library to determine if the data should be replicated, and if so, it passes the data to the Support Library for formatting.
Replication involves three discrete phases, as described below. These
three phases are tracked for each data set in the ds_mode
column of the DATASETS control table as values 0, 1, and 2.
| Data Extraction | This phase (identified by a mode of 0) applies only to data sets that have not been cloned. During this phase, the Databridge Engine sequentially reads all of the records from the data sets being cloned and passes them to the Databridge Client. Using the appropriate bulk loader utility, the Client populates the relational database tables and creates indexes for the tables. |
| Fixup | During this phase (identified by a mode of 1), the Databridge Engine processes audit files and passes all of the DMSII updates that occurred while data extraction was taking place to the Client, which updates the relational database. This phase is fully restartable. During this phase the relational database is not fully consistent, as the not all the tables are in-sync. The only difference between the Fixup Phase and the Update (or Tracking) Phase is that the Client has to deal with conditions caused by the fact that the tables from which records were extracted were changing as the extraction was taking place. Until the audit file processing gets past the point in the audit trail where the data extraction ends, the Client behaves somewhat differently in order to handle such issues as updates to records that are not in the tables, deletions of records that are not in the tables, and inserts of records that are already in the tables. |
| Update | During this phase (identified by a mode of 2), the Client processes audit files and then passes all of the DMSII database updates to the Client, which updates the relational database. This phase is also referred to as the change tracking phase. Databridge uses quiet points to synchronize the replicated database with the DMSII database and ensure accuracy of the data. Quiet points mark the start of a group of updates, which is referred to as a transaction. When the Databridge Engine reaches the end of the last DMSII audit file (or encounters a program that did a rollback), it usually rolls back the transaction and instructs the Client to roll back updates. The Client stores quiet point information with other state information in a set of control tables, referred to as the Client control tables, and uses it to restart the replication process.If near real-time replication is required, set the parameter use_dbwait to true. This causes the Engine to enter a wait-and-retry loop for a configurable amount of time, instead of returning an audit file unavailable status, which normally occurs when no more Audit Files are available. |
Client vs. Host Filtering
Use the following guidelines to determine when to use the host instead of the Databridge Client to perform filtering.
Filtering Columns
On the host side, you can filter columns by creating a filtering routine
with the DBGenFormat utility. On the Databridge Client side, you can
filter columns the same way you can filter data sets, which is to set
the active column to 0 for the corresponding entry in the DMS_ITEMS Client control table.
The advantage of performing the filtering on the Databridge Client side is that you save on host resources. However, there are a few cases where you should consider filtering on the host side, as follows:
-
If you plan to filter many columns, consider filtering on the host side to reduce TCP/IP traffic. The best way to determine this is to try the filtering both ways and see which gives you the best throughput.
-
If you plan to filter columns with confidential or sensitive information, it is best to perform the filtering on the host.
Filtering Data Sets
You can filter data sets on the host side by using a logical database or
by creating a filtering routine with the DBGenFormat program. On the
Databridge Client side, you can filter data sets by setting the active
column to 0 for the corresponding entry in the DATASETS Client control
table.
If you want to filter data sets that contain confidential or sensitive information, consider using a logical database or a filtering routine in the DBGenFormat utility. In this case, the Databridge Client will have no record that these data sets exist.
Filtering Rows
Row filtering limits data to certain ranges; you can accomplish this via the WHERE clause of filtering routines created with the DBGenFormat program on the host. For more information, see Chapter 4 in the Databridge Host Administrator's Guide.
Filtering OCCURS Tables
OCCURS tables are secondary tables generated by the Databridge Client when OCCURS clauses for items (or GROUPs) are not flattened. Frequently, not all rows in such tables contain meaningful data, for this reason it is desirable to filter such rows to reduce the storage requirements and improve performance. Starting with version 6.5, the Databridge Client implements row filtering for OCCURS tables. For more information, refer to OCCURS Table Row Filtering.
Databridge Components
The following table lists all of the Databridge products and components that can have a role when replicating data with the Databridge Client.
Databridge Host (installed on the mainframe)
| Component | Description |
|---|---|
| Databridge Engine (DBEngine) | The main component of the Databridge software, DBEngine is a host library program that retrieves structural information, layout information, and data from the DMSII database and passes the information to the Databridge Server. Additionally, it retrieves updates by reading the audit files on the host and sends the changes to the Client. |
| Databridge Server (DBServer) | An accessory that provides communications between DBEngine and the Databridge Client, and also between DBEngine and Databridge Enterprise Server. DBServer responds to Databridge Client requests for DMSII data or DMSII layout information. |
| Support Library (DBSupport) | A library that provides formatting and filtering to the DBServer and other accessories. After DBServer receives data from the DBEngine, it calls the Support Library to determine if the data should be replicated, and if so, passes the data to the Support Library for formatting. |
| DBGenFormat | A host utility that creates filter and format routines. The DBGenFormat utility interprets the DBGenFormat parameter file to generate ALGOL source code patches, which are included in the tailored Support Library. |
Databridge Enterprise Server
A Windows-based product that provides the same functionality as the Databridge Engine (DBEngine) and Databridge Server (DBServer) on the host. Enterprise Server offloads much of the replication workload from the Unisys mainframe to a Windows computer, reducing mainframe resource utilization and initial load time.
Databridge Clients can connect directly to Enterprise Server, which in turn connects to DBServer on the mainframe. If MCP disks are directly accessible from the Windows server, Enterprise Server extracts the DMSII data directly. Enterprise Server reads the audit trail on the host to retrieve updates that occurred during the extraction and sends the changed information from the audit file to the Client. If MCP disks are not directly accessible, Enterprise Server uses DBServer to retrieve blocks of data from DMSII data sets or the audit files. Enterprise Server provides high-speed file transfer between the host and the Windows environment and audit file mirroring.
| Component | Description |
|---|---|
| DBEnterprise | The executable file for Enterprise Server, frequently used interchangeably with Enterprise Server. |
| Databridge Director (DBDirector) | A Windows Service that listens for Client connection requests and starts DBEnterprise whenever a connect request is received. |
Note
We use terms "Databridge Server" and "Databridge Engine" throughout the rest of this manual as generic terms that apply to either "DBServer" and "DBEngine" on the mainframe or to the equivalent component in "Databridge Enterprise Server".
Databridge Client
The Client initiates a connection with the Databridge Server and then specifies the DMSII data sets to be replicated from a DMSII database.
| Component | Description |
|---|---|
| Client Manager (DBClntControl) | The service (Windows) or daemon (UNIX) that automates most Client operations. It handles operator requests from the Administrative Console and routes all log and informational messages to the administrative consoles. |
| DBClient | A Client program that is launched by the service. DBClient handles the processing of DMSII data and updates the same as dbutilty, except that it runs as a background run and uses the Administrative Console to display its output and interact with the operator. |
| DBClntCfgServer | A program that handles all requests specific to a data source from the Administrative Console. These requests include updating the Client configuration file, providing access to the Client control tables, and handling the Customize command. Like DBClient, this program is run by the service as a background run. |
| dbutilty | A program that runs the Databridge Client from a command-line. |
| Batch Console (bconsole) | A program that allows Windows command files (UNIX shell scripts) to issue console requests to the Databridge Client Manager. The Batch Console executes console commands in script files that are written in a language that vaguely resembles Visual Basic. |
| Administrative Console | A browser-based application that is controlled by a server which connects to the Databridge Client Managers. The Administrative Console, besides providing a replacement for the Eclipse based Client Console and the Client Configurator, also implements a monitor that allows you to monitor the operations of the various Client Managers and the Clients they control from a single screen. To connect to the Administrative Console server from the browser use the following URL https://hostname:7445/ where hostname is the name or IP address of the Administrative Console server. |
Databridge FileXtract
An application that allows you to clone and update Flat Files that reside on Unisys ClearPath NX, LX, or A Series mainframes. You can also use FileXtract with the Databridge Client to replicate this data. From the Client perspective, FileXtract data sources look like DMSII data sources.
FileXtract is bundled with Databridge Host software and includes several Reader libraries and other associated files.
Note
A flat file is a plain text or mixed text and binary file which usually contains one record per line. Within the record, individual fields may be separated by delimiters, such as commas, or have a fixed length and be separated by padding. An example of a flat file is an address list that contains fields for Name and Address.
Databridge Flat File Client
The Flat File Client (also known as PCSPAN) is a Windows implementation of the DBSPAN accessory on the MCP. As is the case with DBSPAN, rather than update the secondary database, the Flat File Client creates data files that contain the data records for the updates. This approach is useful when a Databridge Client does not exist for a particular database or platform or when the data has to be transformed before being loaded into a secondary database. The Flat Client has a very similar architecture to the relational database clients, such as the SQL Server and the Oracle Clients.
Databridge Kafka Client
The Databridge Client for Kafka, which is implemented on Linux platforms only, enables the ability to utilize the Kafka messaging system within the Databridge architecture. The Kafka messaging system is a scalable fault-tolerate data management system that provides efficient real-time data processing.
Comparing the Databridge Client Manager Service to Command-Line Operations
The Databridge Client Manager service performs the same operations as the command-line Client, dbutility. We refer to these operations using the term "service" whether the Client Manager service is running on Windows platforms (service) or UNIX/Linux platforms (daemon). Each machine has its own service (Windows) or daemon (UNIX/Linux). The primary advantage to using the service is its ease of use and the ability to automate Client processes. Additionally, Client runs initiated by the service can't be interrupted or tampered with as they occur as background runs.
The following table can give you a better idea of how the two modes of operations compare when performing Client-specific tasks.
| To do this | With this dbutilty command | With the Databridge Client Manager (via Administrative Console) |
|---|---|---|
| Create Client control tables | configure |
The Client control tables are automatically created if they don't exist when you run a define or redefine command, or, a Customize command from Settings drop-down button for the data source when using the Administrative Console. |
| Clone the data sets specified on the command-line | clone |
To clone selected data sets, select the Clone Data Sets command in the Advanced drop-down button for the data source. The resulting dialog allows you to select the data sets to clone, and to additionally add command-line options. |
| Populate the Client control tables with information about the DMSII data set layouts and the corresponding relational database table layouts | define |
Click on the Define/Redefine command in the Actions drop-down button for the data source. DBClntCfgServer executes the appropriate command (define or redefine). |
| Apply changes from the primary database to the relational database structure while preserving existing information | redefine |
Click on the Define/Redefine command from the Actions drop-down button for the data source. DBClntCfgServer executes the appropriate command (define or redefine).To run a redefine command with the -R option (i.e. redefine all data sets) from the Administrative Console, select Redefine (with options) in the Advanced drop-down button for the data source and enable the Redefine All Data Sets checkbox. |
| To write the Client control table entries to the log file | display |
To write control tables to the log file, select the Log Control Tables command in the Advanced drop-down button for the data source. |
| To create script files | generate |
Select the Generate Scripts command in the Actions drop-down button for the data source. This is the equivalent of running the generate command without using command-line options.To force all script files to be recreated in the dbscripts subdirectory, select the Generate All Scripts command in the Advanced drop-down button for the data source. NOTE: This is equivalent to using the –u option in the command-line Client to create and place all of the script files in the dbscripts subdirectory. |
| To perform the initial clone or process DMSII database updates | process |
Select Process command from the Actions drop-down button for the data source. The service, which controls scheduling for all process commands, starts DBClient at the scheduled time (if specified) and terminates DBClient when the process command finishes. You can run this command anytime.To add command-line options to process commands for runs initiated from the Administrative Console, select the Process (with options) command in the Advanced drop-down button for the data source, then choose the desired options from the provided set of checkboxes. |
| To recreate the stored procedures for tables associated with a given data set in the specified data source (for example, after a DMSII reorganization) | refresh |
Select the Refresh Data Set command from the Advanced drop-down button for the data source. You can either refresh a specific data set or all data sets. |
To alter the relational database using the scripts created by the redefine command. The command automatically refreshes the scripts and stored procedures associated with the tables whose layouts have changed. |
reorg-or- reorganize |
Select the Reorganize command from the Actions drop-down button for the data source. |
| To run user scripts or Databridge Client scripts | runscript |
Select the Run Script command from the Advanced drop-down button for the data source. This command runs the script in the user script directory (user_script_dir), the name and location of which is defined in the Client configuration file. If you start the filename with a backslash for a Windows Client or a slash for a UNIX Client, this command uses the -n option, which overrides the directory specification. |
| To close an audit file on the host | switchaudit |
Not supported. |
| To back up the Client control tables | unload |
Select the Unload Data Source command from the Advanced drop-down button for the data source. |
| To restore the Client control tables using the backup file | reload |
Select the Reload Data Source command from the Advanced drop-down button for the data source. |
| To export the binary configuration file to an editable text file | export |
Select the Export Client Configuration command from the Advanced drop-down button for the data source. You can only execute the export command with the default command-line options from the Administrative Console. |
| To import a text configuration file (and convert it to a binary file) for use with the Client | import |
Not available. The configuration file is updated directly from the Administrative Console. |
| To create user scripts to back up customizations made by the Customize command | createscripts |
Select the Create User Scripts command from the Advanced drop-down button for the data source. |
For more information about dbutilty commands, see dbutility Commands. For more information about the Administrative Console, see Using the Console and Service and the Help included in the Administrative Console. To access the Administrative Console help use the menu icon in the top left of Administrative Console header to expand the left-side menu and select Documentation. Alternatively, select the help icon in the top right of the Administrative Console to see documentation specific to the current view in the Administrative Console.
Switching from Command-Line to Service Operations
Use this procedure if you currently run the Databridge Client from a command-line and want the Client Manager to run it, or if you need to add existing data sources to the Client Manager.
To operate the Client Manager on the Client machine, you'll need a specific directory structure, referred to as the service's working directory. You can use the migrate utility to create this directory.
Important
If you're in the process of upgrading your Databridge software, use the instructions in the Databridge Installation Guide for upgrading the Client.
To switch to the service based client (Windows)
Note
Using the 6.6 console with the 7.0 Client software will not work well. The Databridge 7.0 Administrative Console will not work with the 6.6 Client software. You should always run matching software for the Administrative Console and the Client.
-
Set up the service's working directory. If you use the Client on Windows, you can run the Migrate program to do this. For more information, see The Working Directory section of the Databridge Installation Guide.
-
Install the Administrative Console that matches the version of Databridge Client software in use. For instructions, see the Databridge Installation Guide.
-
Do one of the following:
-
If you use a text Client configuration file, proceed to step 4.
-
If you use a binary Client configuration file (that is, you have not exported your configuration file to a text file to edit it), skip to step 6.
-
-
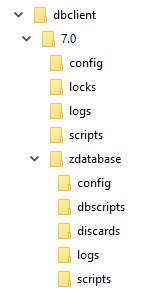
From the data source directory, locate the config folder, and copy the text configuration file
dbridge.cfgto a file nameddbridge.ini.The following image shows an example of a working directory for a data source named "zdatabase".
-
From a command prompt, go to the working directory for your data source and run the dbutilty
importcommand. This creates a binary configuration file required by the service. -
To make sure that the Client Manager service is running, from the Start menu, navigate to Control Panel > Administrative Tools > Services, double-click Micro Focus Databridge Client Manager 7.0, then select [Start].
-
Using a browser (such as Microsoft Edge or Google Chrome) enter the following URL https://hostname:7445/ where hostname is the name or IP address of the Administrative Console server.
-
From the Administrative Console Server page select the +Add button and provide the hostname or IP address of the Client Manager and the port it listens on (typically 8001). This will add the node to the list of servers, and the Administrative Console will detect if the server is a Client Manager.
-
Repeat the previous step for the Databridge server you wish the data source be associated with. This will add the node to the list of servers and detect the fact that it is a Databridge server on the MCP or Databridge Enterprise Server. The Administrative Console will also detect if the connection to the Databridge Server on the MCP is encrypted.
-
Go to the page for the Client Manager that was added by selecting the Client Manager link and select the Client Manager in question (host name or IP address). Click the +Add button and select New to open the Add new data source page.
-
Select the Databridge server from the Select server drop-down list provided. Note that if you skipped Step 9, you can add the server by selecting the Add new server button and providing the server name or IP address and the port it listens on. When finished, select the Add Server button. There will be a brief delay while the Administrative Console verifies the server.
-
Select the Continue button to move the next page of the command.
-
The Administrative console retrieves the data source names configured for the server in question and provides you with a list box from which you can select the desired data source.
-
Fill in the rest of the input fields on the page with the various relational database information that is needed. This includes the ODBC data source name for the SQL Server Client, the database name for the Oracle Client, and the relational database signon information (user/password) if the SQL Server uses Integrated Windows Authentication. When finished, select the Add button in the lower right corner of the Administrative Console.
To switch to the daemon based client (UNIX/Linux)
-
Log on as the userid specified in the USERID parameter of the file
globalprofile.ini. This is the same userid you currently use to run the command-line Client. -
Set the current directory to the home or other directory to which you have write access and copy the script
dbdaemonfrom the install directory. This allows you to make changes to the script. -
In an editor, open the script
dbdaemon. -
Make sure that the environment variables (such as INSTALLDIR, WORKING_DIR, ORACLE_HOME, LD_LIBRARY_PATH) are correct for your system and edit them as needed.
-
Save and close the script.
-
Start the daemon by typing the following:
dbdaemon start -
To verify that the daemon is running use the
pscommand, which should produce output similar to the following:databridge@VMOPENSUS114-64:~> ps -ef | grep DBC databridge 1110 1 0 12:00 ? 00:00:00 /opt/dbridge70/DBClntControl -
If the daemon doesn't start, in the script
dbdaemon, make sure that the WORKING_DIR and INSTALLDIR environment variables are correct. Also, check the Client Manager's working directory to determine if the filedbdaemon.logwas created and if it contains any clues. -
Using a browser (such as Microsoft Edge or Google Chrome) enter the following URL https://hostname:7445/ where hostname is the name or IP address of the Administrative Console server.
-
From the Databridge Server page click +Add and provide the hostname or IP address of the Client Manager and the port it listen on (typically 8001). This will add the node to the list of servers and detect the fact that it is a Client Manager.
-
Repeat step 10 for the Databridge server you wish the data source be associated with. This will add the node to the list of servers and detect whether the server is a Databridge server on the MCP or a Databridge Enterprise Server. The Administrative Console will detect if the connection to the Databridge Server on the MCP is encrypted.
-
Go to the page for the Client Manager added by selecting the Client Manager's link and click on the Client Manager in question. From the +Add drop-down button select New to open the Add new data source page.
-
Select the Databridge server from the Select server drop-down list provided. Note that if you skipped Step 11, you can add the server by selecting the Add new server button and providing the server name or IP address and the port it listens on. When finished, select the Add Server button. There will be a brief delay while the Administrative Console verifies the server.
-
Select the Continue button to move the next page of the command.
-
The Administrative console retrieves the data source names configured for the server in question and provides you with a list box from which you can select the desired data source(s).
-
Fill in the rest of the boxes on the page with the various relational database information that is needed. This includes the database name for the Oracle Client and the relational database signon information user/password. When finished, select the Add button in the lower right corner of the Administrative Console.
-
Type
suto switch to the root user and then copy the scriptdbdaemonfrom the location you specified in step 5 to the following location:-
(Linux/Solaris)
/etc/init.d -
(AIX)
/etc/rc.d/init.d -
(HP-UX only)
/sbin/init.d
-
-
To make the operating system automatically start the daemon whenever the system starts, consult the documentation for your operating system.
Command-Line Client Operations
This section describes the tasks required to clone a DMSII database and track changes using the Databridge Client from a command-line. This sequence assumes that the relational database is properly configured and the required Databridge software is installed and running.
| 1 | Update the configuration file | Because the Client reads the Client configuration file before writing the script files and the log file, you may need to modify this file. To edit the configuration file, you must export it to an editable format and then import it after you make your changes. For more information, see Export or Import a Configuration File. |
| 2 | Run the dbutilty configure command |
In a first-time installation, you must run the dbutility configure command. This creates the Databridge Client control tables that will hold the layout information for the DMSII database and corresponding relational database tables. |
| 3 | Run the dbutilty define command |
This command creates an entry in the DATASOURCES Client control table that contains the data source name, the host name, and the port number on which Databridge Server listens. It also populates the Client control tables with the DMSII layout and creates the corresponding table layout for the relational database.**dbutilty define datasourcename hostname portnumber |
| 4 | Create user scripts | To customize the Client control tables, you must create user scripts. Or, you can use the default mapping that the Databridge Client produces. Creating user scripts is an iterative process that involves writing scripts to select and map data sets and customize data tables. Creating user scripts may require testing until the resulting data table layout meets your specifications. When you are satisfied with the results of your user scripts, re-run the define command with the -u option. |
| 5 | Run the generate command |
This command creates scripts that the Databridge Client uses to create and populate the data tables from the data sets are selected for cloning. You can modify the configuration of your data tables by adding optional parameters to the end of the create table and create index statements. Do not directly modify scripts created by the generate command; your changes will be lost the next time your run this command.dbutilty generate datasourcename |
| 6 | Review the bulk loader options | Review the sections on bulk loader utilities and their related options to make changes to the bulk loader parameters in the configuration file as needed. If you make changes to the Client configuration file, you will need repeat step 5 with the -u option added, as the scripts will otherwise not reflect these changes. |
| 7 | Clone the database | To clone the DMSII database, run the process command. If you want to clone only a few data sets, use the clone command. This step populates the Databridge data tables in the relational database with actual DMSII data.dbutilty process datasourcename |
| 8 | Update the database | To update the relational database with changes made to the DMSII database, run the process command. Or, to make the Databridge Engine wait for updates when it reaches the end of the audit trail, set the configuration parameter use_dbwait to true or use the command-line switch -w. |
Before You Run the Command-Line Client
Before you use dbutility, do the following:
-
Set up the relational database.
-
Install the Databridge software on the host and set up and start Databridge Server (see the Databridge Host Administrator's Guide). If Databridge Server requires signon parameters, include these in the dbutilty configuration file. If necessary, you can also provide these parameters in the environment variables or in dbutilty command-line options.
-
Install or upgrade the Databridge Client (see the Databridge Installation Guide) and create a separate working directory for each DMSII database to be cloned. In most cases, you'll add the relational database logon parameters to the data source configuration file. You can do this by supplying the signon parameters to the
importcommand using command-line switches (such as-U -P -O -W) when you create a new data source. Passwords are automatically encoded.
Important
When you execute dbutility commands for different data sources, make sure that you
have set the current directory to be the directory created for that data source. This
ensures that the process or clone command can locate the configuration files and
the scripts created by the generate command.
Controlling and Monitoring dbutility
The Databridge Client includes a command-line console to help control and monitor dbutility. Commands are entered in the same command prompt session where dbutility is running. When dbutility is running, make sure that the focus is on the command prompt window and then use the keyboard to enter the command. You need to type only enough of the command to make it unique.
The configuration file parameter inhibit_console allows you to disable
the command-line console, and the command-line option -C toggles this parameter. The
available commands are as follows:
| This Command | Allows You To |
|---|---|
co[mmit] a[bsn] <number> |
Dynamically changes the value of the parameter commit_absn_inc. The change only takes effect at the next commit. The allowable range of values is the same as that of the parameter commit_absn_inc. |
co[mmit] ti[me] <number> |
Dynamically changes the value of the parameter commit_time_inc. The change only takes effect at the next commit. The allowable range of values is the same as that of the parameter commit_time_inc. |
co[mmit] tr[ans] <number> |
Dynamically changes the value of the parameter commit_txn_inc. The change only takes effect at the next commit. The allowable range of values is the same as that of the parameter commit_txn_inc. |
co[mmit] s[tats] |
Displays the commit statistics. |
co[mmit] u[pdate] <number> |
Dynamically changes the value of the parameter commit_update_inc. The change only takes effect at the next commit. The allowable range of values is the same as that of the parameter commit_update_inc. |
h[elp] |
Displays a list of available commands. |
l[ogswitch] |
Closes the current log file and starts a new one. |
p[stats] |
Displays the performance statistics. These statistics are the same as those shown after an audit file switch when the show_perf_stats configuration file parameter is set to True. |
q[uit] [at hh:mm | after afn] |
Terminates the program at the next quiet point. Issuing this command during data extraction has no effect until the fixup phase starts. Optionally, you can specify either to terminate the program at a particular time or to terminate it after a particular audit file is processed. |
q[uit] now |
Terminates the program immediately by first closing the TCP/IP connection to the server. This command is particularly useful when using DBWAIT and there are no updates available. This command will not take effect immediately if the Client is waiting for an SQL operation to complete. |
sc[hed] {on | off} |
Disables or enables update scheduling. For instructions on scheduling updates, see Scheduling dbutility Updates. |
ss[tats] |
Displays statistics for Databridge Server at the next quiet point. |
st[atus] |
Displays a variety of status information, such as the current stateinfo during audit file processing, the trace status, and the program status (for example, waiting for TCP for 100 ms). |
tr[ace] trace_mask |
Dynamically alters the trace mask; for more information, see Enabling a Trace. |
ts[witch] |
Closes the current trace file and starts a new one. |
v[erbose] {on | off} |
Alters the setting of the verbose flag; see -v in dbutilty Command-Line Options. |
Databridge Client Exit Status Values
After each command, the Databridge Client command-line program, dbutilty, returns an exit status value.
| exit_status Value | Description |
|---|---|
| 0 | Run completed successfully. |
| 1 | This value identifies generic Databridge Client errors. |
| 2 | Client process or clone command exited because of a DMSII reorganization.NOTE: An exit_status of 2 can occur only with the process and clone commands. |
| 0nnn | Client exited because of a Databridge Engine error. The error is listed in Appendix A of the Databridge Host Administrator's Guide. |
| 10nn | Client exited because of a DBServer error. The error is listed in Appendix A of the Databridge Host Administrator's Guide. |
| 11nn | Client exited because of a DBEnterprise error. The error is listed in Appendix A in the Databridge Enterprise Server Guide. |
| 20nn | Client exited because of a recognized Databridge Client error. The error is listed in Appendix E. |
| 97nn | Client exited because of a recognized TLS error. The error is listed in Appendix E. |
For detailed information about Client exit codes, see Appendix E: Client Exit Codes.
Testing for Exit Status
The following examples show how you can test for the exit status (exit_status).
Windows Example
This example tests for the exit_status in a Windows .cmd file:
dbutility process datasource
if errorlevel 2 if not errorlevel 3 goto reorg
exit
:reorg
echo DMSII reorganization has occurred
sendmail "message"
where <sendmail> is a hypothetical user application that sends a notification to you.
UNIX Example
The following example, written for the UNIX Korn shell (ksh), determines whether or not the value of the exit status (that appears after you run the dbutility program) indicates that a DMSII reorganization was detected. If a reorganization was detected, it echoes a message and runs the sendmail program:
dbutility process datasource
if [$? -eq 2]
then
echo "DMSII reorganization has occurred"
sendmail "message"
fi
where sendmail is a hypothetical user application that sends a notification to you.