4.5 Understanding Workflow Connectors

Workflows use connectors to travel from one activity to another. When you add a connector to a workflow, you can specify whether it is conditional or unconditional. An unconditional connector always allows the workflow to traverse it from one activity to another. A conditional connector uses a conditional expression to determine whether the workflow can traverse it.

4.5.1 Configuring a Connector

The basic steps for configuring a connector are the same for both conditional and unconditional connectors.

To configure a connector:

  1. On the Workflow tab, in the Tools group, click Connect Activities Tool.

  2. On the activity from which you want the connector to originate, click the appropriate port, and then drag the pointer to the appropriate port on the activity to which you want the workflow to travel.

    HINT:

    • An activity’s port turns into a red box when the tool hovers over it.

    • The connector automatically picks the best “route,” based on the ports you select. To switch to manual mode, press the space bar.

    • You can draw all the connectors you need while the Connect Activities tool is active.

  3. To switch back to the standard pointer tool, on the Workflow tab, in the Tools group, click Selection Tool.

  4. If the Connector Properties window does not display automatically, right-click the connector, and then click Properties.

  5. Verify that the From and To fields specify the correct activities.

    HINT:You can use the From and To fields to connect the appropriate activities without manually positioning the ends of the connector.

  6. Choose the desired action to:

    • reverse the flow of the connector, click Reverse Connector

    • configure an unconditional connector, click Always traverse this connector

    • configure a conditional connector, complete the following steps:

      1. Click Only traverse this connector when the following conditions are met.

      2. Under Conditional Expression, click Create Expression to launch the Expression Editor window.

      3. On the Expression Editor window, configure the conditional expression, and then click OK. For more information about conditional expressions, see Understanding Conditional Expressions.

  7. On the Connector Properties window, click OK.

4.5.2 Understanding Conditional Expressions

A conditional expression contains one or more of the following components:

Operator

An operator is a complex rule, such as Has All of the following, that ties rules together and governs how they are related using Boolean logic. Operators may have other operators as descendants, creating unlimited nested levels.

To add a new operator to a conditional expression, click New Template, and then select one of the following:

  • All to require the workflow to match a combination of the following rules

  • Any to require the workflow to match any or all of the following rules

  • None to require the workflow to not match a combination of the following rules

  • Not Any to require the workflow to not match any or all of the following rules

Parameter Expression

Evaluates the value of an output parameter from a previous activity in the workflow. For example, you can specify that the connector allows the workflow to traverse it only if the value for the Status of the send parameter on the Send Email activity equals Succeeded.

Activity Execution Attribute Expression

Evaluates the value of a specific activity’s start time, end time, or duration. For example, you can specify that the connector allows the workflow to traverse it only if the Find Objects activity took less than 60 seconds to complete.

Event Attribute Expression

Evaluates the value of an attribute on the triggering event. Attributes from triggering events are attached to the work item. For example, you can specify that the connector allows the workflow to traverse it only if the event type equals Aegis.Event and the value for the Business Service Name attribute equals Messaging Service.

Work Item Attribute Expression

Evaluates the value of a work item attribute. For example, you can specify that the connector allows the workflow to traverse it only if the value for the Work Item Resource Groups attribute equals Exchange Servers.

Trigger Custom Attribute Expression

Evaluates the value of a custom attribute defined on a trigger. For example, you can specify that the connector allows the workflow to traverse it only if the value for the trigger custom attribute Cause equals Exchange server down.

Global Setting Expression

Evaluates the value of the specified global setting, such as the name of the email server or the URL for the Operations Console. For example, you can specify that the connector allows the workflow to traverse it only if name of the email server computer matches the value you provide.

4.5.3 Understanding How Join Activities Interact with Conditional Connectors

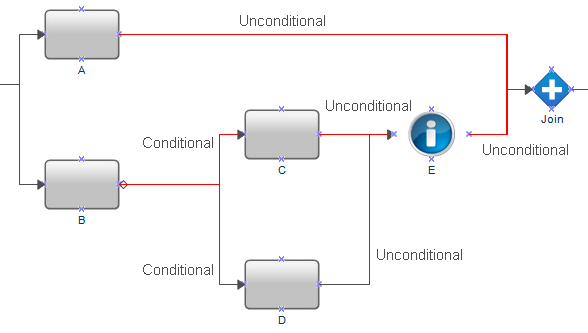
A Join activity requires the workflow to traverse all incoming connectors before it can proceed to the next activity in the workflow. If a conditional expression prevents the workflow from traversing all connectors, the Join activity cannot proceed. For example, if the workflow splits into two parallel flows, one starting with activity A, the other starting with activity B, the Join activity has three incoming connectors.

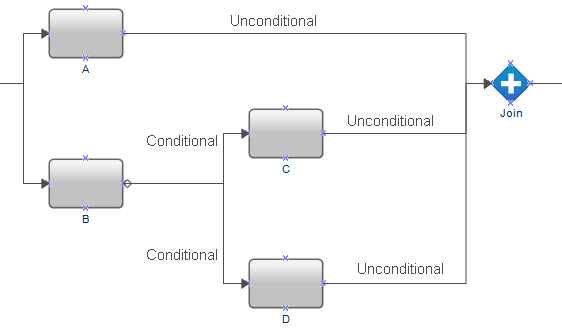
The workflow always traverses the unconditional connector between A and the Join activity, but the conditional connectors after B require the workflow to executing either C or D. If the workflow cannot traverse the connector between D and the Join activity, the Join activity cannot proceed.

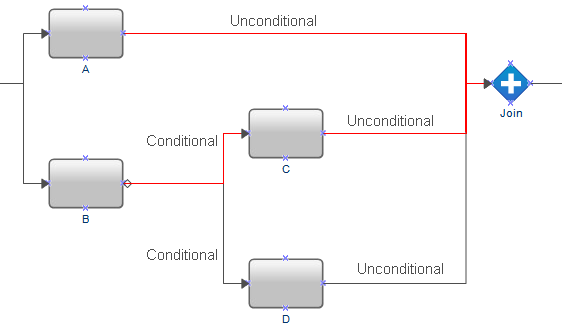
To ensure the workflow is able to traverse all connectors coming in to the Join activity, add a No Operation activity (activity E) between activities C and D and the Join activity. As a result, the workflow is always able to traverse all connectors coming in to the Join activity, and the Join activity is able to proceed to the next activity in the workflow.