Getting Started in the Components Pane
You do most of your work in Component Maker in the Components pane. To illustrate how you extract a logical component in the Components pane, let's look at the simplest task you can perform in Component Maker, Dead Code Elimination (DCE).
Note: The following exercise deliberately avoids describing the properties and options you can set for DCE. See the relevant help
topics for details.
-
In the Components pane, double-click
Dead Code Elimination. The DCE pane opens. This view shows the DCE-based logical components created for the programs in the current project.
Tip: Click the
 button on the tool bar to restrict the display to logical components created for the selected program.
-
Select the program you want to analyze for dead code in the
Interactive Analysis Objects pane and click the
 button. To analyze the entire project of which the program is a part, click the
 button.
- A dialog opens where you can enter the name of the new component in the text field. Click OK. Component Maker adds the new components to the list of components. If you selected batch mode, Component Maker creates a logical component for each program in the project, appending _n to the name of the component.
- Double-click a component to edit its properties. The Component of program field contains the name of the selected program.
-
In the
Entry Point to use field, click the link for the current selection and choose the entry point you want to use in the pop-up menu. To unset an
entry point, click it and choose
Unset in the pop-up menu.
Note: This field is shown only for COBOL programs.
- In the Description field, click the here link to open a text editor where you can enter a description of the component. The description appears in the box below the Description field in the Properties tab and in the Description property for the logical component repository object.
-
Click the
 button on the tool bar to navigate to the list of components, then repeat the procedure for each component you want to extract.
-
In the list of components, select each component you want to extract and click the
 button on the tool bar. You are prompted to confirm that you want to extract the components. Click
OK.
- The Extraction Options dialog opens. Set extraction options as described in the relevant help topic. When you are satisfied with your choices, click Finish.
- Component Maker performs the extraction. You are notified that the extraction is complete. If the extraction completed without errors or warnings, click OK to continue. If the extraction completed with errors or warnings, click Yes to view the errors or warnings in the Activity Log. Otherwise, click No.
-
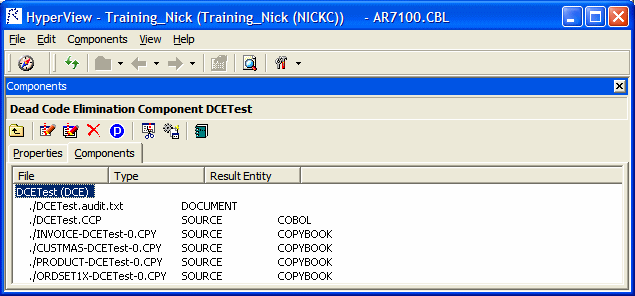
Assuming the extraction executed without errors, the view shown in the figure below opens. Click the Components tab to display
a list of the component source files that were generated for the logical component and an audit report if you requested one.
Click an item in the list to view the read-only text for the item.
