Verifying the CCI.INI File
You can use the Micro Focus Mainframe Access Drag and Drop utility (mfdasmx.exe) to test and verify that the CCI.INI file can be used to establish a mainframe connection. In the steps below it is assumed that your CCI.INI file contains the following:
[ccitcp-targets]
CCITCPT_CSIMVSSSL=,MFCONN:SSL:"C:\SSL\CSIMVS-root-cert.pem":"C:\SSL\CSIMVS-MYUSER-cert.pem"::"C:\SSL\CSIMVS-MYUSER-key.der":A1B2C3D4,MFNODE:CSIMVS,MFPORT:20201
Change the values specified in the steps below to the values that are specified in your configuration:
- At an
Enterprise Developer command prompt, enter:
mfdasmx.exe
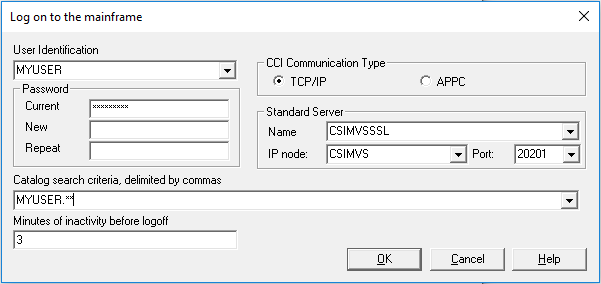
This opens the MFA Drag and Drop utility and the Log on to the mainframe dialog box.
- In the
User Identification field, type your mainframe user ID, or click
 and select a previously-used ID.
- In the Current field of the Password group, type your password.
- In the
Name field, type the value used for the <CCI_Key> in the
CCI.INI file.
In this case, type CSIMVSSSL.
- In the IP node field, type CSIMVS.
- In the Port field, type 20201.
- In the
Catalog search criteria, delimited by commas field, type a search string with wildcards that can find the catalogs that you want.
For example:
- Click
OK.
If the CCI.INI file has been correctly configured you are connected to the mainframe. The matching catalogs are displayed in the right pane. You can now browse the mainframe as normal. This proves that the CCI.INI file is correct and that an SSL connection has been established.