Create a Native COBOL Test Fixture
Use this process to create a test fixture file within a native unit test project, for unit testing native COBOL code. You
can directly populate it with your test code, or link it to existing code in your workspace that you plan to test.
- While in the COBOL perspective, select the unit test project in the COBOL Explorer pane.
-
Click
.
The New COBOL Unit Test dialog box appears.
- In the Containing project field, ensure it states the name of your unit test project.
-
In the
New file name filed, type the name of your test fixture program.
Restriction: Do not use the file name mfunit, as this will not run within the Micro Focus Unit Testing Framework.
-
At this point, you can create a test fixture that links into an existing COBOL program, or create a standalone test fixture
(in which you will add the code under test directly to the test cases):
- To create a linked fixture file, select
Create unit test for program, then click
Browse, select the program that contains the code you want to test, then click
OK.
Note: The selected program must be from a local project that is built to one of the following target types: Single Executable File (only supported when linking to a single project), Single Native Library File, All Native Library Files, or All Int/Gnt Files - the latter three options can be used when the unit test project links to a single or multiple projects. (The All Executable Files target type is not supported.) Any linked project must also share the same Platform Target setting as your test project.
- To create a standalone fixture file, select
Create Unit Test from Template, then select
Micro Focus template.
You may have also configured your own templates; in which case, choose an appropriate template.
- To create a linked fixture file, select
Create unit test for program, then click
Browse, select the program that contains the code you want to test, then click
OK.
-
If you have selected
Create unit test from program, you must select the test type, and the entry points in the source program for which test cases are created. Click
Next and select one of the following:
- Create unit test for data source:
- Unit test data source - click Browse, then select a .csv file that contains the data required for your unit tests. This value is used in the MFU-MD-TESTDATA metadata when the tests are created.
- Data source delimiter - click , (comma) and select the delimiter used in the file. This value is used in the MFU-MD-DD-DSV metadata when the tests are created.
- Program entry point - select the entry point in source program for which a test case is to be created. (Unlike the other type of unit test, you can only select one entry point.)
- Create unit test for entry points: select from a list of entry points with the program under test.
- Create unit test for data source:
-
Click
Finish.
The test fixture file is created within the unit test project.
Both types of fixture file contain similar stub code. Some of the essential elements and additional configuration (required
for linked fixture files) are as follows:
Note: The following excerpts were a result of selecting a program from the AirportDemo project.
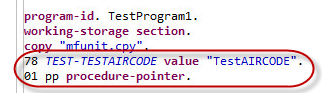
- The two copybooks required by the
Micro Focus Unit Testing Framework are copied into the project.
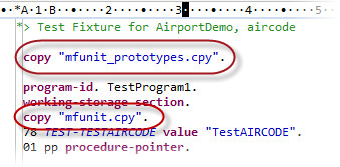
- A test setup and a test case have been created.
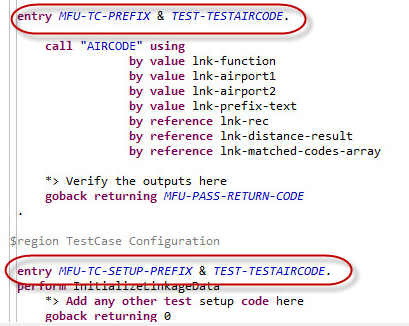
- A procedure pointer has been added to the test setup that enables you to call into the source code, and a level 78 constant
for the test case name has been added (to help when creating the different elements of the test case).
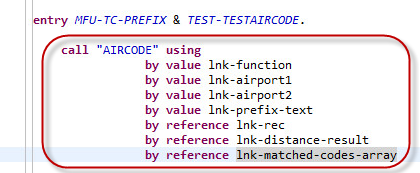
- The Linkage section from the source program has been replicated in the Working-storage section, initialized, and a CALL statement
coded in the test case.
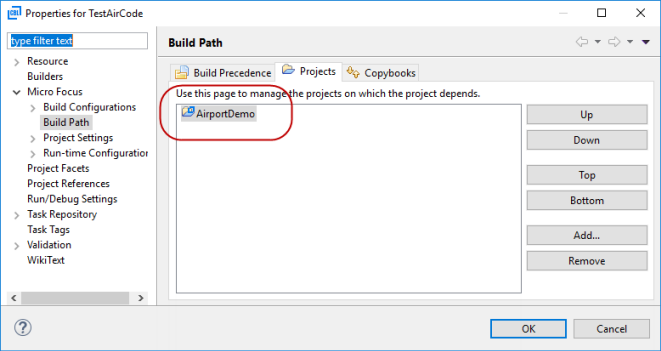
- The project containing the program under test is added to the
Projects tab of the
Build Path properties.