Creating an AWM Plug-in Project
As Enterprise Developer for Eclipse is based on an Eclipse package containing the Eclipse Plug-in Development Environment (PDE), it enable you to develop AWM plug-ins directly in the product itself.
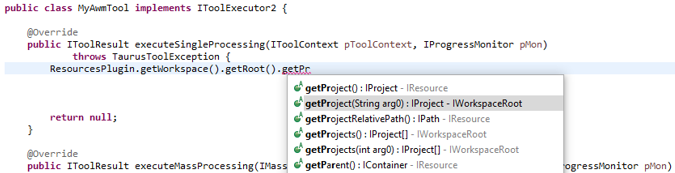
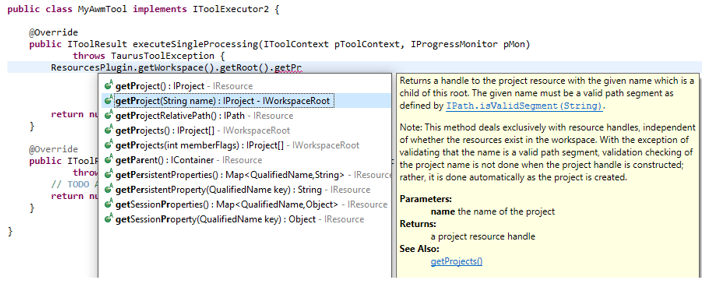
This has the advantage that no particular set up is required for creating, testing, and even deploying new AWM plug-ins. On the other hand, Enterprise Developer for Eclipse is not a complete Eclipse Software Development Kit (SDK), and lacks the source code and JavaDoc of the standard Eclipse API and related frameworks as can be seen in the following screenshots:
The following shows a Java snippet with code completion without Java Doc:
The following shows the development environment set up with Java Doc:
The requirement to set up a full Eclipse Software Development Kit (SDK) is dependent on your intended use and is not a prerequisite for this guide. This guide will operate in a standard Enterprise Developer environment.
To create a plug-in development, first open a Plug-in Development perspective:
- To open the Eclipse Plug-in Development perspective, click
.
This opens the Open Perspective dialog box.
- Click Plug-in Development, and then click Open.
- To create a new Eclipse plug-in, click
.
This opens the New Plug-in Project dialog box.
- Type a Java style project name in the Project name field. For example, com.company.awm.sample.
- Click Next.
- Modify the fields as required, and then click
Finish.
This creates the Eclipse plug-in project and displays it in Project Explorer.
The Eclipse plug-in manifest overview is opened in the editor window.
This editor enables you to view and change various plug-in related settings.
- Under General Information in the Overview tab, check This plug-in is a singleton.
- In order to use the AWM API you will need to add certain plug-in dependencies to your plug-in. Click the Dependencies tab at the bottom of the editor.
- In the
Required Plug-ins pane, click
Add.
This opens the Plug-in Selection dialog box.
- In the Select a Plug-in field, type awm, and then click com.microfocus.awm from the Matching items list.
- Click Add.
- Repeat steps 9 through 11, but this time add the plug-in
org.eclipse.core.runtime as the required plug-in.
- Optionally,
Micro Focus recommends that you remove plug-in version dependencies, for example:
- Select one of the added dependencies, and then click Properties.
- In the opened dialog box, remove the value in the Minimum Version field.
- Click Close.
- Repeat step a. through c. for the other dependencies you are using.
Specifying required plug-in version ranges ensures that a plug-in can only be installed in a tested, compatible environment. Removing version ranges will allow the plug-in to be installed regardless of the versions, but may lead to application errors if referenced APIs have changed or do not exist in the target environment.
- Optionally,
Micro Focus recommends that you remove plug-in version dependencies, for example:
- Click to save the plugin.xml file.