Viewing a System Trace: Diagnostics Example
This subject is covered in the help topic To view a system trace. However, the options are complex and it is worth looking at an example.
To obtain a trace of the system trace table:
- In the Enterprise Server Administration screen, click the diagnostic server's Details button to access the server's Details screen.
- On the Details screen, click ES Monitor & Control to access the diagnostic server's ESMAC screen.
- In the
Diagnostics area in the left pane, check
Trace, and select either the
A or
B to select the A or B dataset.
Note: Do not select C, since the in-memory trace table belongs to the diagnostics server.
- In the Blocks field, specify the number of trace blocks that are to be aggregated into one trace index entry.
- Click Display.
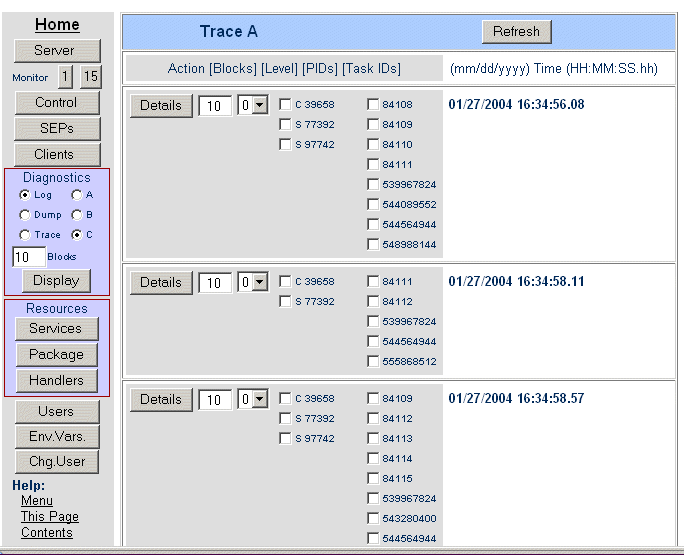
Each block is the same size as the system trace table, that is, it contains the number of trace entries specified in Trace Table Size on the Edit Server page for the server. The index entries are displayed with a timestamp against each one. This is the timestamp of the first trace entry in each set of blocks. These timestamps help you narrow down your search to particular events.
To view the actual trace, go to one of the index entries, and make selections in the following fields:
- In Blocks (immediately to the right of Details), specify how many blocks you want to be included in the trace. This defaults to the value you entered in Blocks in the Diagnostics group of the menu. You can change it to any value you want. Having two Blocks controls helps you control what is displayed in the formatted trace more precisely.
- In
Level, (the next control to the right), specify the level of detail that you want to see in the formatted trace. The options are:
- 0
- Service start, module start, module end, service end.
This is the default value.
- 1
- Enterprise server API entries and exits.
- 2
- Subsystem trace entries.
- 3
- All entries where it is possible to provide some formatting of the data.
- 4
- All trace entries.
- In
PIDs column, check process IDs of the processes in which you are interested. Check boxes are provided for all the processes that
have trace entries in the blocks represented by this trace index entry. Process IDs are prefixed with a letter or number indicating
the function of the process. The following characters are used:
- A
- SNA service
- B
- JES initiator
- C
- Communications process (MFCS)
- D
- IMS DB Manager (IMSD) - DB control
- E
- TRC service
- F
- Fileshare server (internal)
- H
- Temporary Storage, Channels and Containers Control (TSC)
- I
- IMS Communications Manager (IMSC) - TM Control
- J
- Journal control
- l
- Common Communications Interface (CCI)
- L
- MQB service process
- M
- Server manager
- O
- RAS scale-out process
- P
- IMS Message (IMSM) Processing Region
- Q
- MQ service
- R
- Recovery
- S
- Service Execution Process (SEP)
- T
- JES printer
- U
- Unknown
- Z
- Generic terminal or client
- 3
- 3270 terminal or client service
- In Task IDs column, check the check boxes for the task IDS of the tasks in which you are interested. Check boxes are provided for all the tasks that have trace entries in the blocks represented by this trace index entry.
The following is an example of how you can use the controls to select the information you want to see. Suppose you specify 10 in Blocks in the Diagnostics group of the menu. There are actually 60 blocks of information in the dataset, so 6 index entries are displayed. Suppose you were interested in a particular SEP, which you can see listed in the third and fourth index entries. You might then specify 20 in Blocks for the third index entry, check the box next to the process ID for the SEP, then click Details. Now you can only see trace entries for that SEP, in all the blocks that contain them, starting with the first block of the third index entry.
Each trace entry contains the following information:
- Heading
- Contents
- None
- An interpretation of the traced event, if one can be supplied.
- Seq
- Sequence number of the entry in ascending order.
- Task-Nbr
- The five-digit task number.
- ProcessID
- The five-digit process ID.
- ID
- The ID of the event, command, or instruction that was traced. This is a four-byte hexadecimal number.
- hhmmsshh
- A time stamp that indicates when the trace entry was written. The time stamp is in hours, minutes, seconds, and hundredths of a second.
- aaaa bbbb
- Eight bytes of entry-specific data
When you have finished viewing a trace, click Back to return to the trace index page.