Run the ESJCL Job
Start the ESJCL enterprise server region
- On the Server Explorer, expand localhost under Micro Focus Servers to see a list of available enterprise server regions.
- Right-click
ESJCL, and then select
Start from the context menu.
Note: The first time you start the ESJCL region, the Enterprise Server Sign On dialog box prompts you to enter connection details. Because the server is not secured, just click OK to continue.
The Output window shows the progress of the Start command.
Submit the JCL job
- In the
Solution Explorer, right-click
ESJCL.jcl, and select
Submit JCL
from the context menu.
Note: As an alternative, you can submit the job by dragging the ESJCL.jcl file from the Solution Explorer to the Server Explorer and dropping it onto the ESJCL enterprise server region entry.
- Check the Output window for messages confirming that the Job was submitted. The JCLDEMO Spool window opens inside the IDE and shows the details about your job. There is an alternative way to access the spool from Server Explorer.
View the spool queue
The spool queue for submitted JCL jobs is maintained and controlled by ESCWA. You can view the status of jobs in the spool queue by launching the spool queue viewer from Server Explorer.
- On the
Server Explorer, right-click the
ESJCL region, and select
Show Spool from the context menu.
Note: As an alternative, right-click the JCLDEMO project in the Solution Explorer, and select Enterprise Server > Show Spool from the context menu.
The Server Local/ESJCL Spool window opens in the IDE, showing the spool queue.
- Click
 (Home) in the Spool window to access the main menu and see the list of all jobs - you can see more than one entry if you submit
the JCL again.
(Home) in the Spool window to access the main menu and see the list of all jobs - you can see more than one entry if you submit
the JCL again.
- Click
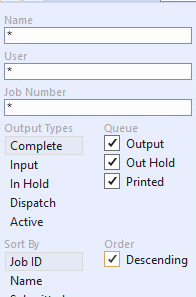
 (Filter) on the Home page of the Spool window to set some filters for records to show. Click
Complete under
Output Types and enable all
Queue check boxes,
Output,
Out Hold, and
Printed in order to view the completed job spool record.
(Filter) on the Home page of the Spool window to set some filters for records to show. Click
Complete under
Output Types and enable all
Queue check boxes,
Output,
Out Hold, and
Printed in order to view the completed job spool record.
- Click the job you have just run in the list of jobs. The job details are displayed on the right-hand side of the Spool window.
You can click
 (Toggle two column layout) in the window taskbar to hide and show the details.
- In the job details pane, expand the DD Entries section and click JESYSMSG in the list. The details for the JESYSMSG are shown below the list of DD entries. Expand the JESYSMSG Display section to see the contents of the dataset.
View the catalog file
The catalog file holds the details of data sets required by the JCL jobs running on an enterprise server region. To view the catalog for the JCLTEST job:
- In Server Explorer, right-click the
ESJCL region, and select
Show Catalog from the context menu.
Note: As an alternative, right-click the JCLDEMO project in the Solution Explorer, and select Enterprise Server > Show Catalog from the context menu.
- Select the dataset in the list. The DCB information is displayed in the right-hand side pane. If this is not visible, click
(Toggle two column layout in the task bar of the catalog window.
- Expand the
DCB section in the details pane to see the catalog entry.
Select the dataset in the list displayed. The DCB information is displayed on the right hand side. If it is not shown make sure that the two column layout is selected.
- To view the file, expand the Display section.