Run MFDEMO
Start the Embedded Rumba Display
- In the
Server Explorer, right-click
IMSDEMO; then select
Mainframe TN3270 Display.
This opens the embedded Rumba+ Desktop display and connects Rumba+ Desktop to the IMSDEMO enterprise server using a TN3270 connection. You can see the login page of the IMSDEMO application.
Note: If at any time the Rumba+ Desktop embedded display is not visible, click Mainframe TN3270 Display on the Visual Studio toolbar.
Start the MFDEMO application
- On the IMS sign-on screen, type SYSAD into both the USERID and PASSWORD fields using the Tab key to move from one to the other; then press Enter.
- Press Ctrl+Shift+Z to clear the Mainframe TN3270 Display screen.
- Enter
MFDEMO
with a trailing space.
Rumba+ Desktop shows the MFDEMO initial menu screen, DEMO91.
Add data
In the sections that follow, each set of instructions includes a screen shot showing the terminal emulator with required fields in green.
- Create a TESTDEPT table
-
- In the
FUNCTION CODE field, type
A to select the <A>DD function.
This action advances your cursor to the TABLE-ID field.
- In the
TABLE-ID field, type
TESTDEPT.
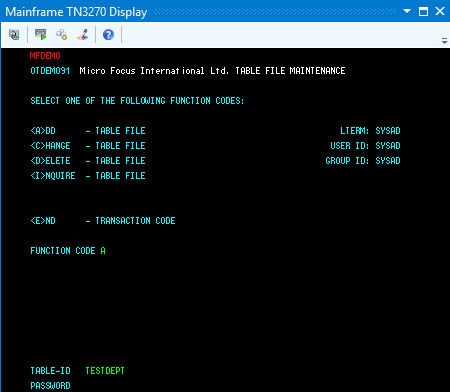
- Press
Enter.
This action advances you to the DEMO92 input screen.
- In the
FUNCTION CODE field, type
A to select the <A>DD function.
- Input records
-
- Complete the following fields as indicated:
DESCRIPTION A TABLE OF TEST DEPARTMENTS NUMBER OF CHARACTERS IN ELEMENT KEY 20 NUMBER OF CHARACTERS IN ELEMENT 50 PASSWORD PROTECT N - Tab to the first entry field under
ELEMENT KEY; then add the following records:
ELEMENT KEY ELEMENT VALUE/DESCRIPTION 123 DEPARTMENT 123 234 DEPARTMENT 234 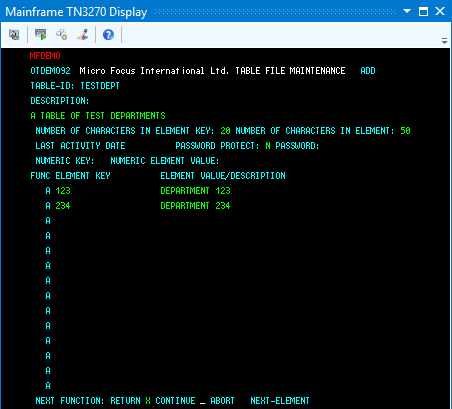
- Tab to the RETURN field; then type X.
- Press Enter to return to the main menu.
- Complete the following fields as indicated:
- Add an additional record
-
- In the
FUNCTION CODE field, type
C to select the <C>HANGE function.
This action advances your cursor to the TABLE-ID field.
- In the
TABLE-ID field, type
TESTDEPT.
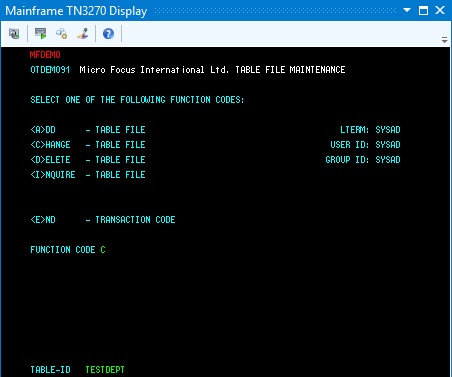
- Press
Enter.
This action advances you to the DEMO92 input screen.
- Tab to the first field in the third row under
FUNC; then add the following record:
FUNC ELEMENT KEY ELEMENT VALUE/DESCRIPTION A 345 DEPARTMENT 345 - Tab to the
RETURN field; then type
X.
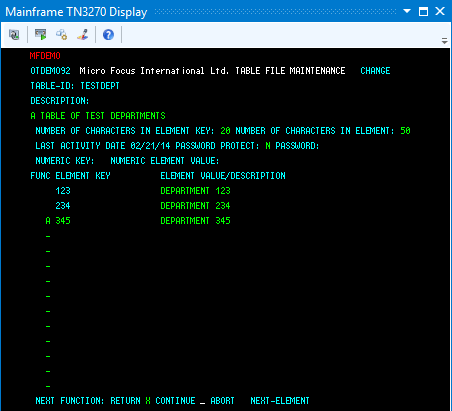
- Press Enter to return to the main menu.
- In the
FUNCTION CODE field, type
C to select the <C>HANGE function.
- Add the TESTERS table and records
-
- Using the same methods as you did to create the TESTDEPT table and add records, add the TESTERS table using these values:
DESCRIPTION A TABLE OF VALID SOFTWARE TESTERS NUMBER OF CHARACTERS IN ELEMENT KEY 20 NUMBER OF CHARACTERS IN ELEMENT 50 PASSWORD PROTECT N - Then add the following records:
ELEMENT KEY ELEMENT VALUE/DESCRIPTION JOHN SMITH IMS DC TEST TECHNICIAN JANE JONES IMS DB TEST TECHNICIAN 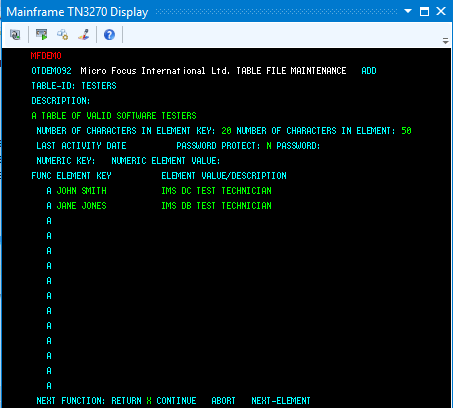
- Press Enter to return to the main menu.
- Using the same methods as you did to create the TESTDEPT table and add records, add the TESTERS table using these values:
- Exit MFDEMO
-
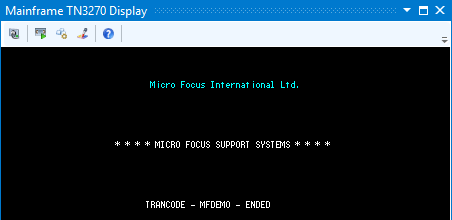
- On the main menu, type
E into the
FUNCTION CODE field; then press
Enter.
This action takes you to the TRANCODE - MFDEMO - ENDED screen.
- Close the Rumba+ Desktop, which automatically disconnects from the database.
- On the main menu, type
E into the
FUNCTION CODE field; then press
Enter.