Configuring Sync Rules
- AccuRev server
- Must be installed. You will need the AccuRev server address and port, the AccuRev user/password and the depot and stream names during the configuration.
- Enterprise Sync server
- Must be installed.
- MFA server
- Must be installed on the mainframe. You will need the mainframe hostname or IP Address and the MFA port during the configuration
and the mainframe userid/password used to connect to the mainframe.
Note: A connection to the mainframe is already required during the configuration, not only when running the synchronization.
- On the machine where Enterprise Sync is installed, type the following into your browser: http://localhost/ConnectWeb. This opens Micro Focus Connect.
- Enter User Administrator and Password Administrator. User name and password are case sensitive.
- For the Authenticator, use the DefaultAuthenticator.
- Click Login.
-
Click
Actions (
 ) and then select
Settings.
The
Global Settings screen appears.
) and then select
Settings.
The
Global Settings screen appears.
- In the Sync Settings group, enter 1 for the Maximum Number of Threads.
- Click Save.
- Click on the Data Source tab, then click Create New Data Source.
- Enter a Name for the AccuRev data source. For example: AccuRevDS.
- Select AccuRev as the Data Source Product.
- Click Add Data Source.
-
Select the added data source for
AccuRev on the left side of the page and then enter the
AccuRev specific connect parameters.
Note the following:
- Exclude List
-
This is a colon separated string that does pattern matching against files and can be used to exclude files from sync operations. If you add a directory named source in AccuRev and you don't want it to sync, the exclude list would include source. If there was a specific file in source you don't want, for example, source\readme.txt you would include that in the string. So multiples would look like:
source:docs\readme.txt:bin
This would exclude elements at the root of your AccuRev streams and workspaces source, bin and the file docs\readme.txt.
- Full Path to AccuRev executable
- If AccuRev is not installed separately on this machine, you will find the path to the AccuRev executable in a sub directory of the Enterprise Sync installation path, by default here: C:\Program Files (x86)\Micro Focus\Enterprise Sync\connectors\accurev\accurev.
- Time OffSet
- You can leave this blank.
- User Name
- This field must match the CC_USER name described in Modify the acserver.cnf File.
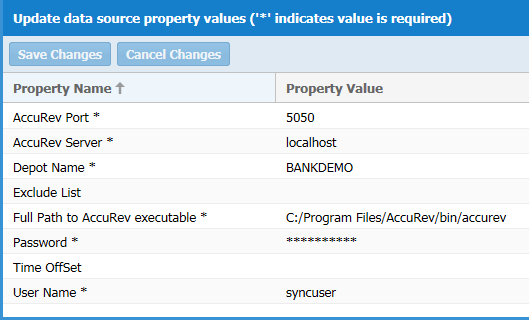
- Click Save Changes.
- Click Create New Data Source again.
- Enter a name for the data source. For example: EndevorDS. Select the Data Source Product Endevor.
- Click Add Data Source.
-
Select the added data source for
Endevor on the left side of the page and then enter the
Endevor specific connect parameters:
.
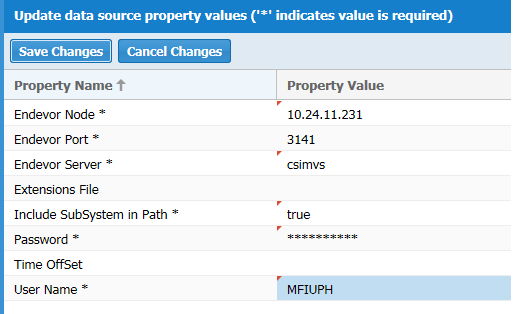 Note the following:
- Endevor Node
- Enter the mainframe IP address in the field.
- Endevor Port
- Enter the MFA port
- Endevor Server
- Must contain a unique server name for this connection (any unique value).
- Include SubSystem in Path
- Select True if you want to include Endevor subsystem names in the synchronization path. Normally you would select False if an Endevor system has exactly one subsystem, and the subsystem name is not relevant in this context.
- Extensions File
-
The format of the file content will follow: java.util.Properties:
KEY=VALUE, PROCESSOR-GROUP
COBOL=CBL,*NOPROC*
COPY=CPY, CICS
EXE=EXE
TRS=TRS
ASM=asm
BMS=asm
JCL=jcl,CICS
JCLPROC=jcl,CICS
Put the full path and name. For example: C:\TEMP\endevorExtensions.properties.
- KEY
- A valid Endevor Type
- VALUE
- A file extension which is added to the Endevor element name when synchronizing files to AccuRev.
- Processor Group
- The Processor group is optional, if not supplied, the default *NOPROC* will be used.
For example: COBOL=cbl
An Endevor COBOL element COB0001 is synchronized as COB0001.cbl
- Time OffSet
- You can leave this blank.
- Click Save Changes.
- Click the Connections tab and then click Add.
- On the Create Connection Wizard page enter a name for the new connection (for example, NDV2ACC) and select the Endevor data source as the Master and the AccuRev data source as the Target. Then click Next.
- On the Types and Fields page select From Master as the Default Sync Direction and then click Add Type Mapping.
- Select ChangeSet for both AccuRev and Endevor Types, ignore all other entries, and click OK.
- Click Next on the Types and Fields tab.
-
On the
Projects tab click
Add for each required mapping from
Endevor to an
AccuRev stream. In our
BANKDEMO sample we will synchronize from
Endevor to
AccuRev the
BANKDEMO subsystem in the stages
PROD,
EMER and
QA. Therefore we will have to define the following three mappings.
Do not define the mapping for stage TEST in this dialog because you will need a bi-directional mapping for stage
TEST. After all relevant mappings have been added click
Save to save this connection and to leave this connection wizard.

- Repeat the previous steps and define the required bi-directional mappings. In our sample, this is the mapping of subsystem BANKDEMO from the Endevor stage TEST to stream TEST.
- The initial status is New connection but will change to Disabled. Use the refresh button on the right side of the page to update the status fields.
-
To start the sync, click the
Start button. Depending on the number of elements to synchronize the initial synchronization process will take a while.
The icon changes if the synchronization is running.
You can stop the synchronization process, if required. Use the Refresh button to see the current status.
When the initial synchronization process is running the status is Restarting.
Micro Focus Connect will begin running regular synchronizations based on the duration configured in the Synchronization Frequency setting. You can change this in Global Settings.