The Tools > Options Dialog
The Options dialog box organizes customizable workbench options into six main categories: Environment, Code Editor, Screen Designer, Code Generator, Data Designer, and Report Writer. Each of these categories is represented as an item in a tree view along the left side of the interface. Each tree can be expanded to reveal sub-categories of information that can be customized for each major category. When you select an item in the tree, options related to that item appear on the right side of the interface.
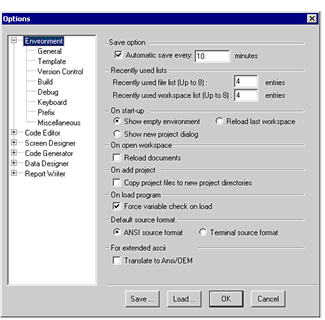
Some options displayed here pertain to user interface customization. Others allow you to configure support for such functions as workspace build behavior, Version Control system support, and Code Insight (code completion), as well as to create template code and set screen and report defaults, and more.
It is important that you take the time to get acquainted with all of the options available in the Options dialog box.
Using the Tools > Options dialog
To change your workspace options, open the Tools menu and select Options. The tree view on the left side of the screen lists each of the major categories that you can customize. Click the plus sign to the left of a category to expand the tree and see all of the available subcategories for that option. Select an item in the tree, then make your changes to the options listed on the right side of the window, according to the information provided in this chapter.
When you are finished making changes, click OK to save your changes. More information about different ways to save and reuse your Tools > Options settings appear later in this section.
Saving option settings
Option settings are automatically saved when you click OK to close the dialog. They are saved to a file called AcuBench.ini, located in your Application Data directory. When AcuBench is launched, the settings are read and applied to the current workspace.
You can save the current settings to a specified file by clicking the Save button at the bottom of the dialog. You determine the file name and path; AcuBench automatically assigns the file an extension of .ini. Because the file contains important default settings for screens and reports, as well as code templates and build options, it can be useful to create a customized .ini file to be shared by all members of the development team.
Loading option settings
When you change workstations, upgrade to a new version of AcuBench, or make changes to the AcuBench .ini file that your team uses for consistency management, you can load your customized .ini file at any time. You do not need to have a workspace open to load a new AcuBench .ini file.
To load the file:
- Open the Tools > Options interface and click the Load button at the bottom of the screen.
- Navigate to the directory containing the file, select the file, and click Open.
- Click OK to close the Tools > Options interface.
Some changes, like automatic save times and color settings, go into effect immediately. Others, like control property defaults, are applied to new elements added to a workspace, but are not retroactively applied to existing program elements.