Issuing Version Control Commands
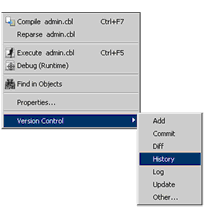
Once you have added commands to the Version Control interface, a new menu option, Version Control, is added to the pop-up menu that appears when you right-click a project node in any Workspace Window view, a program node in the Structure view, a file in the File view, or a data layout in the Data view.

The context for each command that you issue depends partially on which file is selected when you right-click and partially on the arguments that you have specified for the command. If, for example, you have specified that a commit command has {ProjectDir} specified, the entire project will be committed to the version control repository, regardless of which file you have selected. If, however, a commit command has {FileName} or {FileDir} specified, only the currently selected file is committed.
This means that you may define multiple menu options for a single version control command, each specifying a different context. As an alternative, you can specify the Ask Arguments option and manually specify a context each time you issue the command.
When you issue a version control command, AcuBench's default behavior is to echo the command to the Output window, followed by the message Command sent, waiting for completion. Any messages sent back by the version control software are also displayed in the Output window. When the command is completed, AcuBench adds the message Command completed—DONE at the end of output listing.
The following example provides an idea of what appears in the Output window when you issue a version control command. Here, the CVS log command was used to return information about the AcuVet project. (CVS is a free, open-source, third-party version control system.) The example includes only a portion of what was returned by the version control software.
=== cvs.exe -d :pserver:jramos@midas:/home/cvsroot log C:\AcuVet ...		===
	 Command sent, waiting for completion...
	 =============================================================================
	 cvs server: Logging C:/AcuVet
	 RCS file: /home/cvsroot/acuvet/AcuVet.pjt,v
	 >Working file: C:/AcuVet/AcuVet.pjt
	 ...
	 ----------------------------
	 revision 1.2
	 date: 2006/07/27 21:56:42; author: jramos; state: Exp; lines: +1 -1
	 Fixed the problems with the individual pet treatment history report.
	 Both the complete report and the individual report are part of the
	 "graph-rpt" program. Both are accessed from the "Treatment History"
	 interface. Use the button with the printer icon to print the
	 complete report and the button with the "T" icon to print the
	 individual report.
	 ----------------------------
	 revision 1.1
	 date: 2006/07/20 19:38:52; author: bsmith; state: Exp;
	 branches: 1.1.1;
	 Initial revision
	 ----------------------------
	 revision 1.1.1.1
	 date: 2006/07/20 19:38:52; author: bsmith; state: Exp; lines: +0 -0
	 Creating a new testing project for AcuVet.
	 =============================================================================
	 ...Command completed - DONE.
If the Output window displays an error message, rather than the expected result, it's a good idea to double-check the context in which you are issuing the command. Some commands, for example, might work only when issued from the project directory or the root directory.