Installation Steps
If you install from the CD, it will automatically run the .exe version with administrator privileges. If you run the .msi, it does not automatically run with administrator privileges. To run the .msi with administrator privileges, click Start, and in the Search programs and files field, type cmd.exe, then in the list displayed, right-click cmd.exe and select Run as administrator: this opens a command prompt with administrator privileges, where you can run the install by typing the full path name of the .msi file.
Follow these steps to install your products.
- Insert the product CD, or use the provided link to download the installation package from the Micro Focus website.
If you are using the CD, it runs the .exe version automatically.
- If the
.exe version does not start automatically, or you are using the downloaded installation package, do one of the following:
- Navigate to the CD drive, then double-click the .exe.
- Navigate to the location of the downloaded file, then double-click it. (See the above note if you are running the .msi version.)
The installation starts.
- On the Welcome page, click Next.
- On the End-User License Agreement page, select I accept the terms in the License Agreement, then click Next.
-
On the Select Installation Folder page, click Browse and select installation directories for 32-bit and 64-bit (if applicable) products. Alternatively, you can accept the default location(s), then click Next.
- On the
Product Selection page, select the required products, then click
Next.
You must have product codes and keys to activate each product; however, you can install all products now, and activate those products for which you do not have a license at a later date. (Be aware that if you attempt to use products for which you do not have a license, you may receive error messages indicating that no license file is available.)
Note: Ensure you select Documentation on this page to install and access the product user guides. - On the
Installation Settings page, select one or more of the following, then click
Next:
Select To Install License Activator Install a copy of the License Activator Launch License Activator Launch the License Activator at the end of the installation process Start AcuServer 32/64-bit Start your version of AcuServer as a service Start AcuConnect 32/64-bit Start your version of AcuConnect as a service Note: Starting either AcuServer or AcuConnect as a service will only occur if their pre-requisites are satisfied before you run the installer, and only if you have run the .exe or .msi version of the installer with administrator privileges (see note above).If you selected Launch License Activator on the Installation Settings page, the Activator Wizard appears.
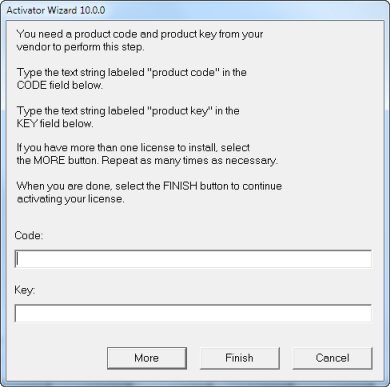
- Type your first product code and key in the appropriate fields.
The License Activator is case-insensitive and displays only uppercase characters. It also ignores embedded spaces and separating characters. Product codes and keys do not contain the letters "O" or "I".
CAUTION:If you have a license for both the Windows runtime (wrun32.exe) and an Alternate Terminal Manager (ATM) runtime (run32.exe) for the same machine, be aware that the Activator Utility creates a license file named wrun32.alc for each of them. To avoid a situation in which the Activator Utility overwrites the license file for the second runtime:- Make a backup copy of the Windows runtime license file prior to creating (and renaming) the ATM runtime license.
- Create the ATM runtime license and rename it to match the executable (change wrun32.alc to run32.alc) before creating the Windows runtime license.
- If you have more than one code and key pair to enter, select
More after typing the first code/key pair. Repeat this process until you have entered all code and key pairs, then click
Finish.
Each time you press More, the License Activator creates a separate license file for the product code and key you entered and returns you to the code and key entry screen.
- Click Finish on the Installation Complete page to complete the installation.