Tree View
The tree view control presents hierarchical data in a list. This list is indented to show the parent and child relationships in the data. Users can expand or collapse items in the list to view or hide subsidiary items.
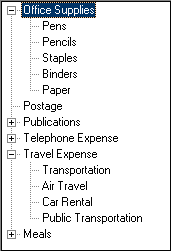
In a tree view control, an ID is assigned to each element when it is added to the control. This provides a unique way to identify each item and allows for duplicate items at different points in the hierarchy without any confusion. Tree view IDs are declared in Working-Storage as USAGE POINTER data items. Tree View Designer functions are explained in detail in the following sections.
Using the Tree View Designer
Create a tree view for a screen by dragging a tree view control from the Screen Component Toolbox to any location in the screen form. When you add a tree view control to the screen, the Tree View Designer dialog box appears. This dialog box lets you add, delete, and move tree view items.
Creating a tree view for a screen
- In the Screen Component Toolbox, click the tree view control icon.
- Move the pointer to the screen form. The pointer changes to a crosshair.
- In the screen form, drag the left mouse button to add a tree view control.
- If the Tree View Designer does not appear automatically, double-click the tree view control box you have placed on the screen form. The text marker is highlighted in the dialog box.
The tree view control has two Property windows. The first one you see is available when you enter tree information in the Tree View Designer. It governs the individual tree and children properties. The second Property window is more extensive, and is available when you enter the tree and children information. It governs the more global behavior of the tree view control.
Adding a tree item to a tree view
- In the Tree View Designer, double-click the text marker. A new text field appears in place of the text marker at the left side of the dialog box. If the tree view already has tree items, the new item appears below and at the same level as the selected tree item.
- If you want to add a tree item before a selected entry, right-click in the designer and select the Insert Item Before command.
- Enter a name for the new tree item from the keyboard. Press Enter.
Adding a child item to a tree view
- Highlight the tree item that needs a submenu and click the Insert a sub-item button. You can also right-click in the designer and select the Insert Sub-item command. The cursor drops to a lower field, enabling you to type in the name of a child item.
- Once you have entered all of the child items for a particular tree item, you can enter the next tree item and child items by selecting the text marker below the last child item.
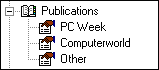
Adding bitmaps to a tree view
The Tree View Designer makes it easy to add bitmap icons to items in a tree view control.
- In the Screen Designer, select the tree view control on the screen.
- In the Property window, click the Value column next to the Bitmap property, then click the browse button.
- Navigate to the location of the bitmap or bitmap strip that you want to use, then click Open.
- In the Tree View Designer, select an item in the tree, then use the Property window to enter a value for the Bitmap Number property. If you are using a single bitmap image, rather than a bitmap strip, this number is 1. If you are using a bitmap strip, enter the number corresponding to the position of the icon that you wish to use.
Deleting an item from a tree view
- In the Tree View Designer, select and highlight the tree item or child that you want to delete.
- Click Delete.
Moving an item in a tree view
- In the Tree View Designer, select the tree or child that you want to move.
- Click the Move item up or Move item down button, depending on where you want the item to move. You can also right-click in the designer and select the Move Up or Move Down command.