Creating a New Screen
When you create a new project using the Standard Project template, a program containing a blank, graphical screen is automatically created within the project. Similarly, if you create a new AcuBench program within your project using the Standard Program template, the program includes a single blank, graphical screen.
If you have created an AcuBench program that does not include a screen, or if you want to add additional screens to a program, you can use either of two methods: select a template from the New Screen interface, or open a screen template file that you have previously created. This topic discusses the first method. The second method is discussed in Working with Screen Templates.
To add a new screen to your AcuBench program using the New Screen interface:
- In the Workspace window’s Structure view, expand the node (tree) associated with the program to which you want to add a screen.
- Right-click the Screen folder and select New Screen.
The New Screen dialog appears, listing the available screen templates.
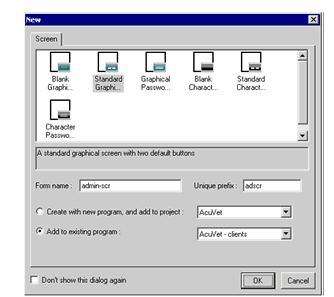
- Select a screen template. By default, seven templates appear on this screen. You can also use the Tools > Options interface to add additional, custom templates to this interface (see Adding Screen Templates).
The default templates include the following:
Template Description Blank Graphical A blank graphical screen Standard Graphical A graphical screen that contains an OK button, a Cancel button, and a main menu Graphical Password A graphical screen with entry fields and push buttons for collecting user login data Blank Character A blank character-based screen Standard Character A character-based screen with an OK button, a Cancel button, and a main menu Character Password A character-based screen for collecting user login data - Fill in the Form Name entry field with a descriptive name for your screen. Adding a descriptive name can help to minimize confusion and simplify
maintenance, especially in programs with multiple screens.
It is also possible to change the screen name after the screen has been added to your program. Just enter a new value in the (Name) field of the screen’s property sheet.
Note that when you change the name of a screen after the screen has been created, the prefix appended to the name of any existing controls is updated to reflect the change. The new prefix is automatically set to the first 10 characters of the screen name. See the next step for more information about prefixes.
- The Unique Prefix entry field is filled in automatically with the first ten characters of your screen name, but you can change the default
value. The Screen Designer uses this prefix for its default control and variable naming scheme.
As with the screen name, you can change the screen prefix after the screen has been created. To do this, right-click the screen form in the Screen Designer and select Change Prefix.
- By default, the screen will be added to the current program when you click OK. If desired, you can use the radio buttons near the bottom of the New Screen window to add the screen to a different program.
- When you are finished making changes, click OK.
The new screen form is opened in the Screen Designer, and an icon for the new screen is added to the program’s Screen node in the Workspace window’s Structure view. When needed, you can double-click the Structure view icon to open the screen in the Screen Designer.