Creating an AcuBench Program
In AcuBench, creating a program means creating a program structure file. For more information, see Programs. After the program structure file is created, you generate to create a program source file (.cbl). The source file can then be modified to include those parts of the program that are not generated by AcuBench
This topic describes the process of creating a new AcuBench program.
To add an existing program to a project and in the process create a program structure file, see Creating a PSF for an Existing Program.
To add an existing source file without creating a program structure file, see Adding an Existing Source File.
To create a new source file without creating a program structure file, see Creating a File.
Create a new program as follows:
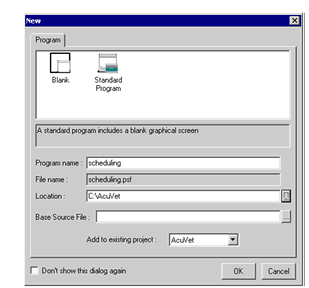
- Select New from the File menu and click the Program tab. You can also right-click the project node in the Structure view and select New Program.

- Select a program template.
The Standard Program template includes code for a standard graphical screen.
The Blank template does not include a screen.
- Enter the name of the new program in the Program name field.
The read-only File name field is updated to show the name of the program structure file that will be created for your new program.
- Enter a location for the program structure file (PSF) in the Location field. To browse for a directory path, click the button
to the right of the field.
By default, the new program structure file is placed in the base directory for the current project.
- If you want an existing source file to be associated with a new program, enter the file name in the Base Source File entry field or click the browse button to navigate to the file you want to use. The selected source file is renamed to that shown in the Program Name entry field and copied into the source directory of the current project. AcuBench program tags are generated when the program is added to the project. Although program tags are added to the source file, a run-mainscr tag is not generated. You need to create a main screen and the code to call that screen.
- Select the project to which the new program will be added (this field is set to the current project, by default).
- Click OK.
You should note that when an existing source file is selected in the New > Program dialog, the Code Generation options in its Program > Properties area are selected, and the Regenerate tagged area only selection in the Tools > Options > Code Generator > Generate Document dialog should be cleared. Ensure that any automatic code generation capabilities that you don’t want are disabled.
If CRT STATUS is declared in your existing source file template, you should ensure that the Do Not Generate CRT STATUS variable in .wrk check box in the Program Properties dialog is set.