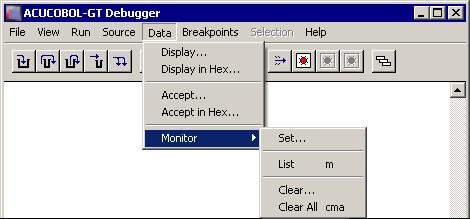
Data Menu
The Data menu contains commands relating to your program's variables.
You may use name qualification with the Display, Accept, and Monitor commands. For example, you can use the syntax FIELD-1 IN GROUP-1 to refer to a field called FIELD-1 that belongs to group item GROUP-1. Name qualification is not supported for on-screen commands (such as F7) or for situations in which you double-click on the data name.
| Menu Option | Description |
|---|---|
| Display | Shows the contents of a variable. With source-level debugging, you can either click on the variable name in the code before
you select Display, or wait to be prompted.) Numeric variables are converted to show their value. Other variables are shown
as text. The value is shown in the debugger command window. The keyboard form of this command is
D
variable.
Table elements cannot be highlighted with a mouse click. Instead, use this keyboard command: d variable (index) The variable's name is followed by the desired index in parentheses. The index must be a numeric literal. To display a reference modified variable (that is, to view some portion or substring of the data item), use the syntax: d variable(x:y) This shows y characters of variable, starting from character x. When you display a variable, and multiple fields with the same name are defined in the program, the debugger lists all instances of the field. For example, if the following two group items were defined in Working-Storage:
   01 start-date.
      05 ws-day     PIC XX.
      05 ws-month   PIC XX.
      05 ws-year    PIC X(4).
   01 end-date.
      05 ws-day     PIC XX.
      05 ws-month   PIC XX.
      05 ws-year    PIC X(4).
and you entered the command d ws-day, you would see the value for the field in both the start-date and end-date group items. Reference modification and indexing are valid with duplicate names. For example, all of the following are valid: d field-1(1:1) d field-1(1) d field-1(1)(1:1) If your display command contains multiple field names, only the first name specified may be a duplicate. Using the group definitions shown in a previous example, the Shows the contents of a variable in hexadecimal. (With source-level debugging, either click on the variable name in the code before you select Display in Hex, or wait to be prompted for the name.) command d ws-day(1:ws-month) would fail, because there is more than one ws-month defined. Keep in mind that you must compile with -Gd or -Gy in order to reference variables by name. If the program was not compiled with one of these options, you must refer to each variable by its absolute address from a program listing, preceded by . (a period). For example: d .213.5 |
| Display in Hex | This option allows you to determine the data stored in each byte of the variable. The value is shown in the command window
below the source code.
The keyboard form of this command is D variable, X. |
| Accept | Allows you to modify the contents of a variable. (With source-level debugging, either click on the variable name in the code
before you select Accept, or wait to be prompted for the name.) For numeric variables, the value entered is converted to the
internal storage format of the variable.
The keyboard form of this command is A variable. When you accept a variable in the debugger, the current value of the variable is shown as the default. To leave the current value in place, press Enter. Table elements cannot be highlighted with a mouse click. To modify a table element, follow the variable's name with the desired index in parentheses, as shown here: a variable (index) The index must be a numeric literal. Keep in mind that you must compile with -Gd or -Gy in order to reference variables by name. If the program was not compiled with one of these options, you must refer to each variable by its absolute address from a program listing. |
| Accept in Hex | Allows you to modify the contents of a variable in hexadecimal format. You can enter or display up to 2048 hex characters
(1024 bytes of data).
To accept a variable in hexadecimal format from the command line, use the command: a variable x |
| Monitor | This submenu contains commands that relate to monitored variables. |
| Set | Displays a dialog that prompts you for the name of a variable to be included in the
Watch Window. (For source-level debugging, either click on the variable name in the code before you select
Monitor, or wait to be prompted for the name.)
The keyboard form of this command is Mvariable. |
The Monitor dialog looks like this
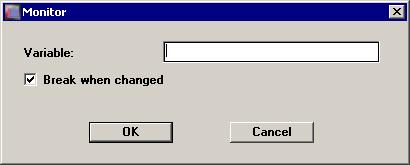
The Monitor dialog box includes a check box labeled Break when changed. When this box is checked, the selected variable becomes monitored, and if it is unchecked, the variable is only watched. The default value of this check box is On (checked).
If the Break when changed box is checked in the Monitor dialog box, monitoring a variable suspends the program run. Any time a monitored variable changes, the program stops executing and control returns to the debugger, where the new value of the variable is displayed in the command area of the debugger window and in the Watch Window.
If the Break when changed box is unchecked in the Monitor dialog box, the item is watched. Though changes to a watched variable's value are indicated in the Watch Window like those of a monitored variable, these changes do not cause the program to stop executing.
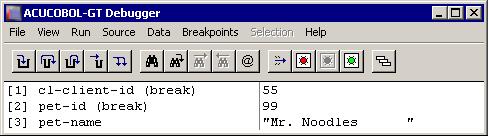
You can tell which variables in the Watch Window are monitored by the phrase (break) following the variable name (for example, those variables for which the Break when changed check box was clicked on). The watched variables do not have this phrase displayed after their names.
When any variables are set for monitor/watch, a new window is created as a sub-window of the main debugger canvas, located at the top of the screen. This window, called the Watch Window, shows all the monitored/watched variables and their values, one name/value per line (values that exceed the size of the window are truncated). By default, the Watch Window contains as many lines as there are variables being monitored, up to a maximum of three. If you set more than 3 variables, you can scroll through the Watch Windowto view them all, or you can make the Watch Window larger with the Window Size option on the Source menu. If your system does not use the mouse, you can scroll the Watch Window using Ctrl + P (for previous item) and Ctrl + N (for next item) keys on your keyboard. The maximum number of variables you can set is limited only by system memory. The Watch Window looks like this:
To monitor a table element, follow the variable's name with the desired index in parentheses, as shown here (table elements cannot be highlighted with a mouse click):
m variable (index)
The index must be a numeric literal.
Keep in mind that you must compile with -Gd or -Gy in order to reference variables by name. If the program was not compiled with one of these options, you must refer to each variable by its absolute address from a program listing.
| Menu Option (continued) | Description |
|---|---|
| List | Shows all monitored variables and their values. Also displays a sequence number for each monitor. You need the sequence number
to clear an individual monitor. See
Clear, below.
The keyboard form of this command is M. |
| Clear | Clears a monitor from one variable. You will be prompted to identify the variable by number. Use the
List option to display all monitors and their numbers.
The keyboard form of this command is CM number. |
| Clear All | Clears all monitors.
The keyboard form of this command is CMA. |