9.7 Upgrading from Content Editor 1.2.3 to 2.0
Review the following sections before you upgrade your Content Editor Appliance 1.2.3 setup to Content Editor 2.0:
9.7.1 Support Matrix
Make sure that all the CE appliances are running version 1.2.3 with the latest patches applied.
9.7.2 Upgrading Content Editor Appliance
Before upgrading Content Editor Appliance, you must ensure certain requirements are met. See Before You Upgrade! and then complete the instructions in the following sections in order:
Before You Upgrade
Failure to comply with the following critical points could result in a non-functional CE system.
|
Critical Point |
Details |
|---|---|
|
|
|
|
|
|
|
|
|
|
|
|
|
|
After ensuring that you have met the prerequisites and cautions above, complete the instructions in the following sections in order.
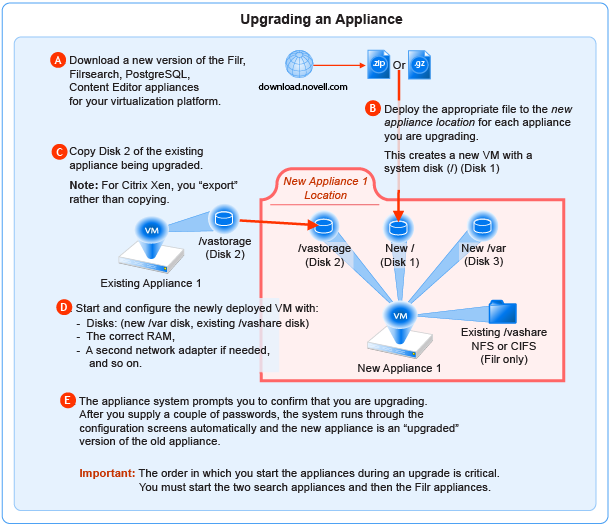
9.7.3 Understanding the Appliance Upgrade Process
The process of upgrading OpenText appliances is illustrated in Figure 10-1.
Figure 9-1 Overview of the Appliance Upgrade Process
NOTE:
-
If you are using PostgreSQL DB shipped with Filr, then the order in which you start the appliances during an upgrade has to be
-
PostgreSQL
-
Lucene (Search Appliances)
-
Content Editor
-
Filr Appliance
-
-
If you are using an external database, the order in which you start the appliances during an upgrade is critical. You must start the two search appliances and then the Filr appliances
9.7.4 Downloading and Preparing Software for the Upgrades
Download and prepare the software for your virtualization platform as described in the following sections:
VMWare
-
Download the CE software shown below to your management workstation.
IMPORTANT:Registration with OpenText is required to receive an email with a software-download link.
Appliance Type
Filename
Content Editor
ContentEditor.x86_64.2022-09-13.53.ova.zip
-
Extract each .ova.zip file on your management workstation until an ApplianceType-version folder appears.
-
Launch the vSphere Client and navigate to the datastore where you plan to host the upgraded VMs.
-
Create a folder for each appliance that you plan to upgrade.
Name each folder with a name that is easily associated with (but not the same as) the VM name of the associated appliance being upgraded.
-
Continue with Copying Each Appliance’s /vastorage Disk (Disk 2).
Hyper-V
-
Log in to the Hyper-V host server either locally or from a remote workstation using Remote Desktop.
-
Download the CE software shown below to the location where you plan to host your upgraded VMs.
IMPORTANT:Registration with OpenText is required to receive an email with a software-download link.
Appliance Type
Filename
Content Editor
ContentEditor.x86_64.2022-09-13.53.vhdx.zip
-
Extract each .vhdx.zip file in the directory where you downloaded it until an ApplianceType-version.vhdx archive file appears.
-
Create a new directory for each virtual machine you are upgrading.
As a best practice, name these directories with names that are easily associated with, but not the same as the VM name of each appliance being upgraded.
-
Move the ce-version.vhdx archive file to the first CE appliance-type folder and then copy the file to the remaining CE appliance type folders.
-
Continue with Copying Each Appliance’s /vastorage Disk (Disk 2).
Xen
-
Log in to the Xen VM host server either locally or from a remote workstation.
If you are connecting from a remote Linux workstation, use the following command:
ssh -X root@host_ip_address
The -X in the command in required for the GUI installation program upon which the steps in this section are based.
-
Download the CE software shown below to the Xen VM host server in the location where you plan to host your upgraded VMs.
IMPORTANT:Registration with OpenText is required to receive an email with a download link.
Appliance Type
Filename
Content Editor
ContentEditor.x86_64.2022-09-13.53.qcow.zip
-
Copy and rename the ApplianceType-version directories until you have one directory for each appliance that you are upgrading.
IMPORTANT:Only change the directory names.
Do not change the names of the .qcow2 or .xenconfig files within the directories that you have copied and renamed.
For example:
-
Rename the CE-version directory to CE-1-30-192.168.1.61.
-
Copy the CE-1-30-192.168.1.61 directory and rename it to CE-1-30-192.168.1.62, and so on until you have a directory for each appliance you are upgrading.
-
-
Continue with Copying Each Appliance’s /vastorage Disk (Disk 2).
Citrix Xen
-
On a workstation with Citrix XenCenter installed, download the CE software shown below.
IMPORTANT:Registration with OpenText is required to receive an email with a download link.
Appliance Type
Filename
Content Editor
ContentEditor.x86_64.2022-09-13.53.xva.zip
-
Extract each .xva file on your management workstation until an ApplianceType-version folder appears.
-
Continue with Copying Each Appliance’s /vastorage Disk (Disk 2).
9.7.5 Copying Each Appliance’s /vastorage Disk (Disk 2)
IMPORTANT:
-
VMware requires shutting down an appliance before copying a disk.
This doesn’t mean that the entire service must be down while disk copying takes place.
If you have a Filr-clustered deployment, you can minimize service interruption by shutting down one Filr or Filrsearch appliance, copying the disk, restarting the appliance and continuing with the next appliance.
-
On Citrix Xen you
export
rather than copying Disk 2.
Copying each appliance’s disk is at the heart of the upgrade process because it uses the corresponding old
appliance’s configuration settings on Disk 2 to create an upgraded version of the appliance with minimal input on your part.
Disk copying can take a while, depending on disk size and the VM host environment.
Therefore, we recommend keeping service downtime to a minimum by making the copies while the Filr system is still running.
-
Using the tools provided by your hypervisor, copy the /vastorage (second disk) to its associated folder or directory that you created for your upgraded appliances in Downloading and Preparing Software for the Upgrades.
9.7.6 Upgrading the VMs
Shutting Down the Appliances
-
Shut down all of your existing appliances in the shut down order that you identified earlier:
-
Continue with the instructions for your VM platform:
Upgrading VMware VMs
Complete the steps in Table 10-1 for each appliance that you are upgrading
Table 9-5 Upgrading a VMware VM
|
Page, Dialog, or Option |
Do This |
|---|---|
|
1 - Launching the vSphere Client.
|
|
vSphere Client |
2 - Deploying the OVA Template and naming the VM.
|
|
Deploy OVA Template |
|
|
Open |
|
|
Deploy OVA Template |
|
|
3 - Editing the VM settings. |
|
|
vSphere Client |
|
|
Virtual Machine Properties |
|
|
4 - Configuring Disk 2 (/vastorage) |
|
Virtual Machine Properties |
|
|
Add Hardware |
|
|
5 - Adding and Configuring Disk 3 (/var) |
|
Virtual Machine Properties |
|
|
Add Hardware |
|
|
Virtual Machine Properties |
|
|
Add Hardware |
|
|
vSphere Client |
|
Upgrading Hyper-V VMs
Complete the steps in Table 10-2 for each appliance that you are upgrading.
Table 9-6 Upgrading a Hyper-V VM
|
Page, Dialog, or Option |
Do This |
|---|---|
|
1 - Open Hyper-V Manager. |
|
|
Hyper-V Host Server |
|
|
2 - Create a new VM. |
|
Hyper-V Manager |
|
|
Specify Name and Location |
|
|
Specify Generation |
|
|
3 - Specify memory |
|
Assign Memory |
|
|
4 - Assign network adapter |
|
|
Configure Networking |
|
|
6 - Identify the system disk |
|
Connect Virtual Hard Disk |
|
|
Summary |
|
|
7 - Specify processors |
|
Hyper-V Manager |
|
|
Processor |
|
|
8 - Use existing copy of hard Disk 2 (/vastorage). |
|
Settings for VM on Host Server |
|
|
9 - Add hard Disk 3 (/var). |
|
Hyper-V Manager |
|
|
Summary |
|
|
Hyper-V Manager |
11 - Repeat until all VMs have upgraded copies
|
Upgrading and Deploying Xen VMs
IMPORTANT:Unlike the other virtualization platforms, which you power on and deploy separately from the upgrade process, upgraded Xen VMs power on automatically when the upgrade process completes. You must then deploy the appliance before continuing with the next one.
Therefore, it is critical that you make sure to follow the deployment order that you identified earlier.
Complete the steps in Table 10-3 for each appliance that you are upgrading and deploying.
Table 9-7 Upgrading and Deploying a Xen VM
|
Page, Dialog, or Option |
Do This |
|---|---|
|
1 - Launch the installer. |
|
|
Terminal prompt on Xen VM Host Server |
|
|
Create a new virtual machine |
|
|
Storage path and Operating System |
|
|
Choose Memory and CPU settings |
|
|
2 - Name the VM. |
|
Name of Virtual Machine |
|
|
3 - Configure Disk 2 (/vastorage) |
|
Hardware |
|
|
4 - Add and Configure a new Disk 3 (/var) |
|
|
|
Summary |
|
|
Network Adapters |
|
|
Virtual Network Adapter |
|
|
Network Adapters |
|
|
Summary |
|
|
Console |
6 - Deploy the Appliance :
|
|
Port 9443 Admin Console |
For more information see Configuring Content Editor Options in Filr Appliance |
|
7 - Upgrade the Next Appliance:
|