4.0 Setting Up Shared Storage

IMPORTANT:Filr 4.x is available as an Online update to Filr 4.0, PostgreSQL 4.0, and Filr Search 4.0 appliances or later.

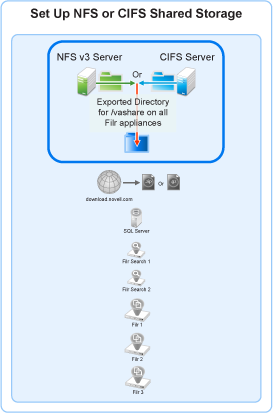
Figure 4-1 is the first in a series of illustrations that visually track deployment order.

Figure 4-1 Export an NFS Directory or Create a CIFS share for the /vashare mount point

Complete the instructions in the section below:

Exporting an NFS Directory for the /vashare Mount Point

IMPORTANT:Filr does not support remote NFS from a Novell Storage Services (NSS) volume.

If you plan to use a CIFS share for Filr shared storage (/vashare), skip to Creating a CIFS Share for the /vashare Mount Point. Otherwise, export an NFS directory on a Linux server by doing the following:

Table 4-1 Task 1: Exporting an NFS Directory for /vashare

Page, Dialog, or Option

Do This


1 - Verify that the server has adequate disk space.

  1. Make sure that the Linux server that you are targeting has the available disk space you have identified.

    If necessary, add disk space to the Linux server.


  1. On the Linux server, launch YaST2.

YaST Control Center

  1. In the Network Services section, click NFS Server.

    The NFS Server Configuration dialog box displays.

NFS Server Configuration

  1. Make sure that the NFS Server is set to Start, that Open Port in Firewall is selected (running firewall required for option), and that Enable NFSv4 is not selected - i.e. NFS v4 is disabled.

  2. Click Next.

Directories to Export

  1. Click Add Directory.

YaST2

  1. Click Browse and choose the directory or share path that has the required disk space.

    You can add a directory name, such as /shared to the path if desired.

    IMPORTANT:The directory path must not be located in the /var directory structure on the NFS server, as explained in NFS Mount Point Must Not Point to /var on Target Server.

  2. Click OK.

    As your first Filr appliance is deployed, a directory named filr will be created within the directory path you have specified.

  3. If you added to the directory path, click Yes to confirm directory creation.

  4. Leave the asterisk (*) in the Host Wild Card field.

  5. Click the Options field to edit it and change the following options:

    • ro to rw (read-only to read-write)

    • root_squash to no_root_squash.

  6. Click OK.

Directories to Export

Creating a CIFS Share for the /vashare Mount Point

Table 4-2 Task 1: Creating a CIFS Share for /vashare

Page, Dialog, or Option

Do This


1 - Verify that the Windows server has adequate disk space.

  1. Make sure that the Windows server that you are targeting has the available disk space you have identified.

    Beginning with Filr 4.0, CIFS share is configured with SMB2/SMB3 protocol. Versions earlier than SMB2/SMB3 are not supported.

  2. Open Windows Explorer

Windows Explorer

  1. In Windows Explorer, navigate to the folder that will be the shared storage location (/vashare) for Filr.

  2. Right-click the folder, then click Properties.

folder Properties

  1. Click the Sharing tab.

  2. Click Share.

Filr Sharing

  1. Add a user (new or existing) to the list and assign the Read/Write permission to the user.

    IMPORTANT:You will need the username and password when you select the CIFS share while deploying the Filr appliances.

  2. Click Share > Done > Close.

Directories to Export