A.5 Configuring a Reverse-Proxy Single Sign-On Service for Micro Focus Filr

The Access Gateway can be configured as a reverse proxy server that provides single sign-on to Filr and restricts access to the Filr server by securely providing credential information for authenticated users.

To configure a reverse-proxy single sign-on service for Filr, complete the following tasks:

A.5.1 Creating a New Reverse Proxy

You must ensure that the Reverse Proxy that you use for integrating NAM with Filr listens on the default HTTP (port 80) and HTTPS (port 443) ports.

Before you can configure the proxy service, you need to create a new reverse proxy. See Configuring a Reverse Proxy in the NetIQ Access Manager Administration Guide.

A.5.2 Configuring the Proxy Service

  1. In the NAM Administration Console, click Devices > Access Gateways > Edit, then click the name of the reverse proxy that you created in Creating a New Reverse Proxy.

  2. In the Reverse Proxy List, click New and then fill in the following fields:

    Proxy Service Name: Specify a display name for the proxy service.

    Published DNS Name: Specify the publicly-available DNS name for accessing your Filr site. This DNS name must resolve to the IP address you set up as the listening address. For example, filr.doc.provo.microfocus.com.

    Web Server IP Address: Specify the IP address of the Filr server.

    Host Header: Select Forward Received Host Name.

    Web Server Host Name: Because of your selection in the Host Header field, this option is dimmed.

  3. Click OK.

  4. Click the newly added proxy service, then select the Web Servers tab.

  5. Change the Connect Port to the default HTTP or HTTPS Filr web service port.

  6. Click OK.

  7. Continue with Creating Policies.

A.5.3 Creating Policies

You need to create two policies: LDAP Identity Injection and X-Forwarded-Proto:

Creating the LDAP Identity Injection Policy

  1. In the NAM Administration Console, click Policies > Policies.

  2. Select the policy container, then click New.

  3. Specify ldap_auth as the name for the policy, select Access Gateway: Identity Injection for the type, then click OK.

  4. (Optional) Specify a description for the injection policy. This is useful if you plan to create multiple policies to be used by multiple resources.

  5. In the Actions section, click New, then select Inject into Authentication Header.

  6. Fill in the following fields:

    User Name: If users are provisioned with cn or uid attributes, select Credential Profile, then select LDAP Credentials:LDAP User Name. In the Refresh Data Every drop-down, select Session.

    Password: Select Credential Profile, then select LDAP Credentials:LDAP Password.

  7. Leave the default value for the Multi-Value Separator, which is comma.

  8. Click OK.

  9. To save the policy, click OK, then click Apply Changes.

    For more information on creating such a policy, see Configuring an Authentication Header Policy in the NetIQ Access Manager Administration Guide.

Creating the X-Forwarded-Proto HTTP Header Policy

If your network provides HTTPS (secure) connections between browsers and NAM but HTTP (insecure) connections between NAM and Filr, we strongly recommend creating an X-Forwarded-Proto HTTP Header Policy as a best practice.

  1. In the NAM Administration Console, click Policies > Policies.

  2. Select the policy container, then click New.

  3. Specify x-forward as the name for the policy, select Access Gateway: Identity Injection for the type, then click OK.

  4. (Optional) Specify a description for the injection policy. This is useful if you plan to create multiple policies to be used by multiple resources.

  5. In the Actions section, click New, then select Inject into Custom Header.

  6. Fill in the following fields:

    Custom Header Name: Specify X-Forwarded-Proto as the name.

    Value: Select String Constant in the drop-down, then specify https.

  7. Leave the other settings at the defaults.

  8. Click OK.

  9. To save the policy, click OK, then click Apply Changes.

    For more information on creating such a policy, see Configuring an Authentication Header Policy in the NetIQ Access Manager Administration Guide.

A.5.4 Configuring Protected Resources

You must create two protected resources: a protected resource for HTML content and a public protected resource for web services.

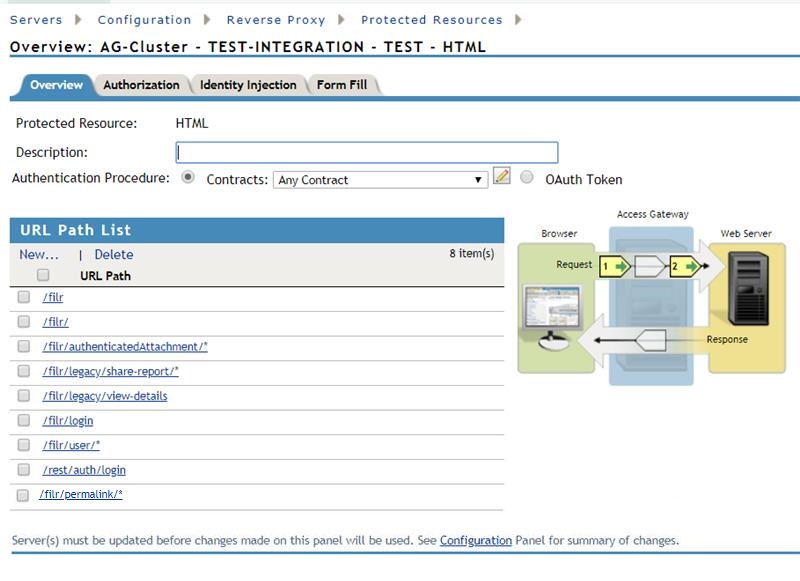
  1. Create a protected resource for HTML content:

    1. In the Protected Resource List, click New. Specify a name, then click OK.

    2. (Optional) Specify a description for the protected resource. You can use it to briefly describe the purpose for protecting this resource.

    3. In the Authentication Procedure, select Contracts and specify the value that uses the FilrAuth method.

    4. In the URL Path List, add the following paths for HTML content:

      /filr
      /filr/
      /filr/authenticatedAttachment/*
      /filr/legacy/share-report/*
      /filr/legacy/view-details
      /filr/login
      /filr/user/*
      /rest/auth/login
      /filr/permalink/*
    5. Click OK.

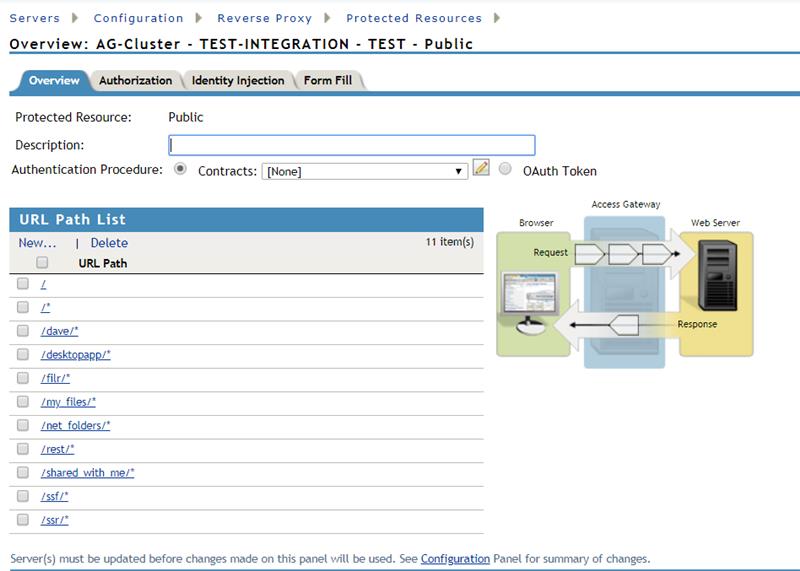
  2. Create a public protected resource for Web Services:

    1. In the Protected Resource List, click New. Specify public for the name, then click OK.

    2. (Optional) Specify a description for the protected resource. You can use it to briefly describe the purpose for protecting this resource.

    3. In the Authentication Procedure, select Contracts and specify the value as None.

    4. Click OK.

    5. In the URL Path List, add the following paths for public content:

      /
      /*
      /dave/*
      /desktopapp/*
      /filr/*
      /my_files/*
      /net_folders/*
      /rest/*
      /shared_with_me/*
      /ssf/*
      /ssr/*
    6. Click OK.

  3. Assign the X-Forwarded-Proto Header policy to both protected resources that you created:

    1. Click Access Gateways > Edit > [Name of Reverse Proxy] > [Name of Proxy Service] > Protected Resources.

    2. For each Filr protected resource, click the Identity Injection link, select the x-forwarded policy that you created, click Enable, then click OK.

    3. Click OK.

  4. Assign the Identity Injection policy to the HTML protected resource that you created.

    1. Click Access Gateways > Edit > [Name of Reverse Proxy] > [Name of Proxy Service] > Protected Resources.

    2. For each Filr protected resource, click the Identity Injection link, select the ldap_auth policy that you created, click Enable, then click OK.

    3. Click OK.

  5. In the Protected Resource List, ensure that the protected resources that you created are enabled.

  6. To apply your changes, click Devices > Access Gateways, then click Update All.

A.5.5 Configuring a Rewriter Profile

  1. Click Devices > Access Gateways > Edit > [Name of Reverse Proxy] > [Name of Proxy Service] > HTML Rewriting.

  2. In HTML Rewriter Profile List, click New.

  3. Specify a name for the profile, select Word as the search boundary, then click OK.

  4. In the And Document Content-Type Header Is section, click New, then specify the following type:

    application/rss+xml
  5. In the Variable or Attribute Name to Search for Is section, click New, then specify the following as the variable to search for:

    value
  6. Click OK.

  7. In the Protected Resource List, ensure that the protected resources you created are enabled.

  8. To apply your changes, click Devices > Access Gateways, then click Update All.