Micro Focus Filr - Frequently Asked Questions (FAQ)
This section provides frequently asked questions on the tasks performed by the Filr application.
1.0 What is displayed on the Home page?
The page is the default landing page for all the users (except the guest).
The Home page consists of:
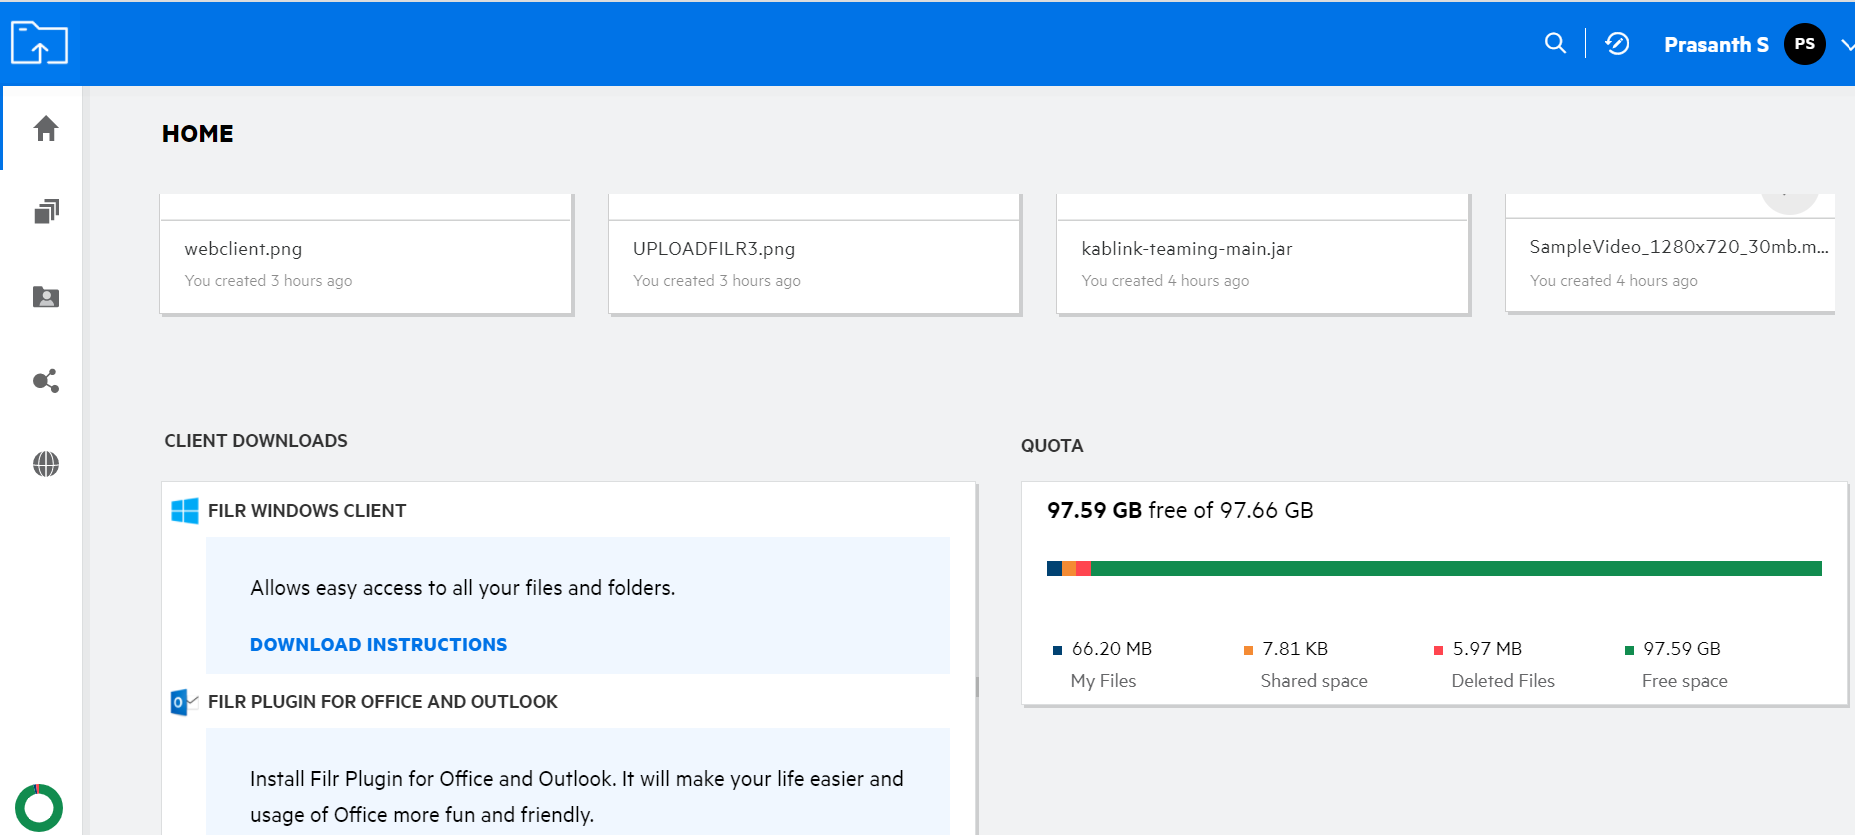
RECENT FILES: By default, lists the files that are accessed by the logged-in user.
CLIENT DOWNLOADS: Information about the native Filr client, download links to other Filr clients, and Office and Outlook plug-ins.
QUOTA: The Filr administrator can enable and limit the amount of data an individual user can store on Filr.
Based on what is enabled by your Filr administrator, you will find different information on your Home page.
For example, when you are logging in for the first time to the Filr site, you will see a Welcome screen like below.
Figure 1 Home page
2.0 What are the Filr work areas?
2.1 My Files (All Files, Shared By Me, and Deleted Items)
To view area, click  on the left side pane. By default, files and folders in this area are visible only to you and your administrator determines the sharing rights for them. All your files and folders are stored in one convenient location.
The area contains:
-
Personal Storage: Lists files and folders that you have uploaded to the Filr site.
-
User Home Directory: Lists files or folders from your organization’s file system.
All Files
All your files and folders are available in one location. The items that you uploaded to Filr or that are shared by you are listed under this section.
Shared By Me
Lists the files and folders that you have shared with other users. Use this area to manage the rights that the other users have on the files that you have shared with them. You can revoke rights, grant additional rights, and so forth.
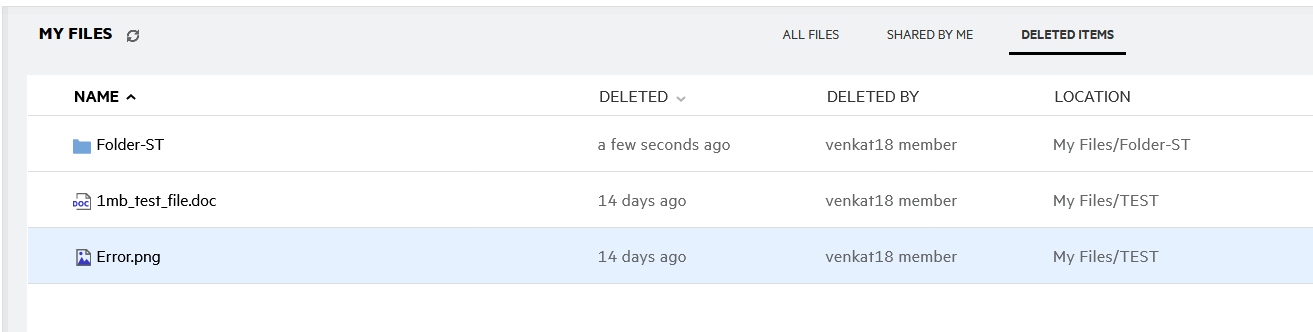
Deleted Items
Lists the files or folders that are deleted by you. Filr enables you to retrieve the files and folders from trash and restore them to their previous location. When you restore a file, all associated comments are also restored.
NOTE:You cannot restore files that are located in NetFolders or your user Home directory.
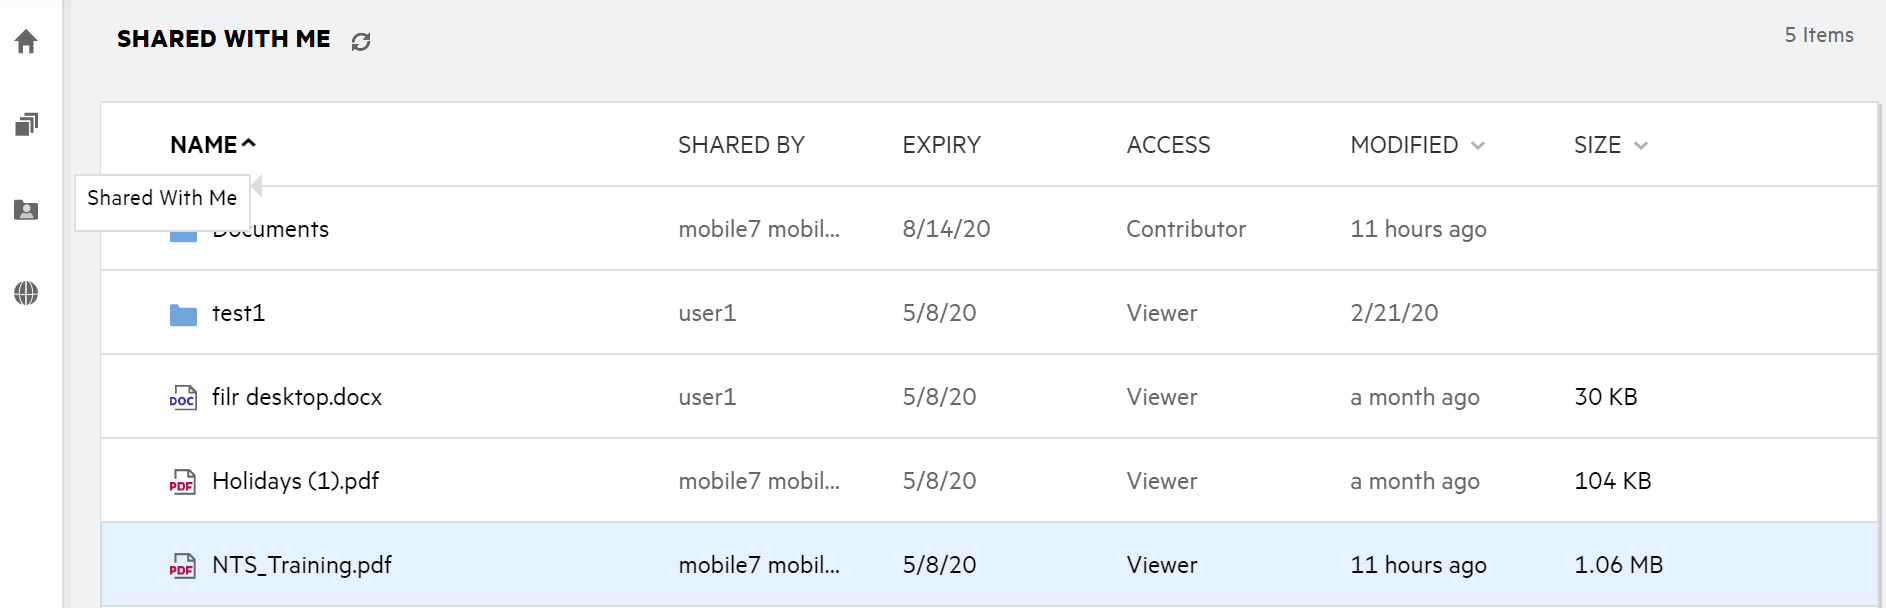
2.2 Shared With Me
To view area, click ![]() on the left side pane. Lists the files and folders that other users have shared with you.
on the left side pane. Lists the files and folders that other users have shared with you.
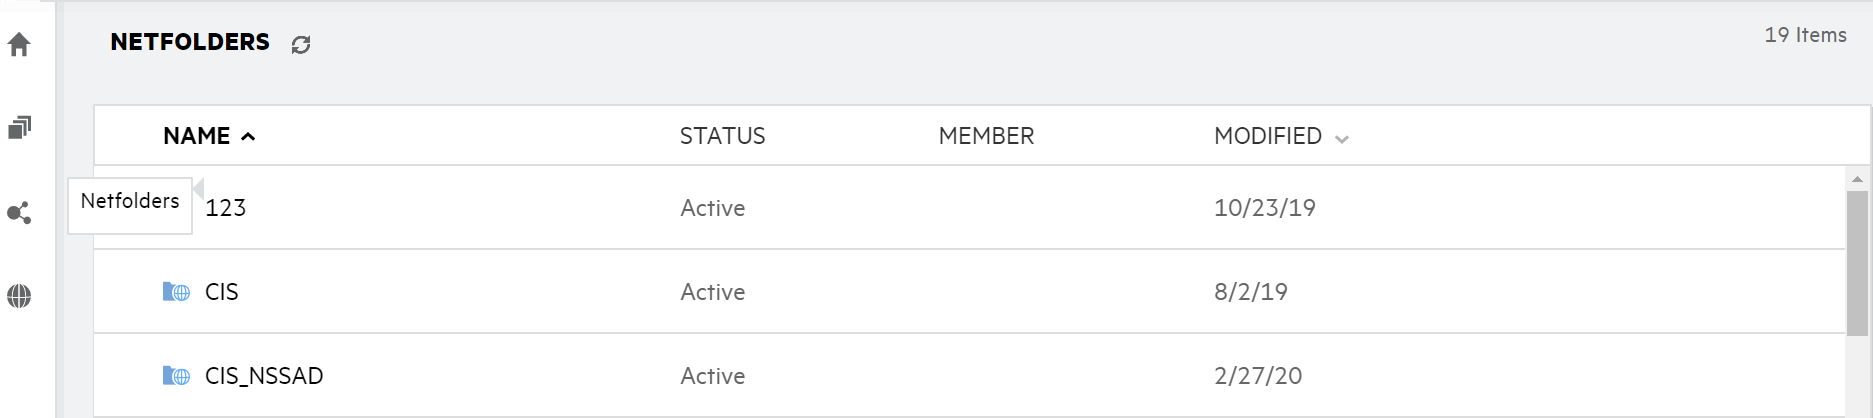
2.3 NetFolders
To view area, click ![]() on the left side pane. NetFolders provide access to your organization’s file system. The Filr administrator defines which NetFolders you can see and the sharing rights you have on them. NetFolders is not available in the left side pane if the Filr administrator has not assigned any NetFolders.
on the left side pane. NetFolders provide access to your organization’s file system. The Filr administrator defines which NetFolders you can see and the sharing rights you have on them. NetFolders is not available in the left side pane if the Filr administrator has not assigned any NetFolders.
3.0 What are the columns available in the Filr work areas?
3.1 My Files and NetFolders
The ( and ) and area include the following columns:
-
Name: The name of files or folders.
-
Status: Status of file or folder - Expired or Active.
-
Member: Member of the file or folder. If shared, the number of users or groups.
-
Modified: Displays when the file or folder was last modified.
-
Size: Displays the size of the file.
Figure 2 My Files Area

Figure 3 Shared By Me Area
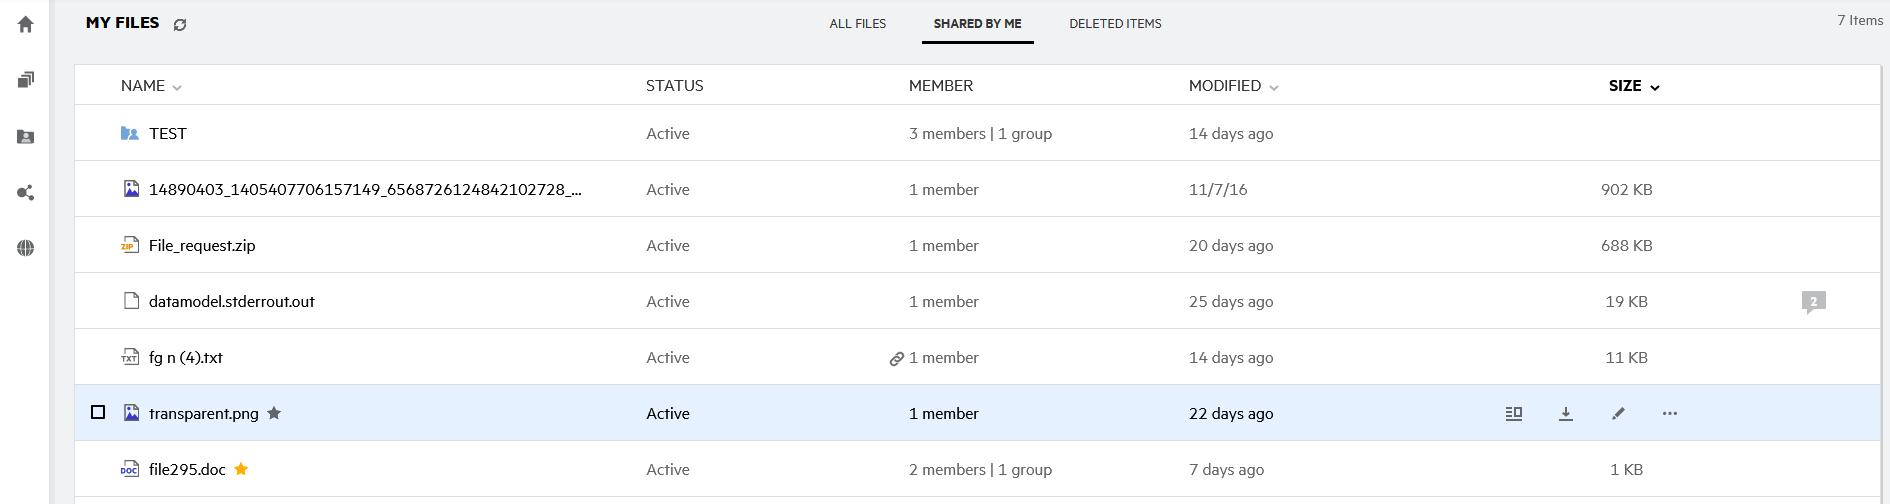
Figure 4 NetFolders Area
3.2 Deleted Items
The includes the following columns:
-
Name: The name of files or folder stored in the deleted Items.
-
Deleted: The time when the file and folder are deleted.
-
Deleted By: User information who deleted the item.
-
Location: Displays the location of the file and folder.
Figure 5 Deleted Items Area
3.3 Shared With Me
The includes the following columns:
-
Name: The name of files or folders.
-
Shared By: The users who shared the item with you. If more than one user has shared a particular item with you, each user is listed.
-
Expiry: The date of share expiry. After this date, you no longer have access to the shared item.
-
Access: The level of access that you have to the shared item. Depending on the access rightsthat you have been granted to the item, you can view, edit, or share the item. If the item thatwas shared with you is a folder, you might also be able to manage files within the folder.
-
Modified: Displays when the file or folder was last modified.
-
Size: Displays the size of the file.
Figure 6 Shared With Me Area
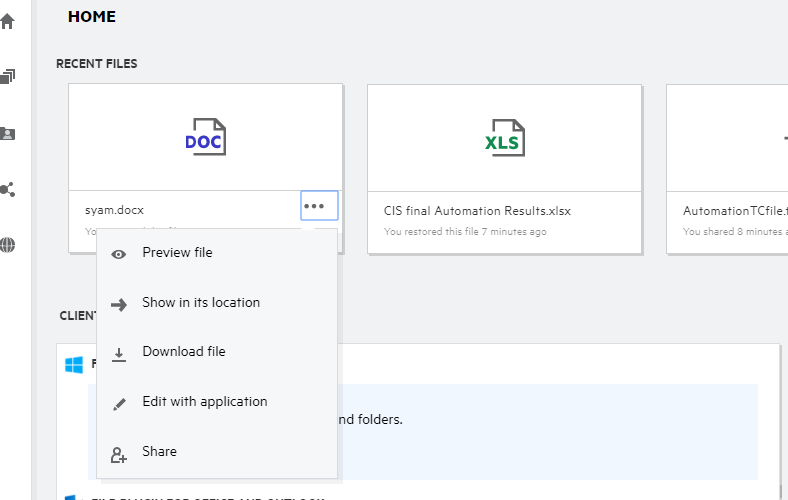
4.0 What is the Recent Files List?
This is the list of recently accessed files by the logged in user and the files shared (by the logged in user and other users). By default, 10 files accessed by the user, in the past 7 days are listed. The Administrator can configure the number of days. For more information, see the Recent Files List in the Filr 4.3: Administrative UI Reference. The user can change the number of files to be displayed in the list. By default, the NetFolders flag is enabled. If the Administrator disables NetFolders for the Recent Files, then the files uploaded, renamed, commented, or edited in the Netfolder by any users are not listed under logged in user’s . For more information, see the Recent Files List in the Filr 4.3: Administrative UI Reference.
All the files that you or other users accessed recently are listed in this area. There is no need to browse the individual folders to access those files.
The list displays:
-
Who has modified the file.
-
What is the operation performed on the file.
You can also perform some basic operations on the file directly from the list:
-
– HTML view for the files that can be rendered via browser and in the Filr application.
-
– Navigates user to the file location.
-
– Downloads the file.
-
– Edit file by using Micro Focus Content Editor. This option needs to be enabled by the Filr administrator.
-
– Edit the file by using the native application like Microsoft Office.
-
– Opens the share dialog to share the file.
Figure 7 Recent Files Listing

Figure 8 Recent Files Operations
6.0 How to configure the number of files to be listed in Recent Files?
The number of files to be displayed on the is configurable. To configure the settings, navigate to your .
Figure 9 User Profile
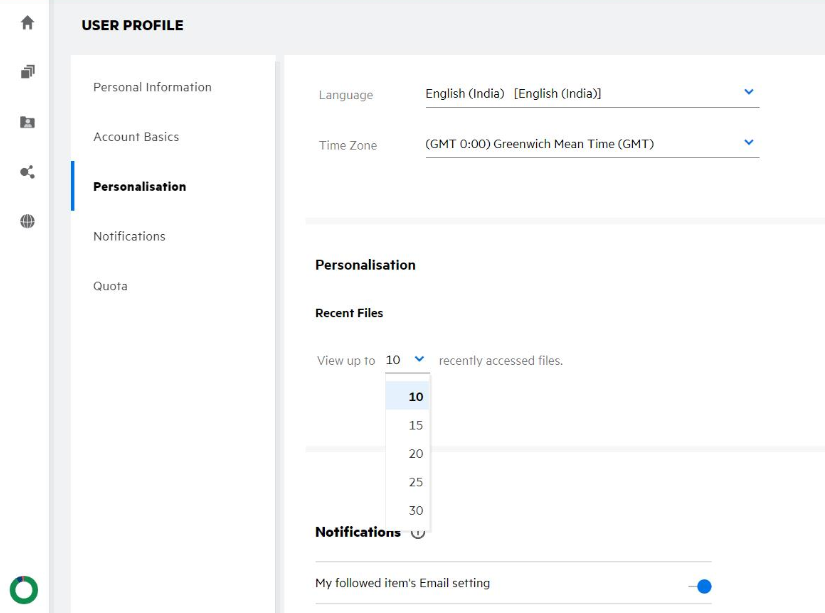
In the section, select the number of files you want to see in the Recent Files.
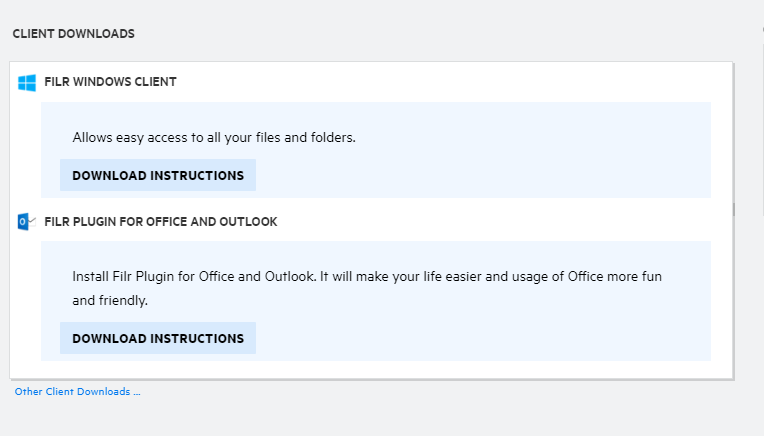
7.0 What is Client Downloads?
This section includes information about the native Filr client, download links to other clients, install instructions, and link to the documentation. This section is available only if the Filr administrator has enabled permission to download and install the Filr Client.
Based on the operating system, the appropriate client executable is available to download. For example, accessing web client from a Windows machine displays Windows executables.
To download other clients, click on the link
Figure 10 Client Downloads
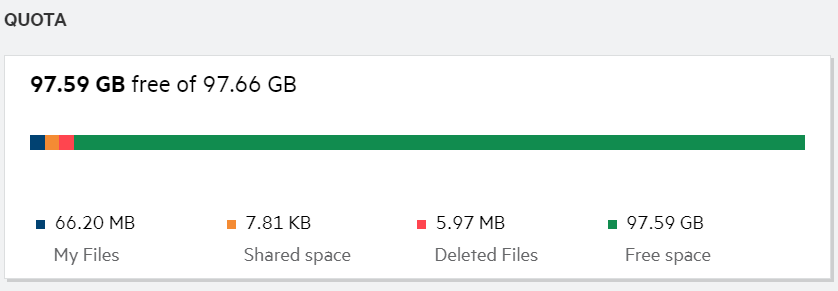
8.0 What is Quota?
Over time, disk space usage increases. You can limit the amount of data that can be uploaded to Filr’s shared storage disk at the system level or at individual users and groups. Files in NetFolders (including your Home directory) do not count towards your quota. Your quota is displayed on your page only when the quota is enabled by your Filr administrator. When your data quota is exceeded, an email notification is sent to the you and the administrator to notify the same.
Quota shows the used space on Filr. Following are the color indicators:
-
The blue color indicates the space consumed by the files saved in the area.
-
The red color indicates the space consumed by the deleted files. The files and folders that are moved to trash are listed under .
-
The orange color indicates the space consumed by the files that are uploaded by other users to folders shared by you to them.
-
The green color indicates the remaining free space available for you.
Figure 11 Home Quota
9.0 How to manage Quota?
The on the page reflects the data quota used and available for your account.
Figure 12 Quota Used
Following are the scenarios when your data quota is consumed:
-
Only files count toward the data quota. Empty folders and the files in the Net Folders will not count towards the user’s data quota.
-
If other user uploads the same file or reshares the folder or a subfolder, then the size of the file is attributed to the data quota of the user who has created.
-
While deleting files, select the option accordingly, if you want to move the files to trash or delete them permanently. If the files are moved to trash, the files are attributed to your data quota.
NOTE:
-
Data quotas at all levels are strictly enforced. If uploading a file would cause a user to exceed the assigned quota, Filr rejects the upload attempt and the attempt is aborted.
-
When a user is nearing to exceed or exceeds the data quota, a warning message displays on the user’s profile page informing the user that he or she is approaching the data quota limit. Also, an email notification is sent to the user when the data quota is exceeded.
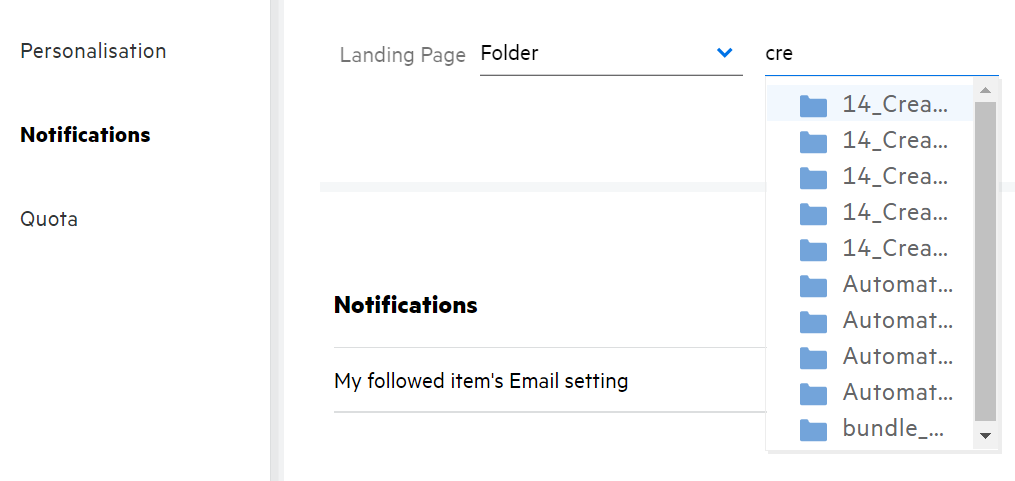
10.0 How to Customize the Landing Page?
The page is the default landing page and is customizable. You can set the Filr work areas (except Public) or folder in the work areas as a landing page. After configuration, when you log in to Filr, you will land on the folder or the work area that is set as the default landing page. Perform the following steps to set the Landing Page Preferences:
-
Click on the user name on the top right corner and select .
-
Go to the section.
-
Select your preference from the drop-down menu under in the section.
-
Under the , select the work areas to be displayed as landing page.
Figure 13 Landing Page Preferences

-
On selecting , the field is displayed. Enter the folder name or the first three alphabets of the folder name. All the folders with the folder name matching the entered string in the search field are listed for selection. The folders from all the Filr work areas for which you have access (My Files, Shared With Me, and NetFolders) are listed. Hover over the folder name to know the exact path of the folder.
Figure 14 Folder as a Landing Page Preference
-
NOTE:
-
Landing Page Preferences is not available for an external user or a guest user.
-
If the access to the folder set as a Landing Page Preference is expired or revoked by an Administrator, then the Landing Page Preference automatically resets to the Home page.
-
If the folder set as a Landing Page Preference is renamed, the changed value is reflected in the Landing Page Preferences, and the setting persists.
-
If the folder set as a Landing Page Preference is deleted, then it automatically resets to the Home page.
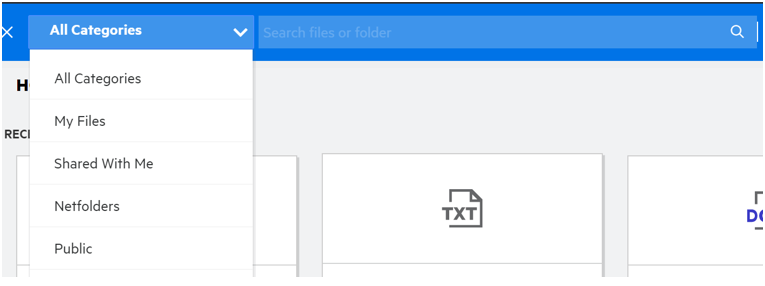
11.0 How does Search Work in Web Client?
You can perform search operations on file and folders based on the access rights, you have on each item. The Search string should contain a minimum of 3 characters for Filr to start searching the content.
To use the Search option,
-
Click the search icon on the top right of the page.
Figure 15 Search Icon on the Home page

-
From the list, select a category and specify a search string.
Figure 16 Category List
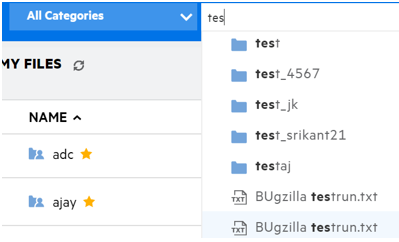
-
Filr populates the list of items matching to the search string. Clicking on the folder or file takes you to the exact location where the item is present.
Figure 17 Search String
Additional Information on Search Operations:
-
The page is a consolidated view of search items inside a specific location selected by you.
Figure 18 Search Results
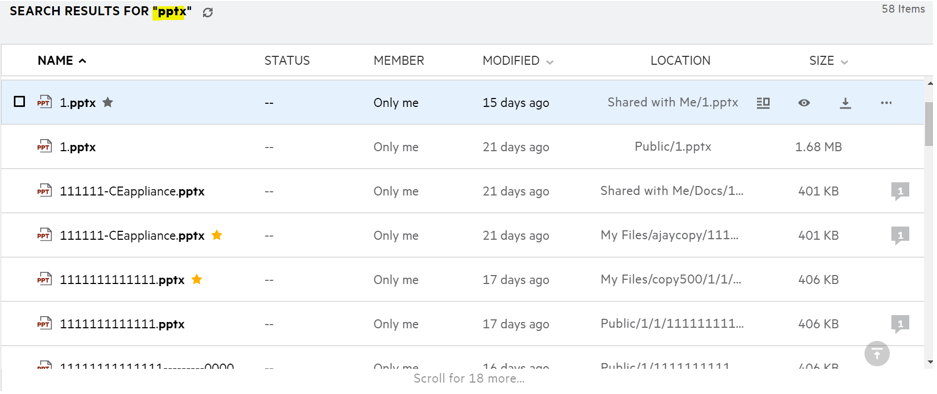
-
The column displays the location of each item.
-
You can perform all operations on file and folders based on rights, you have on each item.
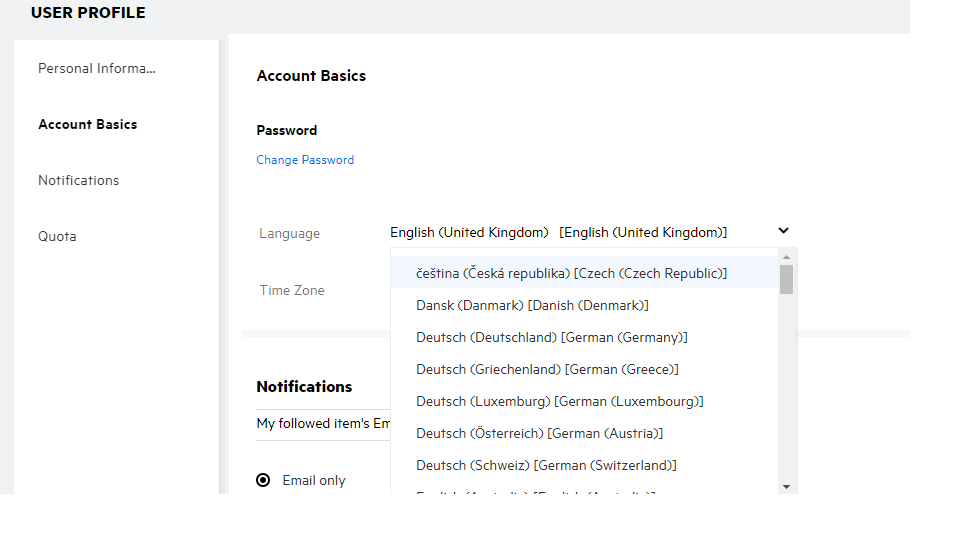
12.0 How can I change the UI language to my local language?
You can select your preferred language from the Language drop-down list located in the under . On selecting the preferred language, the UI content is changed to the selected language.
NOTE:Your preferred language will appear in the Language drop-down list only if the administrator has added it to the language list.
Figure 19 Change Language
13.0 How to set the date and time display format?
Users can modify the and in the . Throughout the Filr Web client the date and time are displayed as per the selected region.
Figure 20 User Locale
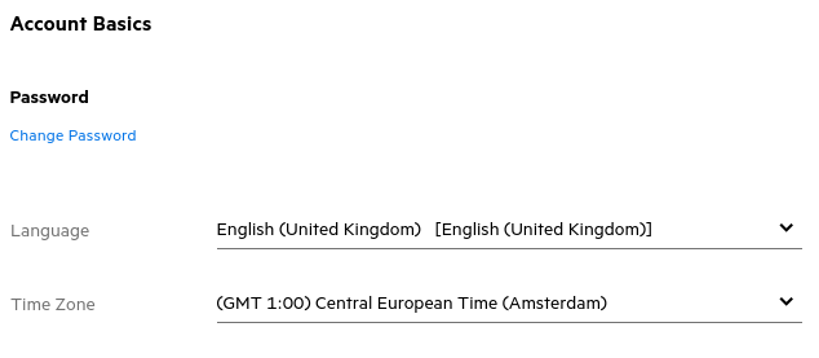
For example, when a user modifies the Language and Time-Zone in the user profile the time and date in the are displayed as per the updates made. Date and time format for two regions are as shown below:
-
English (United Kingdom): dd/mm/yyyy HH:MM 24H.
Figure 21 English (United Kingdom)
-
English (United States): mm/dd/yy HH:MM AM/PM.
Figure 22 English (United States)
14.0 What is Follow Notification Settings and how to access them?
Follow Notification Settings is present in under .
When you mark a file or folder as , you will receive an email notifications when any changes are made to that file or folder.
Figure 23 Follow Notifications
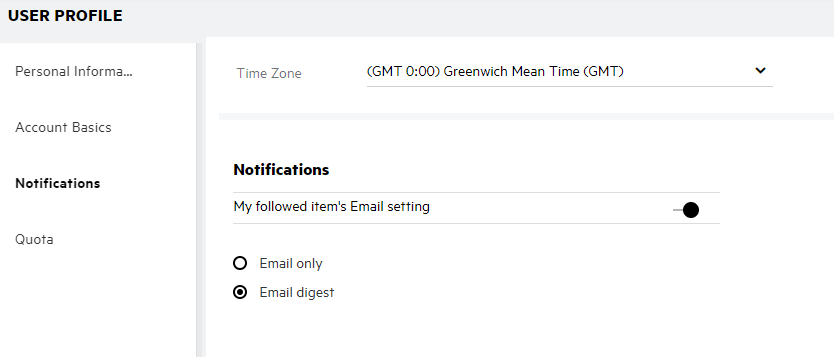
If the notification setting is disabled, then the user does not have an option to follow a file or folder. On enabling the setting, you must specify your email address to receive the notifications.
You can add your email in the > . If the details in are grayed out, contact your administrator to add the email address.
When you follow a file or a folder, you will be notified of the following actions performed on a file or a folder that you follow:
-
Upload
-
Comment
-
Edit
-
Rename
The notifications setting has two options:
Email Only:
-
Email notification applies both to folders and files.
-
Filr sends one email message for every new or changed file. The email message does not include an attachment of the actual file but includes information about the file and the activity that occurred.
-
Email notification is sent every time an activity happens.
Email Digest:
-
Digest Notification applies only to folders and not files.
-
By default, Email Digest is enabled when the user enables the notification.
-
Filr sends Digest Notifications at a scheduled time set by the Filr administrator.
-
Filr sends an email that summarizes all the activity in the folder and its sub-folder during the specified interval.
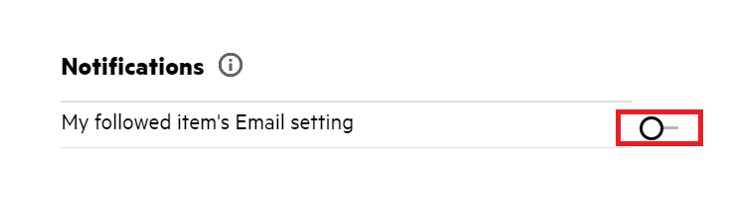
15.0 What happens when the Notifications are disabled?
For disabling the notifications user can go to -> and click the toggle button. Follow state will be preserved for the previously marked items, just that the user won’t be able to follow new items when notifications are disabled.
Figure 24 Notifications
16.0 How do I create a folder in the Filr work area?
You can create folders in , and area based on the permissions you have. To create a folder, click  Create folder button.
Figure 25
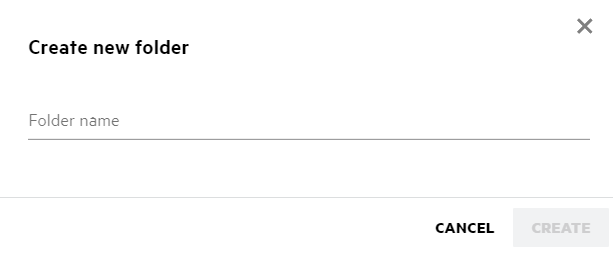
Enter the folder name and click .
19.0 How to upload a file?
You can upload files to area, to folders in the area, and area. You can upload files to shared folders only when you have permission. To upload a file, navigate to the folder where you want to upload the file. Click  , browse and select the file from your computer. Users can also drag-drop the files to the folders.
If you receive a file request from a Filr user, click the link in the file request email sent to you and upload the requested file.
20.0 How to upload a folder?
You can upload folders to area, to folders in the , and area. You can upload folders to shared folders only when you have contributor permission.
To upload a folder, navigate to the area where you want to upload the folder. Click , on the right top corner of your work area, browse and select the folder from your computer. You can also drag-drop the folders to upload.
IMPORTANT:
-
When you upload a folder, all the files in the folder are uploaded. The upload notification window displays the file names. When you hover on the file name the relative path to the folder in Filr is displayed.
-
The upload folder feature is not supported on IE.
-
Be cautious while uploading complex structured folders as the behavior is browser dependent.
-
Filr does not allow you to upload an empty folder.
-
When Filr fails to upload a folder, none of the files in the folder are uploaded.
21.0 How to download a file or a folder from Filr?
You can download files or folders from the area, and area. You can download files/folders from shared folders only when you have contributor permission.
To download a file or a folder from Filr, click  Download button of the selected file or folder. You can also select multiple files or folders and click download on the right top of the page.
NOTE:If the folder has too many files, then the download fails and an error message “Item chosen for download has no content” is displayed.
22.0 What happens when you upload a file or a folder that already exists in Filr?
On uploading an existing file: When you upload an existing file to Filr, a notification is displayed as shown below, where you are asked if you want to overwrite the existing file. Click , the existing file is overwritten.
Figure 26 Overwrite a file

If you click , a message “There is already a file with the name <file name> in this location” is displayed.
On uploading an existing folder: If there are new files along with already existing files, then new files are uploaded successfully and for the existing files, an option to overwrite a file is displayed.
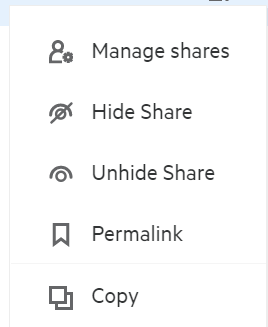
23.0 How can I hide or unhide the files?
and options are available in the , area, and Shared By Me area of a NetFolder. After you log in to Filr, go to or area. You will find the drop-down menu on the left top corner of the area.
Figure 27 Hide - Unhide shares
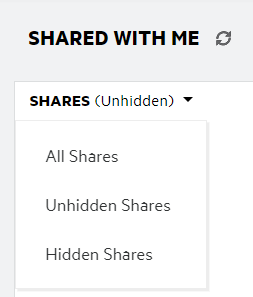
Following options are available:
-
All Shares: When All Shares are selected, all the hidden and unhidden files are displayed in the Shared with me area.
-
Unhidden Shares: By default, Unhidden Shares is selected and all the unhidden files are displayed in the Shared with me area.
-
Hidden Shares: When Hidden Shares are selected, all the hidden files are displayed in the Shared with me area.
To hide files, select the files from and click the  button on the right top corner of the area. On doing this, the selected files will be listed under hidden files. Similarly, to unhide a file, select a file from the files listed under and select
  button on the right top corner of the area. On doing this, the selected files will be listed under . If you want to perform hide and unhide on a single file or a folder, then click the More options of the file and select the and options, respectively.
Figure 28 More Actions Menu
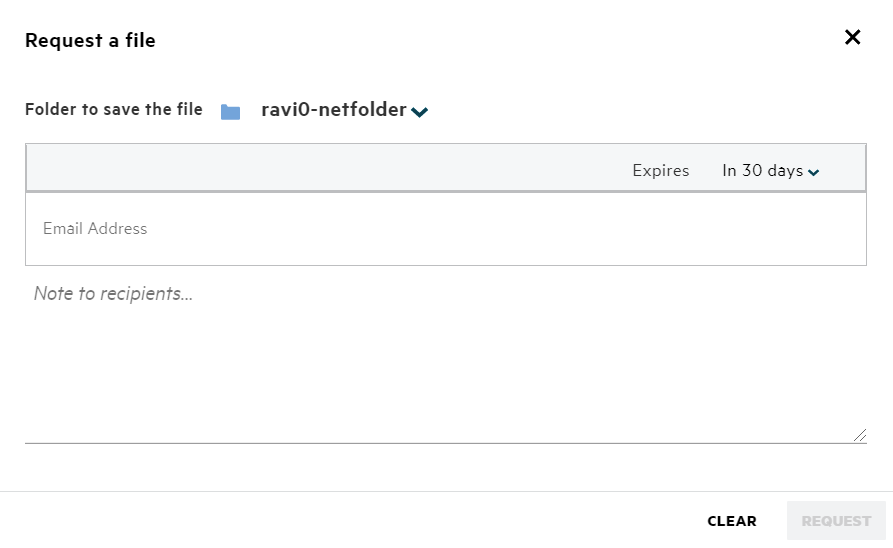
24.0 How to request for a file?
You can request an internal user or an external user to upload a file to a specific folder. This feature is available only in and .
Navigate to the folder where you want the other user to upload a file. Click  . Enter the user name or the email id, add a note about the file you are requesting for and click .
Figure 29 Request Files
25.0 How to preview a file?
Filr allows you to preview the files. The Preview option is available only for the supported file types.
MS Office files: .doc,.docx,.docm,.dotm,.lwp,.odg,.odp,.ods,.odt,.ppt,.pptx,.pptm,.rtf,.csv,.xls,.xlsx,.xlsm
Text files: .'txt', 'c', 'cc', 'cpp', 'cs', 'diff', 'java', 'less', 'out', 'patch', 'php', 'pl', 'properties', 'py', 'rb', 'scala', 'script', 'scm', 'scss', 'sh', 'sml', 'sql', 'swift', 'vb', 'vi', 'vim', 'xsd', 'yaml', 'yml',.pdf
Image files: 'jpg', 'jpeg', 'png', 'svg', 'bmp', 'webp', 'ico', 'gif'.
To preview a file in the page > , select option from the menu.
Figure 30 Preview Files
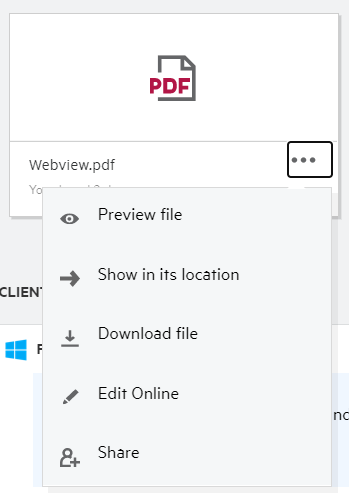
To preview the files from , , and select the file and click the Preview  icon.
icon.
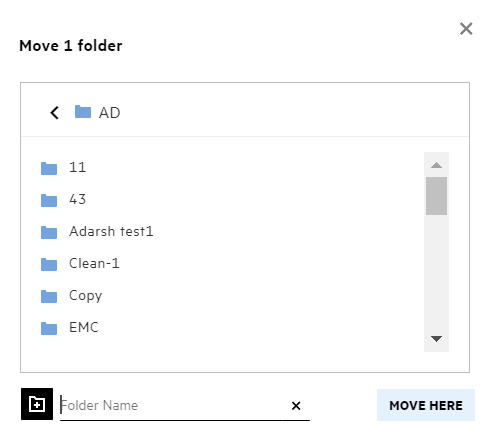
26.0 How to move a file?
You can move files and folders across and within and . You are not allowed to move files from one Netfolder to another Netfolder. For moving the items you need to have permissions to both source and destination folders.
To move a file/folder, (you can also move multiple items) select the item you want to move and choose option from menu.
If you want to move multiple items, select multiple files/folders, and select option from the menu on the right-top corner of the Main menu.
Figure 31 Move Files
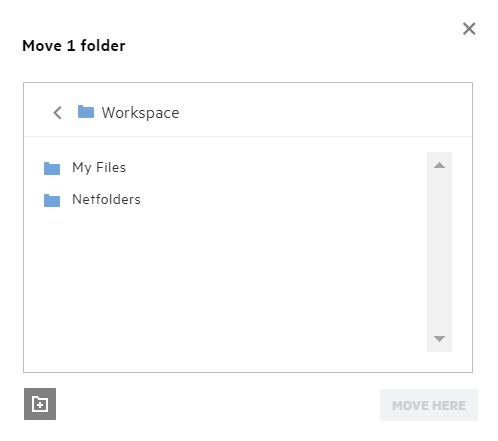
Navigate to the destination location, click . Or you can also create a new folder by clicking on the folder icon on the bottom left corner of the window, enter the folder name and then click .
Figure 32 Create Folder and Move
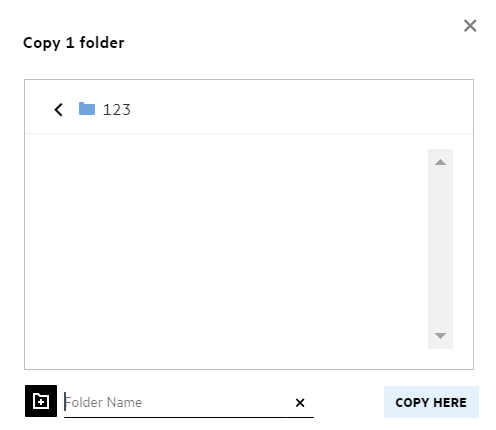
27.0 How to make a copy of a file or a folder?
You can make a copy of files or folders existing within or across the My Files and Netfolder areas in Filr. To copy the items, navigate to the source location, select the files or folders to be copied, choose option from the menu. If you want to copy multiple files, select multiple files/folders and click the Copy icon on the right-top corner of the Menu bar.
Figure 33 Copy Files
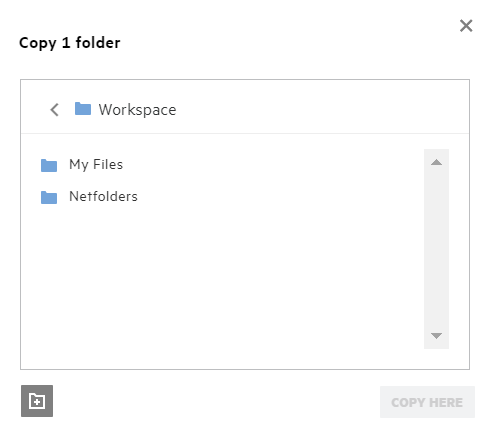
Navigate to the destination location, click . Or you can also create a new folder by clicking on the folder icon on the bottom left corner of the window, enter the folder name and then click .
Figure 34 Create Folder and Copy
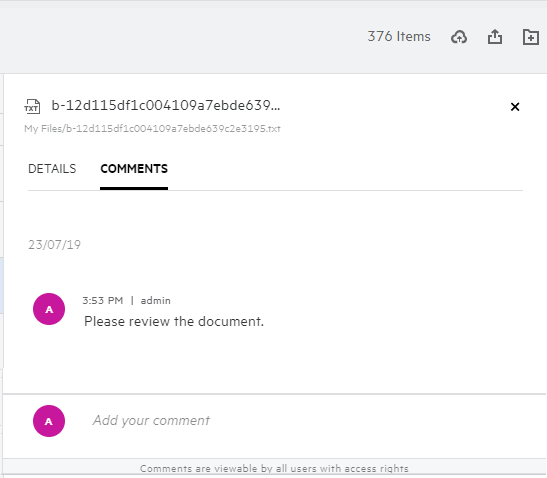
31.0 How to view the comments?
Any user who has access to file and has at least read permission to a file can view the comments. To view the comments,
-
Select a file and click the
 .
.Figure 35 View Comments
-
Click the tab.
Adding a Comment
To add comments, in the tab, enter the comments in the textbox and click ![]() . The total number of comments will be displayed beside the comment icon of a file.
. The total number of comments will be displayed beside the comment icon of a file.
Editing a Comment
To edit the comment, in the tab, hover the mouse on the comment, click and make the required changes and click  .
.
Figure 36 Edit Comments
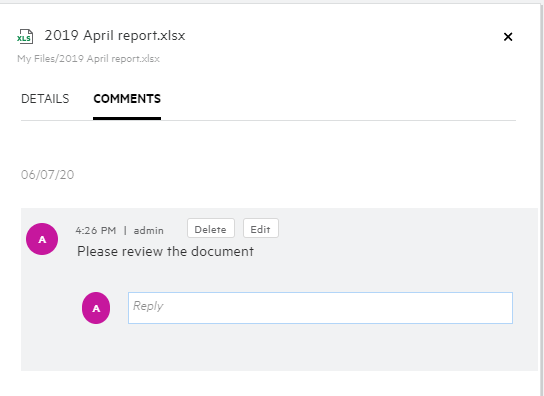
Replying to a Comment
To add a reply, in the tab, enter the comments in the textbox and click the ![]() .
.
Deleting a Comment
To delete a comment, select the comment and click .
33.0 What is Permalink?
Accessing a file or a folder saved at a nested level is made easy by using the permalink. Permalinks are permanent, authenticated links to files or folders. Every file or folder in the Filr application has a permalink. When a permalink is shared with an authenticated user, the user should at least have view rights to access the file or folder. the user can directly view the previewable files. If the file is non-previewable, then after logging into the Filr application, the user is taken to the location of the file. The checkbox of the file is selected in the list of files in that location.
Right-click on a file or a folder, select from the menu. A link for the file or folder is displayed.
Figure 37 View Permalink
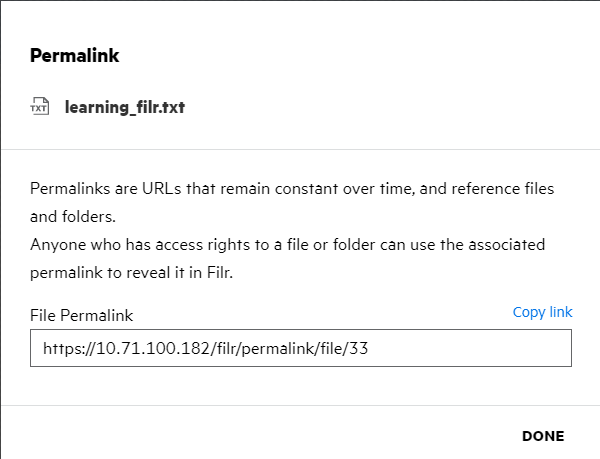
You can click the option and share the link.
Accessing Files and Folders using Permalink
Accessing a folder: When you access a folder using its permalink, you will be navigated to the folder after you log in to the Filr application. Based on the permissions, you will be able to view the files and folders inside the accessed folder.
Accessing a previewable file: When you access a previewable file using its permalink, after you log in to the Filr application, file preview is displayed in the browser.
Accessing a non-previewable file: When you access a non- previewable file using its permalink after you log in to the Filr application, you are navigated to the folder where the file is located and the check box of the file is selected to differentiate the file from the other files in the folder.
NOTE:When you access a file or a folder using its permalink, if the share is expired, or deleted from your workspace or Shared By Me, then an error message “The file/Folder you are looking for, does not exist. or may have been deleted” is dispalayed.
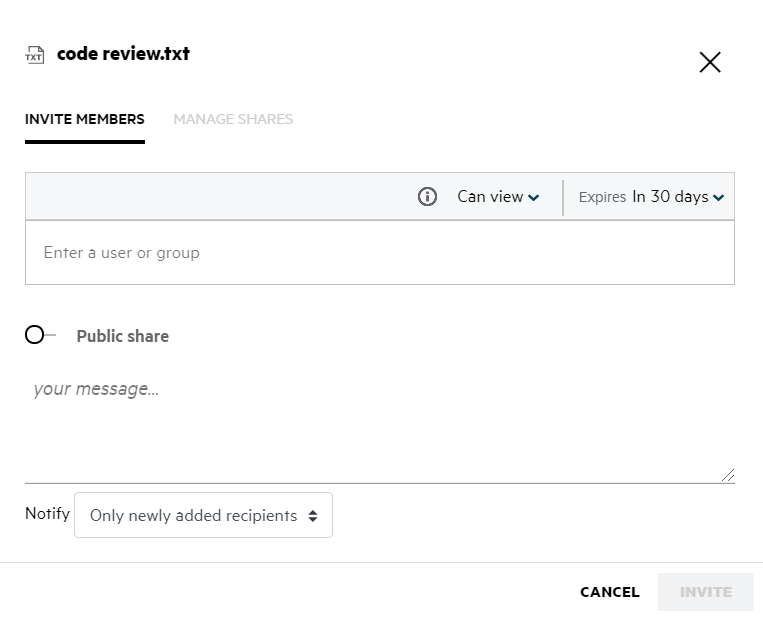
34.0 How do you share a file?
Sharing a file: A file can be shared in two ways:
-
Sending an invite
-
Share Link
You can share a file with an external user or an internal user. You should have share permissions at the folder level. To share a file:
-
Select a file to be shared. You can also select multiple files and folders.
-
Select the option.
-
Right-click on the selected file.
-
Select from the menu.
-
Click
 for a selected file. If you want to share multiple items, select multiple files/folders, and click the share icon on the right-top corner of the bar.
Figure 38 Share Invite
-
-
Enter the email id of a user or multiple ids (list of comma seprated email ids) of the users to whom you want to share the file. If it is an internal user, then the email id is replaced with the username. You can also enter the user names of internal users; the address book will auto-populate with the list of internal users. An invalid email id is identified and is displayed in red color and you can delete it.
NOTE:Only 10 email IDs or groups can be copy-pasted in one instance. Rest will be ignored. Also, when copy-pasting the email IDs, if there is an ID to which the file is already shared, then it will be overwritten.
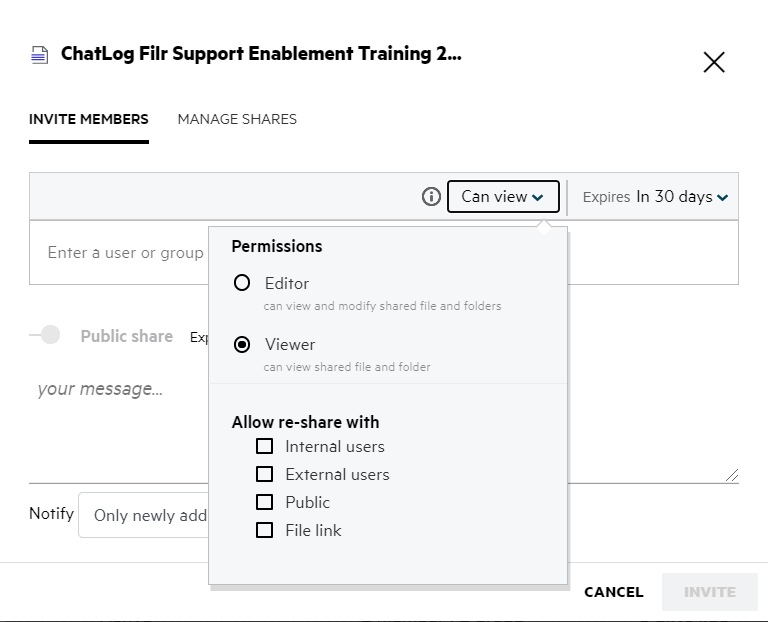
-
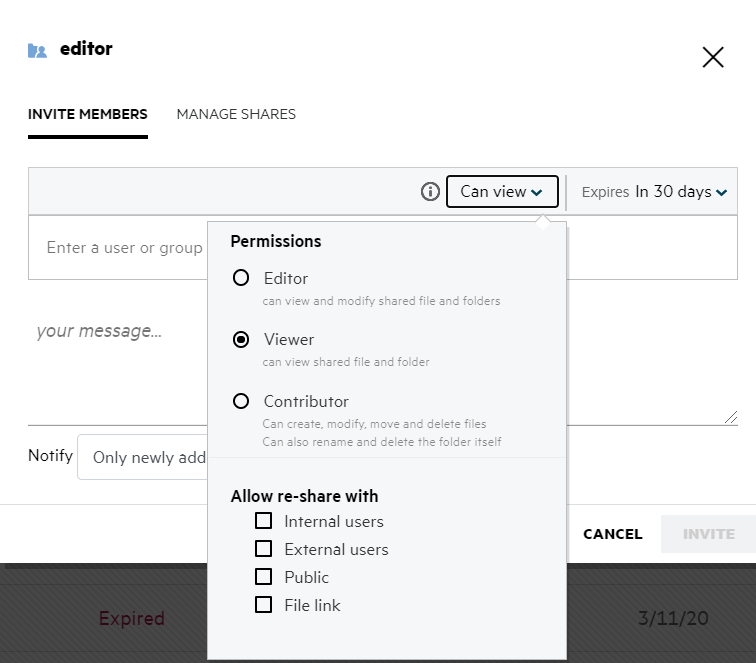
Set up the permissions:
-
Viewer: Users with this permission can view the document.
-
Editor: Users with this permission can view and edit the document.
-
Contributor: Users with this permission can view, edit, delete, and move the files across the folders. This option is available at the folder level and not at the file level.
Figure 39 Share Permissions
-
-
You can give re-share permission to the user to whom the file is shared.
-
Click .
Share Link: Using this option, you can generate a link to a file and share it with the users.
35.0 How do I know who has the share access to a file or a folder inside a NetFolder?
Click the button of a file.
Figure 40 SHARED BY OTHERS
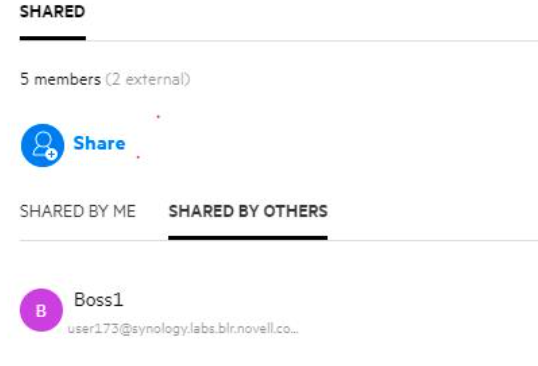
If the file is shared to others, then the names of the sharees are listed under tab in the window.
36.0 How to set expiry settings for a file being shared?
When a file is being shared, you can make the expiry settings to state till when the sharee can have access to the shared file.
In the tab, click drop-down menu.
Figure 41

Following are the options available in the menu:
In 7 days: When this option is selected, sharee’s access to the file/folder being shared expires in 7 days from the date of sharing.
In 30 days: When this option is selected, sharee’s access to the file/folder being shared expires in 30 days from the date of sharing.
On: On selecting this option, you can set the date of expiry. The sharee can access the file being shared till the set date.
Never: If you select the option, then the sharee’s access to the file/folder being shared will never expire. For added security, the administrator can decide to hide the option in the expiry settings menu by disabling the check box in the . If the administrator disables check box, the existing shares which were shared with the option would continue to be in never expire state. However, when you edit/modify such shares, then by default the expiry for the file/folder is set to 30 days.
38.0 How do I know if a file is already shared and by which method?
On sharing a file, the column in the area gets updated with the count of members or groups the file is shared with. All the files you share are also listed under in their respective areas. If any files are shared with you, those files are listed inside area. You can also click the button to view more details.
Figure 42 View More Details
The details of the users and the groups are displayed along with the share expiry status.
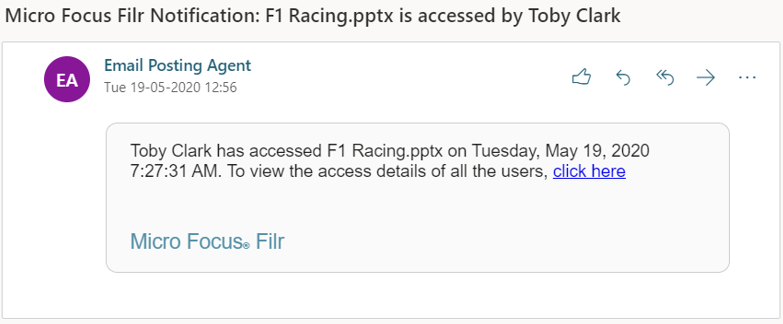
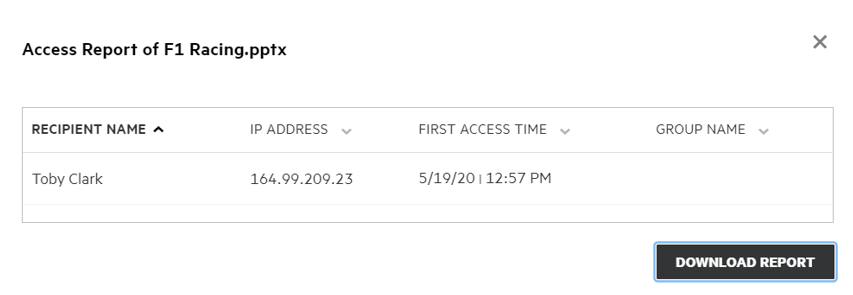
40.0 What is a Share Access Report?
The Share Access Report provides you with the details of a file such as, who has accessed the file on what time and if the comments are added to the file. The Share access report is available only in Filr Advanced. When a receiver accesses the shared file, you will receive a notification email from Filr. You can also view the access report by clicking the link provided in the email, which then routes you to the receiver’s details. If the receiver has accessed the shared file, then option is displayed in menu.
Figure 43 Share access notification
The report includes access information of the recipients like who accessed the file, the IP address of the machine with which file was accessed, date and time of the file access. You can download a pdf version of the report by clicking .
Figure 44 Access Report
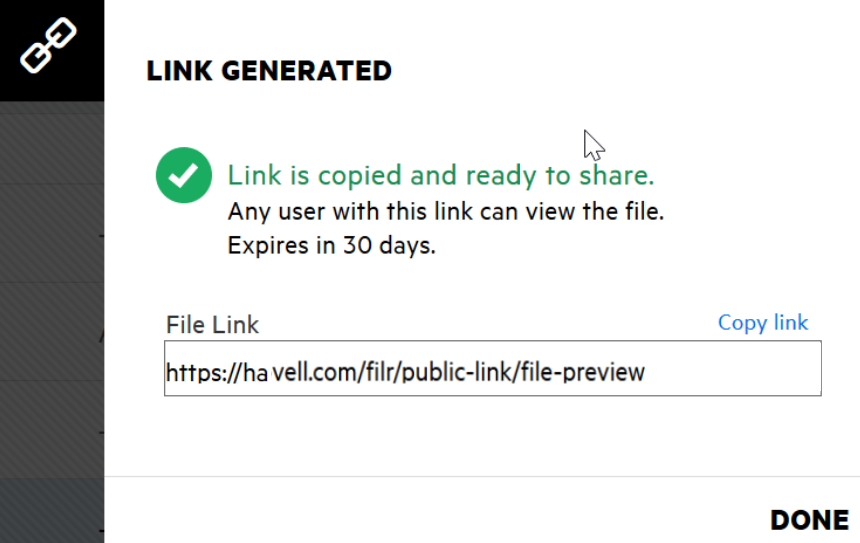
41.0 What is a share link?
Share Link is used to generate a link to share a file/folder. A user with the share link can access the file without authentication. The user can view or download a file but cannot move, edit or delete it. You can generate a link to:
-
View file - The file is converted to an HTML view and is rendered on the browser.
-
Download file - The user can download the file/folder. Any media file that is supported by the browser are rendered on the browser. You can then download the file. If the file type is not supported by the browser, then the file is automatically downloaded. Any PDF file whose size is greater than or equal to 32 MB, it will be downloaded. You can also download files using command line tools like wget and curl.
To generate a link, right-click on a file/folder and select or select the option from the menu of a file.
Figure 45 Share Link
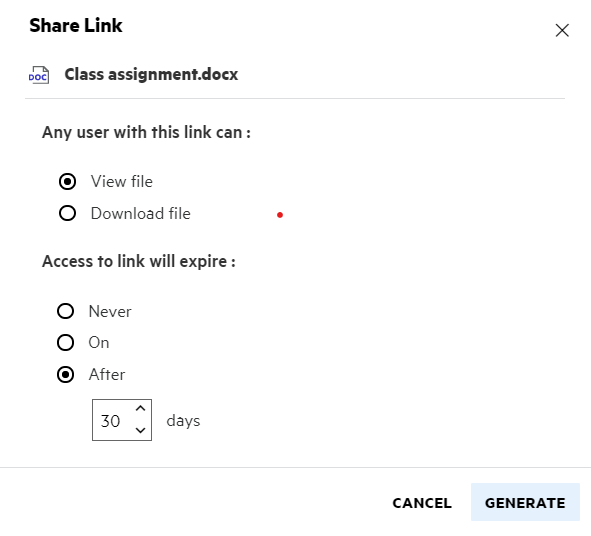
Select the type of link you want to generate and make the expiry settings for the link. Click .
The link is generated and automatically copied to your clipboard. You can now share the link directly with anyone through email, text messages, social media, or any other collaboration forum. Any user clicking on the link will get direct access to the file. Based on the type of link, users will be able to view or download the file.
Figure 46 Link Generated
42.0 How to unshare a shared file?
To unshare a file, you can select the option from the menu.
If the file is shared with multiple users and you want to unshare the file to a specific user, then use the option in the menu of a file. In the dialog box, under the tab, select the user name and click  .
.
You can go to the area, select multiple files, and select option from the menu on the right top corner of the page.
43.0 How do you edit the share permissions?
While sharing multiple files or folders, if one file has View right and one folder has Contributor right, then View rights will be considered. You can edit the share permissions by using the option in the menu of a file. In the Manage Share dialog box, under tab, select the user/group name and click  .
.
Figure 47 Edit Shares
Here you can change the share permissions and the share expiry. Clicking the option will reset the changes made to the old permission settings.
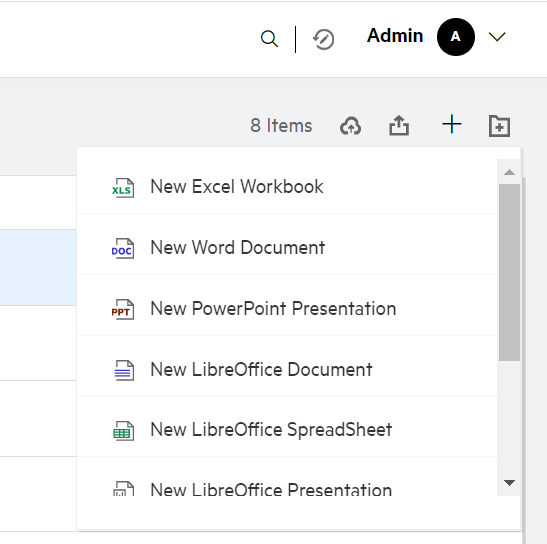
44.0 How do I use a custom template or create a new file?
You can now edit the custom templates or create a new file within the Filr. The option is available only for Advanced Filr Edition and Content Editor has to be enabled by the Administrator. In and area, you can find this option at the root level and folder level, in the and area, you will find this option only at the folder level.
To create a new file, perform the following steps:
-
Click
 on the corner in the Filr work areas.
The default file templates that are shipped with Filr and the templates that are added by an Administrator are displayed in the file template list. window is displayed.
Figure 48 Creating a new file
-
Select the file template from the list.
Figure 49 Create New Document
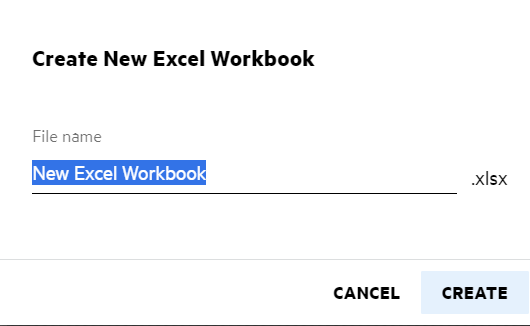
-
Enter the file name and click . The file is saved in Filr, you can then edit the file as required.
NOTE:This option is displayed when you have Contributor permissions at the folder or Filr work-areas.
All the type of file template added by an Administrator will be available in the template list , However you can edit the template in the Filr Web Client only if the file type is supported by CE.