Creating Fortify ScanCentral SAST sensor pools
If your Application Security server is integrated with Fortify ScanCentral SAST, you can create sensor pools, which you can then target for scan requests.
For information about how to install, configure, and use Fortify ScanCentral SAST to streamline the static code analysis process, see the OpenText™ Fortify ScanCentral SAST Installation, Configuration, and Usage Guide.
To create a new sensor pool:
On the header, select ScanCentral, and then select SAST.
On the navigation pane, select Sensor Pools.
The Sensor Pools page lists the default pool and any other sensor pools created on the system.
The default pool includes all application versions that have not been assigned to a sensor pool.
Click + NEW POOL.
If the + NEW POOL button is unavailable, Application Security is not connected to the Controller. Check your Fortify ScanCentral SAST configuration (see Enabling integration with Fortify ScanCentral SAST).
In the Name box, type a name for the new pool.
The first character of the pool name must be a Unicode alphanumeric character (lowercase or uppercase a through z, or 0 through 9).
- (Optional) In the Description box, type a description of the new pool (its properties or purpose).
To enable the new pool to use any unassigned sensors, select the Use unassigned sensors check box.
Selecting the Use unassigned sensors check box does not assign those sensors to the new pool. Instead, it enables the pool to take advantage of available unassigned sensors. The sensors remain unassigned.
You can have up to ten sensors in a pool.
The Sensors table lists the host names of all of the sensors in the system, including those that are assigned to other pools. A padlock symbol next to the host name indicates that the sensor is assigned to a pool. To see information about a sensor, select its row. The Sensor information area lists basic information about the sensor, including the pool to which it is currently assigned, if any.
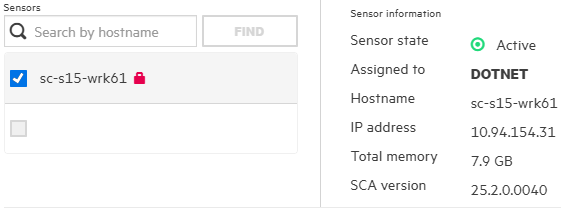
To find a specific sensor, type its host name in the Search by hostname box, and then click FIND.
Select the check box for each sensor you want to assign to the new pool.
If you select the check box for a sensor that is already assigned, that sensor will be moved from the pool to which it is currently assigned.
To assign application versions to the pool:
Under Versions, click ADD.
In the APPLICATION pane, select an application that you want to assign to this pool.
The VERSIONS pane lists all active versions of the selected application.
- To list any inactive versions of the selected application, select the Show inactive check box.
To assign all the listed versions to the new pool, select the Select all check box. Otherwise, to assign only a subset of the application versions, select the check boxes next to the version names.
The SELECTED VERSIONS pane lists your selections.
- To assign versions of another application to this pool, repeat steps b through d.
- To remove an application version from the SELECTED VERSIONS list, click the Delete button
 next to its name.
 - Click DONE.
In the CREATE NEW POOL dialog box, click SAVE.
The Sensor Pools table now lists your new pool.
You can edit or delete the pool at any time.
See Also