OpenText™ Identity Governance and Administration as a Service Quick Start
This quick start provides a brief overview of the OpenText Identity Governance and Administration hybrid solution and the tasks you need to complete to start using OpenText Identity Governance as a Service.
Figure 1 Overview of OpenText Identity Governance and Administration
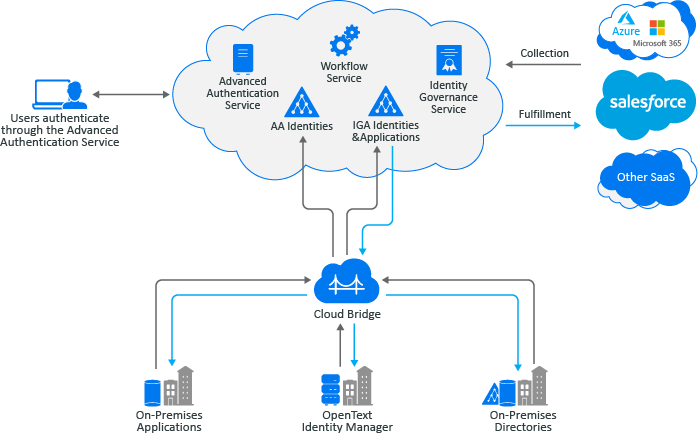
OpenText Identity Governance and Administration manages and governs digital identities and enforces appropriate access across the enterprise. With a unified governance framework, organizations can determine who has access to which resources and whether that access is appropriate. Scaling to billions of identities, OpenText solution automates and streamlines processes related to access requests, access certification, identity lifecycle management, provisioning, and compliance reporting. Our solution detects changes as they happen in the connected systems and adjusts security controls for continuous compliance, thus reducing risk and increasing efficiency for the organization.
Our solution as illustrated in the above diagram, includes following main components and additional services:
-
OpenText Identity Governance helps organizations run effective access certification campaigns and implement it. Key features include certification reviews, micro-certifications, access request and approval, segregation of duties (SOD), and governance insight. OpenText Identity Governance can be deployed on premises or using SaaS.
-
OpenText™ Identity Manager powers the entire identity management lifecycle, managing identities and their associated attributes to minimize privileges. Key features include automated provisioning, identity attribute management, password synchronization, and data and event transformation to match organizational business processes.
You can use our hybrid solution to log in to OpenText Identity Governance as a Service using OpenText™ Advanced Authentication as a Service for authentication based on methods and repositories configured in OpenText Advanced Authentication tenancy. In addition, you can collect data from on-premises OpenText Identity Manager using a data transfer bridge (OpenText™ Cloud Bridge), create custom workflows for request approval on fulfillment, and generate reports.
OpenText Identity Governance as a Service and OpenText Advanced Authentication as a Service will be deployed, configured, and maintained by OpenText™. Once you receive your tenancy URL (http://tenantid.igasubdomain.hostedsaasdomain.com), you can log in to OpenText Identity Governance, assign authorizations, and perform governance tasks.
4.0 Installing and Configuring the Cloud Bridge Agent
In as a Service environment, OpenText Cloud Bridge is a data transfer bridge between the application in the cloud and data sources in on-premises environments. The Cloud Bridge Agentis the entity that responds to the collection and fulfillment commands and directs them to the proper data source for execution. The following diagram provides an example of a Cloud Bridge setup.
Figure 2 Cloud Bridge Setup Example
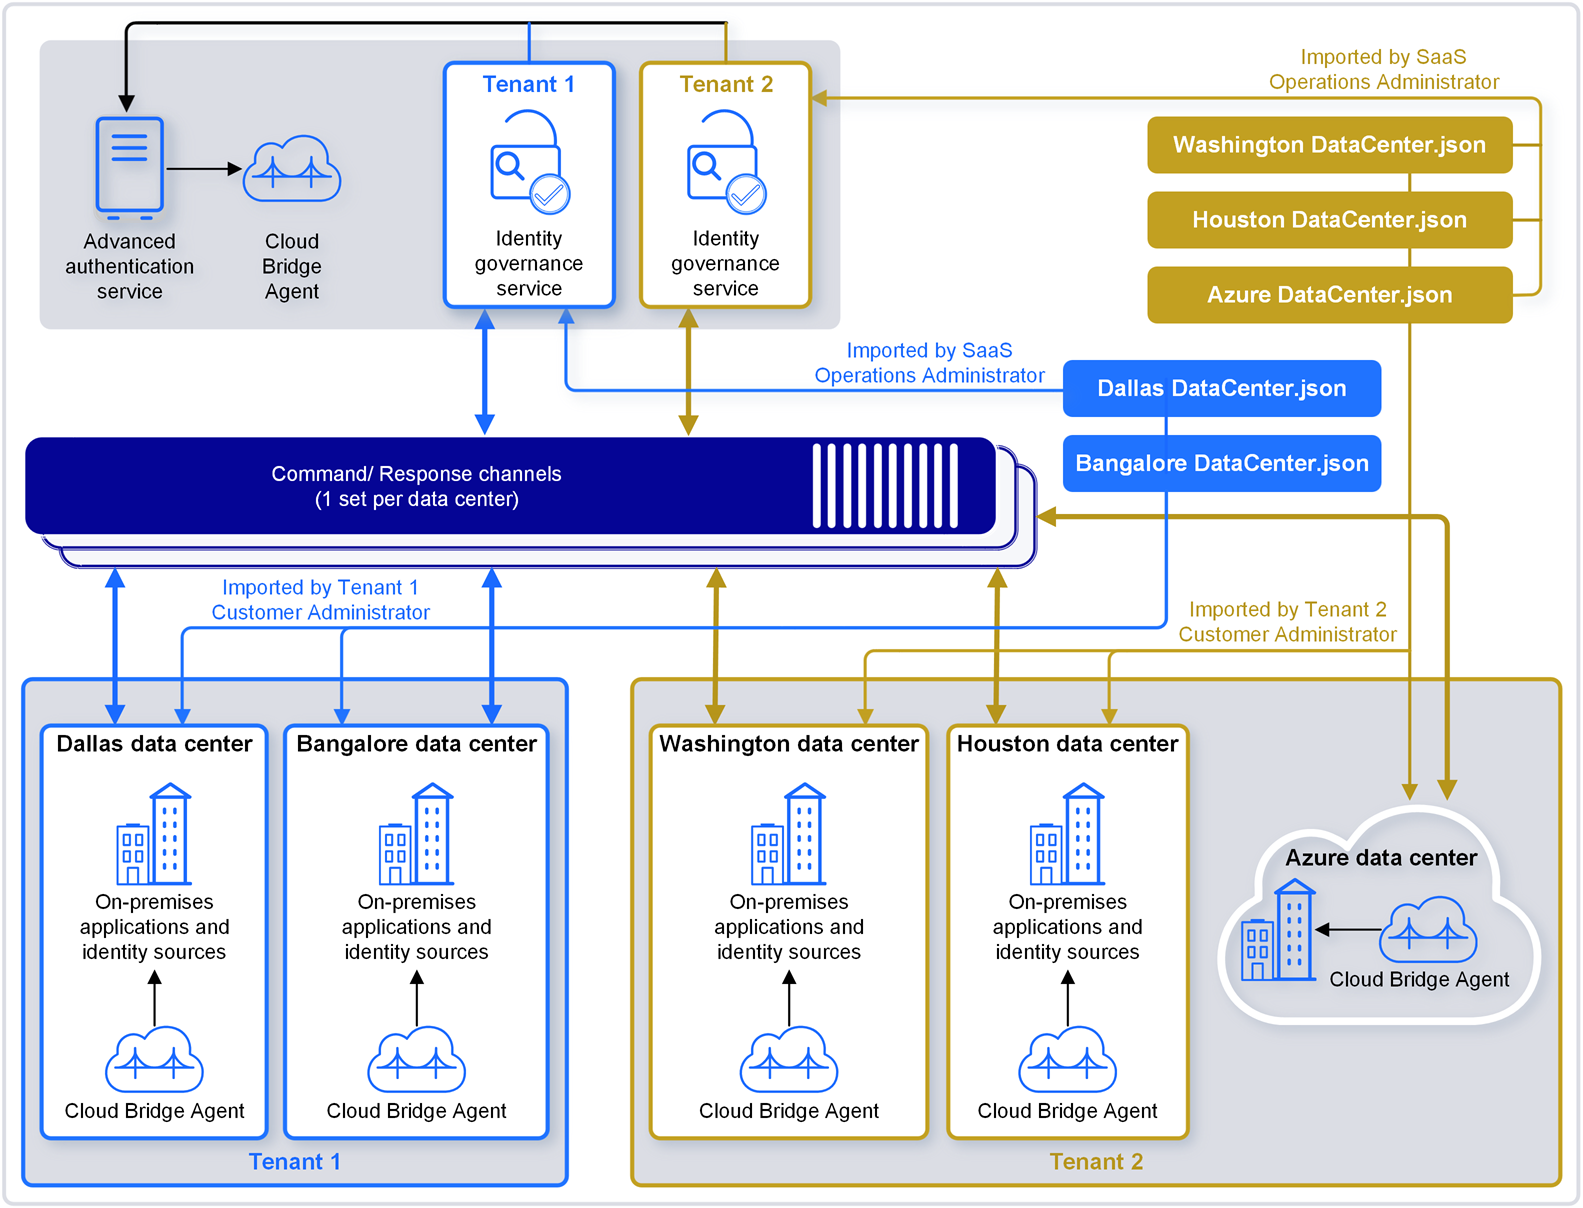
The Cloud Bridge Data Center in your OpenText Identity Governance tenancy is created by the SaaS team based on the information you provide in the technical questionnaire. Data Centers are a conceptual representation of your Cloud Bridge Agent instance and could reside in different on-premises and cloud environments. DataCenter.json contains customer-specific data center information. Defines the connection information between the Cloud Bridge Client and a single Agent instance. Install the Agents on your local systems, then log in to OpenText Identity Governance and configure Data Source Connections and Data Sources as needed to connect to your on-premises data sources.
For information about the Cloud Bridge Agent and related OpenText Identity Governance procedures, see the following sections.
4.1 Installing and Upgrading the Cloud Bridge Agent
Prior to installing the Cloud Bridge Agent on premises, the SaaS operations team must have granted you the privilege to use Cloud Bridge. You or an authorized user can then add an external repository in the OpenText Identity Governance Advanced Authentication tenancy.
NOTE:Use TENANT_ID_AA_ER, where TENANT_ID is in uppercase, as the name of the external repository. For more information about adding Cloud Bridge external repository, refer to the OpenText Advanced Authentication Administration Guide.
Regarding upgrading your Cloud Bridge Agent, before you upgrade an existing Agent installation, you should review your environment and do some planning for high availability. For more information about installing and upgrading the Cloud Bridge Agent on premises, refer to the OpenText Cloud Bridge Agent Release Notes and the OpenText Cloud Bridge Agent Installation and Administration Guide.
4.2 Configuring Data Source Connection and Adding Credentials
After installing the agent, you must configure a data source connection in OpenText Identity Governance, then add credentials using the Cloud Bridge Agent UI. When adding credentials, in addition to unique ID, user name, and password, you must also specify the appropriate ordinal for the authentication method. When a connector (collector or fulfiller) takes only one credential pair, then the default ordinal value of 0 is used. When a connector supports more than one credential pair (user name and password) combination such as the IDM AE Permission Collector and SCIM collectors and fulfiller, then you need to specify additional ordinals.
NOTE:The user name and password fields are limited to 255 characters.
You can view the existing credentials you have by visiting http://localhost (Cloud Bridge Agent IP address or DNS name):8080/api/v1/credential. Since the connector can only be configured for one type of authentication, the other credential sets will be unused by the connector.
IMPORTANT:When configuring the Cloud Bridge Agent, it is critical that the correct ordinal value is used for the selected authentication method. For example, if a SCIM Identity Collector is being configured in OpenText Identity Governance and Basic Auth is selected for the Authentication Method, the basic authentication credentials would need to be added to the Cloud Bride Agent using ordinal value 3. Also note that if an authentication method is chosen that requires multiple credential sets, ALL of these credential sets must be added to the Cloud Bridge Agent using specific ordinal values.
For information about:
-
Configuring data source connections, see
Collecting Data Using Cloud Bridge
in the OpenText Identity Governance as a Service User and Administration Guide -
Adding credentials, see
Add Credentials for Data Source Connections
in the OpenText Cloud Bridge Installation and Administration Guide -
Specific ordinal values and authentication methods, see the OpenText Identity Governance as a Service User and Administration Guide