2.4 Using coverage maps

Coverage maps allow administrators to map review or access request items to respective reviewers or approvers when creating a review definition or an access request approval policy. Coverage maps use one or more rules to specify:

  • An entity type or attribute based on the item under review

  • Different entity and attribute criteria in a single column

  • Secondary or related entity or attribute of related entity referenced by entity-entity relationships

For more information, see:

2.4.1 Coverage map types and rules

OpenText Identity Governance supports the following coverage map types:

Type

Description

REVIEW

Maps for user and group access and account review based reviews

REQUEST

Maps for request based approver determination

These coverage maps comprise one or more rules that define and specify the following:

  • Reviewers of a User Access or Account Review definition

    NOTE:To specify a coverage map as a reviewer for unmapped accounts, ensure that All unmapped accounts is selected for the review items, and then specify Review by Coverage Map as the reviewer.

  • Approvers for requested access in the Request application

To create coverage map rules, OpenText Identity Governance uses an interface similar to the advanced filter for searches. The interface uses conditions and subconditions to define rules for coverage maps.

Rule creation requires that you create expressions to define and add criteria for your coverage map. You can define criteria for one or more of the following review or approval items:

  • User

  • Account

  • Permission

  • Application

After defining criteria, you can add criteria to define conditions or relationships that create expressions for one or more of the following reviewer or approver criteria:

  • User

  • Group

You can also export the coverage map that you create, and import coverage maps that others have created.

2.4.2 Using criteria definitions in rules

Criteria options in the rules interface correspond with the criteria that you define in your rules. For example, if you want to create a condition for your rule that specifies users with specific titles, select User: Title.

2.4.3 Using operators, conditions, filters, relationships, and attributes in rules

The rules interface uses the operators AND, OR, and NOT to create expressions that direct the rule definition to include, respectively, ALL of the conditions you define, ANY of the conditions you define, or NONE of the conditions you define in the search filter. Select one of these operators to start building a filter. The operator you select applies to every condition you create.

Conditions allow you to specify a criteria option as a criterion for a rule, and then use additional operators, such as “equal to,” “not equal to,” “equals one of,” “does not equal any of,” “greater than,” “less than,” and “greater than or equal to,” to define how the rule includes, or if it excludes, the defined item in the coverage map as a result of the condition.

Filters are subconditions that allow you to fine-tune a condition with additional AND, OR, and NOT statements.

Relationships and attributes appear as options only when you define reviewer or approver criteria. Relationships require that you also assign and define an attribute for the relationship.

2.4.4 Supported relationships

Relationships can be nested in coverage maps. However, relationships cannot be referenced in the ReviewItem criteria cell; they can be accessed only from the Reviewer or Approver criteria cell.

The supported predefined relationships appear below:

Coverage Map Type(s)

Entity

Relationship

Resolved To

Review and Request

User

Supervsior

User

Review and Request

User

Affiliate

User

Review and Request

Application

Owners

User

Review and Request

Application

Members of group owners (an user who is a member of group that owns an application)

User

Review and Request

Application

GroupOwners

Group

Review and Request

Permission

Owners

User or Group

Review and Request

Permission

Holders

User

Review and Request

Permission

Members of group owners (an user who is a member of group that owns a permission)

User

Review and Request

Account

Holders

User

Review and Request

Account

Custodians

User

Review only

User

User Under Review

User

Request only

RolePolicy (technical role)

Owners

User

Request only

RolePolicy (technical role)

GroupOwners

Group

2.4.5 Creating a coverage map

When you create a coverage map, OpenText Identity Governance searches for a matching statement in the order defined in the coverage map. When one or more review items match all defined review item criteria, the users or groups matching the respective user or group criteria become reviewers for those items.

To create a coverage map:

  1. Log in to OpenText Identity Governance as a Customer Administrator.

  2. Select Policies > Coverage Maps.

  3. Click the add icon (+).

  4. Type a name and a description for the coverage map.

  5. Specify the coverage map type.

  6. (Conditional) Create the Review Type coverage map rules.

    1. Select Review.

    2. Click the plus icon (+).

    3. Under Review Item Criteria, click Define Criteria.

      NOTE:You are not required to define review item criteria. A rule may contain only a reviewer criteria.

    4. Click the plus icon (+) for the criteria you want to define, and then use operators, conditions, and filters available to create one or more expressions for each criteria.

      NOTE:Some condition expressions require 1:1 mapping. For example, if the condition "User: Display Name equals <Account Holder Display Name>" returns more than one possible result, OpenText Identity Governance displays an error message. You should configure "User: Display Name equals one of <Account Holder Display Name>."

    5. Click Save.

    6. Under Reviewer Criteria, click Add Criteria, and then select either Define Criteria or Define Relationship.

    7. Choose the criteria you want to define, and then use operators, conditions, and filters to create one or more conditions for each criteria.

    8. Click Save.

    Perform these steps for each rule you want to add to your Review Type coverage map.

  7. (Conditional) Create the Request Type coverage map rules.

    1. Select Request.

    2. Click the plus icon (+).

    3. Under Approval Item Criteria, click Define Criteria.

      NOTE:You are not required to define approval item criteria. A rule may contain only an approver criteria.

    4. Click the plus icon (+) for the criteria you want to define, and then use operators, conditions, and filters available to create one or more conditions for each criteria.

      NOTE:Some condition expressions require 1:1 mapping. For example, “equals” is not valid if the rule could return more than one possible result. In those cases, “equals one of” is a valid choice.

    5. Click Save.

    6. Under Approver Criteria, click Add Criteria, and then select either Define Criteria or Define Relationship.

    7. Choose the criteria you want to define, and then use operators, conditions, and filters to create one or more conditions for each criteria.

    8. Click Save.

    Perform these steps for each rule you want to add to your Request Type coverage map.

  8. Click Save.

2.4.6 Coverage map — an example

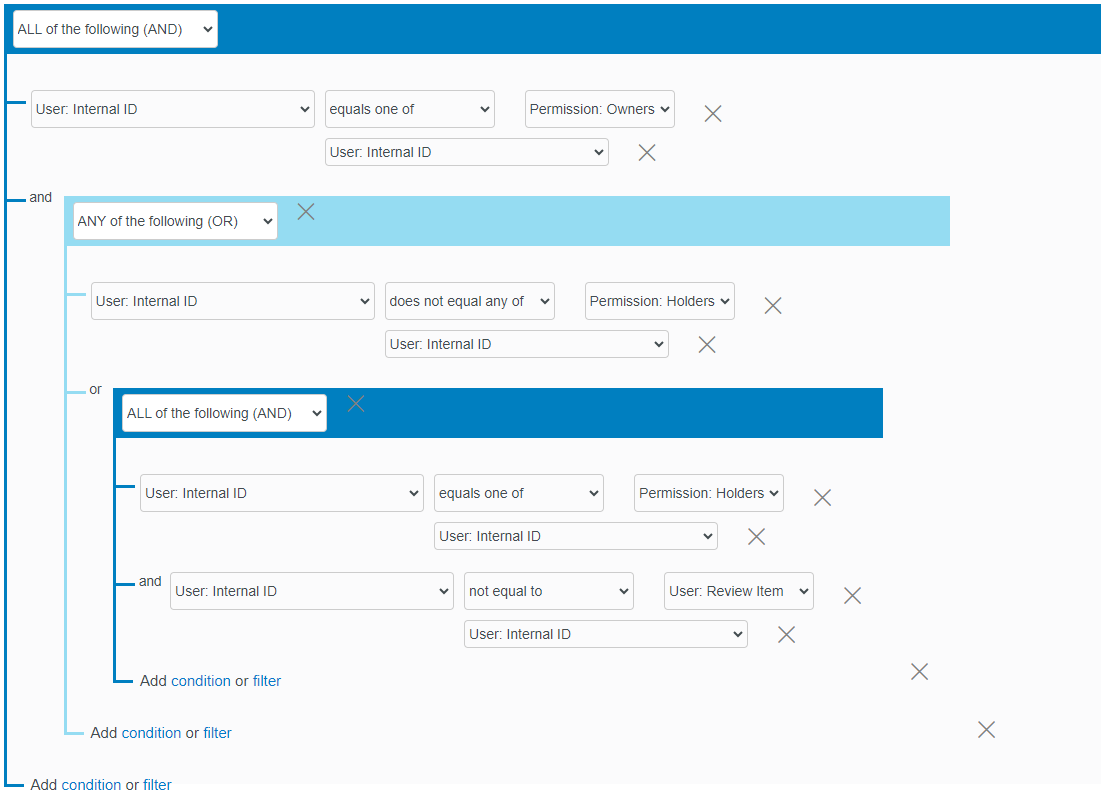
OpenText Identity Governance provides the flexibility to create simple and complex coverage maps by selecting an entity, then defining additional criteria using advanced search filters. For example, you can use the advanced search filter to specify criteria as displayed below to create a review coverage map where reviewers can only be reviewers when they are the permission owner but not when the reviewer also has that permission and is not the user under review.

2.4.7 Exporting and importing a coverage map

OpenText Identity Governance allows you to export one or more coverage maps to a file that you can download and share with others in your enterprise.

OpenText Identity Governance saves the following files to a ZIP archive in your browser download directory:

  • A JSON file containing information for the coverage maps you chose to export

  • A JSON file containing information for review definitions or access request approval policies (depending on the coverage map type) that use the coverage map(s)

You can share the downloaded file with others, who will extract the coverage map file before importing it. For more information about exporting and importing procedures, see Section 30.0, Exporting and importing.

NOTE:Before you run a review, verify all mappings in the review definitions to ensure the coverage map associations are correct.

2.4.8 Editing a coverage map

OpenText Identity Governance allows you to edit your coverage maps as needed.

To edit a coverage map:

  1. Log in to OpenText Identity Governance as a Customer Administrator.

  2. Select Policy > Coverage Maps.

  3. Click the name of the coverage map you want to edit.

  4. Click Edit.

  5. Make the desired changes.

  6. Click Save.

2.4.9 Deleting a coverage map

You can delete coverage maps only if all the following conditions are met:

  • OpenText Identity Governance purged all the associated review instances

  • Authorized administrators either deleted and purged the mapped review definition or changed the mapping

To delete a single or multiple coverage maps:

  1. Log in to OpenText Identity Governance as a Customer Administrator.

  2. Select Policy > Coverage Maps.

  3. Click on the review definition column and view associated review instances.

  4. Click the name of the coverage map that meets the conditions for deletion outlined above.

  5. Click Edit.

  6. Click the delete icon.

  7. To delete multiple coverage maps:

    1. Repeat Step 3 for each coverage map that you want to delete.

    2. Select the coverage maps that meet the conditions outlined above.

    3. Click Actions > Delete Coverage Map.