You can dynamically show or hide controls on the user interface to provide a customized user experience. You can also enable or disable controls and change the actions that are mapped to controls.
You can manipulate any control that is configured with the UI Designer. InfoConnect does not provide programmatic access to other controls.
This walkthrough shows how to:
Add a Custom Control in the UI Designer
Add a Custom Control in the UI Designer
Before you open Visual Studio, you'll need to add the custom controls you want to access in the InfoConnect UI Designer.
To create a custom control
-
Open the InfoConnect workspace and create a demo session as follows:
If you are using IBM, create an IBM3270 session with a host name of "demo:ibm3270.sim" and save the session as demoSession.rd3x in the default folder (...\myDocuments\Micro Focus\InfoConnect.)
If you are using Open Systems, create a VT session with a host name of "demo:UNIX" and save the session as demoSession.rdox in the default folder. - On the Appearance tab, open the UI Designer.
- On the UI Designer, under Insert Controls, select Tab to add a custom tab.
- Under Settings, change the label of the new tab to Custom and clear the Visible setting so the tab is not visible by default.
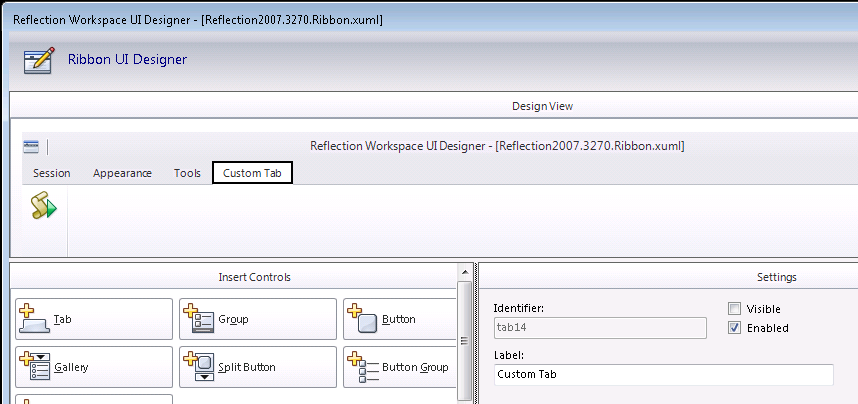
- Note the Identifier for the Custom Tab (tab14) in the Settings pane. We'll need this ID to identify the control when we access it from the API.
- Select the Custom Tab and then click Group to add a Group to the tab.
- Click Button to add a new button to the tab.
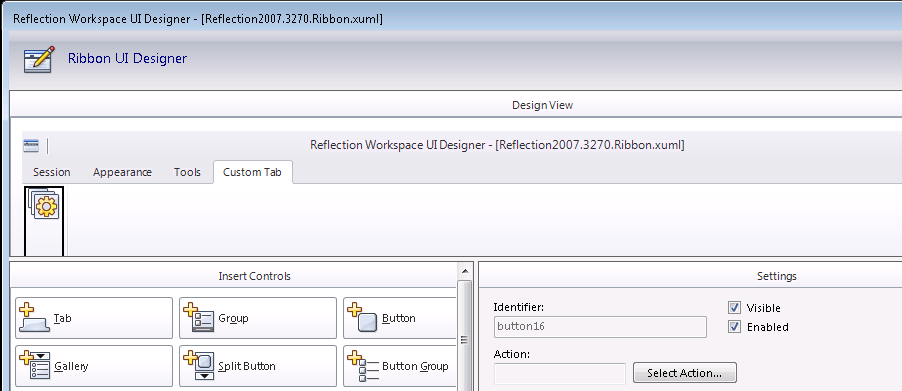
- Note the Identifier for the button in the Settings pane.
In this example, we have a tab with an Identifier of "tab14" and a button with an Identifier of "button16." - Click Select Action, choose to map the action to Open URL, and then enter the URL you want to open.
- Back in the UI Designer, click OK and then enter the name of the new Ribbon (.xuml) file.
InfoConnect configures your session to use the new Ribbon file. - Save the session as demoSession.
To test your customization
- Open the demoSession document file.
- Verify that the Ribbon displays the Custom tab and the new button.
- Click the new button and verify that it opens the Web URL you specified when you added the button.
Display the Control
This sample shows how to dynamically display a tab on a session that you have configured previously in the UI Designer.
To display a control for a specific screen or command
- In Visual Studio, create a new Console Application project and add references for the following InfoConnect assemblies. (Depending on your version of Visual Studio, these can be found either on the .NET tab or under Assemblies | Extensions.)
Attachmate.Reflection
Attachmate.Reflection.Framework
Attachmate.Reflection.Emulation.IbmHosts - Replace all the code in the Program.cs file with the following code for the terminal you are using. This opens the InfoConnect session with the custom Ribbon that you configured earlier. It also adds an event handler that can be used to identify screens or commands that have been entered.
- Add the following code to the event handler you added above. This code gets the UIMode container that includes all of the custom controls and then gets the control for the tab based on its control identifier. After it gets the control, it sets its Visible property to show the control.
To test this project
- Press F5 to run the sample.
- At the first screen, enter any credentials to log on.
- Verify that the tab is visible after you log on.Map
Map an Action to the Control
You can dynamically add or change the action mapped to a button. This sample changes the action of the button you configured above from opening a URL to sending a string of data to the host.
To map an action to a control
Add the following code to the bottom of the event handler that you set up earlier (in Display a Control). This code creates an action and adds it to an Input action sequence. Then it gets the button with its control ID and maps the action sequence to the button.
| Map an action to a button |
Copy Code
|
|---|---|
        static void screen_NewScreenReady(object sender, EventArgs e)
        {
               .....................................................................
                controlTab.Visible = true;

                //Create an object array that contains data and an action to send it to the host
                //Then create an action sequence and add the action to it
                object[] param = { "data" };
                InputMapAction action = new InputMapAction(InputMapActionID.SendHostTextAction, param);
                InputMapActionSequence actionSequence = new InputMapActionSequence();
                actionSequence.Add(action);

                //Get the button control with its control ID and bind the action sequence to the button
                IUiControl controlButton = (IUiControl)ui.GetControlById(ctrlID_button);
                screen.Parent.UiControlActionMapper.Add(controlButton, actionSequence);
            }

        }
|
|
To test this project
- Press F5 to run the project and enter any credentials to log on.
- Open the Custom tab on the Ribbon and click the button on the tab.
- Verify that the button sends the text in the param array ("data") to the host.